Month: May 2024

Oatmeal Molasses Bread (Bread Machine)

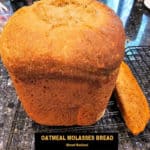
Pull out your bread machine and make a delicious loaf of Oatmeal Molasses Bread! It’s easy to make this flavorful, 1½ lb. loaf of bread!
Pull out your bread machine and make a delicious loaf of Oatmeal Molasses Bread! It's easy to make this flavorful, 1½ lb. loaf of bread!

If you are fortunate enough to have a bread machine, then you will LOVE this recipe for Oatmeal Molasses Bread! I don’t know about you, but I make a lot of bread by hand and sometimes forget I have a bread machine in the cupboard.

About 20 years ago I found this bread machine recipe in one of my old cooking magazines. Recently I dug my trusty bread machine out of an “out of the way” cupboard and made this large loaf of bread for our family.

It rose higher than any other recipe I’ve made in the machine, and the taste of the finished loaf is outstanding! The addition of molasses gives it such a beautiful brown color, and adds such a depth of flavor!

If you have a bread machine, I highly recommend trying this simple, yet wonderful recipe! It only takes about 5 minutes of active prep time! Here’s how to make oatmeal molasses bread.

Scroll Down For A Printable Recipe Card At The Bottom Of The Page

Add Ingredients To Bread Machine Pan In Order

When using a bread machine it is important to add the ingredients to the machine’s bread pan in the right order, for best results! So here is the order to add the 7 ingredients to the inner loaf pan.

First add warm water (between 110°-115°F.), then add vegetable oil, molasses, salt, flour, and oats. Make a small well in the middle of the oats, then add the active dry yeast on top.

Bread loaf ingredients are added to bread pan in a specific order.

Baking The Bread

On the control panel of your machine, select a “White Bread” setting, then select the loaf size as a “Large (1½ lb.) loaf”.  Set the crust color as “Medium”, if that selection is available.

Start the bread machine, and then let it do all the work of kneading and baking for you. I actually forgot how ridiculously easy it is to make a loaf of bread in the machine!

Bread machine and control panel used to make a loaf of bread.

Hot And Fresh From The Bread Machine

In our bread machine, the baking time for this size loaf (1½ lb.) is approximately 3 hours, 15 minutes. It was so fun to see how tall this loaf rose in the pan (almost touching the lid!).

As it baked, the smell permeated our kitchen, which made us incredibly hungry and ready for the finished bread. It was heavenly! I let the bread cool for at least 10 minutes before removing it from the pan to cool on a wire rack.

A tall, hot loaf of oatmeal molasses bread, right out of the machine.

Slice The Cooled Bread

It’s important to have patience before trying to slice the hot bread. Really hot bread doesn’t slice very well, because it is so soft and FRESH, so the slices can be crushed easily!

I totally suggest letting the loaf cool for awhile once out of the pan before ever attempting to slice it. Once it has cooled, use a serrated knife to cut the loaf into 8 slices. 

After cooling, the bread is cut into slices.

The caloric calculation for this recipe was made for 8 total slices of bread. Truthfully, it’s such a large loaf, we usually cut each slice in half for each serving, which makes 16 half-slice servings.

A slice of oatmeal molasses bread, cut and resting on a wire rack.

Enjoy A Slice Of Oatmeal Molasses Bread

We spread softened butter on each warm slice of oatmeal molasses bread, and it makes it perfect! The bread is dense and really flavorful, thanks in part to the half cup of molasses in this recipe! YUM!

Melted butter is spread on the warm slice of bread.

I hope you have the opportunity to try this bread, and trust you’ll enjoy it as much as we do. It is a wonderful side dish for soups, salads and meats. This bread also tastes wonderful toasted or broiled and served with butter and jam for a quick breakfast.

Thanks for stopping by, and I invite you to come back soon for more family-friendly recipes. Take care, have a GREAT day, and may God bless you.

Looking For More HOMEMADE BREAD Recipes?

You can find ALL of my recipes in the Recipe Index, which is located at the top of the page. I have many wonderful bread recipes (savory and sweet) you might enjoy, including:

Want More Recipes? Get My FREE Newsletter!

I publish a newsletter 2 times per month (1st and 15th) with lots of recipes, tips, etc..
Would you like to join our growing list of subscribers?

There is a Newsletter subscription box on the top right (or bottom) of each blog post, depending on the device you use.
You can submit your e-mail address there, to be added to my mailing list.

Find Me On Social Media:

Facebook page: The Grateful Girl Cooks!
Pinterest:
The Grateful Girl Cooks!
Instagram:
jbatthegratefulgirlcooks

Author's signature

Recipe adapted from Ruth Andrewson, via: “Taste of Home” magazine, Feb./Mar. 1994 edition, page 23, published by Reiman Publications

↓↓ PRINTABLE RECIPE BELOW ↓↓

0 from 0 votes
Oatmeal Molasses Bread
Prep Time
5 mins
Cook Time
3 hrs 15 mins
Total Time
3 hrs 20 mins
 

Pull out your bread machine and make a delicious loaf of Oatmeal Molasses Bread! It's easy to make this flavorful, 1½ lb. loaf of bread!

Category: Bread, Side Dish
Cuisine: All Cuisines
Keyword: oatmeal molasses bread
Servings: 8 thick slices
Calories Per Serving: 287 kcal
Author: JB @ The Grateful Girl Cooks!
Ingredients
  • cups warm water (110-115℉.)
  • 1 Tablespoon vegetable oil
  • ½ cup molasses
  • 1 teaspoon salt
  • 3 cups all purpose flour
  • 1 cup quick cooking oats *SEE NOTES
  • teaspoons active dry yeast
Instructions
  1. IMPORTANT: Add ingredients to the machine's bread pan in the order listed for optimal results.

  2. First add warm water (between 110°-115°F.), then add (in this order) vegetable oil, molasses, salt, flour, and oats. Make a small "well" in the middle of the oats, then add active dry yeast to the "well".

  3. On the control panel, select a "White Bread" setting, then select the loaf size as a "Large (1½ lb.) loaf".  Set the crust color as "Medium", if that selection is available. Start the bread machine, and let it do all the work of kneading and baking for you.

  4. The bread will take about 3 hours, 15 minutes from start to finish. Of course, machines vary greatly, so your time will depend on the bread machine you use.

  5. When done, remove the bread pan from the machine. Let bread cool at least 10 minutes before removing loaf from the pan. Let the bread cool on a wire rack until cool enough to slice well. Enjoy!

Recipe Notes

NOTES: Old fashioned oats may be substituted for the quick cooking oats called for in the recipe. Pulse them several times in a food processor to break down the oat flakes into slightly smaller pieces.

Nutrition Facts
Oatmeal Molasses Bread
Amount Per Serving (1 slice (1/8 of total))
Calories 287 Calories from Fat 27
% Daily Value*
Fat 3g5%
Saturated Fat 0.5g3%
Trans Fat 0.01g
Polyunsaturated Fat 1g
Monounsaturated Fat 1g
Sodium 302mg13%
Potassium 402mg11%
Carbohydrates 59g20%
Fiber 2g8%
Sugar 16g18%
Protein 7g14%
Vitamin C 0.003mg0%
Calcium 57mg6%
Iron 4mg22%
* Percent Daily Values are based on a 2000 calorie diet.

Here’s one more to pin on your Pinterest boards!Pull out your bread machine and make a delicious loaf of Oatmeal Molasses Bread! It's easy to make this flavorful, 1½ lb. loaf of bread!


Strawberry Rhubarb Cobbler For Two

Hungry for a delicious dessert? Make Strawberry Rhubarb Cobbler For Two! With a crumbly, buttery topping, you’ll LOVE this decadent treat!
Hungry for a delicious dessert? Make Strawberry Rhubarb Cobbler For Two! With a crumbly, buttery topping, you'll LOVE this decadent treat!

I was so excited recently to return home after being out of state, and find that my 8 year old rhubarb plant had decided to grow again! It is in a very large pot, and for some reason, last year it just didn’t produce well.

This year is a different story (go figure), so I grabbed a few stalks, and grinning from ear to ear, came into our house and made strawberry rhubarb cobbler for two later that afternoon.

I read through some of the other cobbler recipes I have posted on my blog, then took the best ingredient ideas from 3 of them and came up with this recipe. 

This delicious cobbler recipe is easy to make in two 4″ oven-safe ramekins, and my husband and I absolutely love it! Here’s how to make strawberry rhubarb cobbler for two.  

Scroll Down For A Printable Recipe Card At The Bottom Of The Page

Prepare The Fruit Filling

Cut fresh rhubarb into 1″ slices, then core and slice fresh strawberries into thirds (lengthwise). You will need 1 cup of each, measuring them after are they have been sliced.

Place the sliced rhubarb and strawberries in a medium bowl. Add granulated sugar, fresh lemon juice, lemon zest, vanilla extract and a pinch of salt.

Stir gently to combine these ingredients thoroughly, then set the bowl aside. See how easy it was to make the fruit filling for this cobbler?

Fresh strawberries and rhubarb are cut into slices, then measured.Strawberries and rhubarb slices in a large bowl with sugar, lemon juice, etc.

Make The Crumbly Topping For The Cobbler

Now it’s time to make the topping for the cobbler. Combine all purpose flour, sugar, baking powder and salt in a medium bowl. 

Once combined, cut a half stick of very cold butter into chunks and add it to the flour mixture. Use a pastry blender or two forks to cut the cold butter into the flour mixture.

Continue until the butter is reduced to the size of peas and the mixture is crumbly. Add sour cream and stir it into the topping mixture until it has been fully incorporated.

Cold butter chunks are cut into the dry ingredients for the cobbler topping.Sour cream is stirred into the crumbly cobbler topping until incorporated.

Make The Strawberry Rhubarb Cobbler For Two

Spray two 4″ oven-safe ramekins with non-stick baking spray (bottom and sides). Evenly divide the rhubarb strawberry mixture between the two dishes.

Now you need to use that topping mixture to cover the fruit filling! To do this, use your hands and pinch the dough together into small “clumps of dough”.

Place these small clumps of topping all over the surface of each cobbler to fully cover the fruit. Use all of the topping mixture! Sprinkle the top of each cobber with 1 teaspoon of granulated sugar.

Strawberry Rhubarb Cobbler For Two in ramekins on foil, before baking.Each mini cobbler is sprinkled with granulated sugar before baking.

The ramekins should now be filled with fruit, topped with the crumbly dough, and sprinkled with sugar. Now it’s time to bake the rhubarb strawberry cobbler for two!

TIP: I strongly recommend placing aluminum foil under the ramekins to catch any fruit juices that may bubble up and out of them while baking! I turn up the edges of the foil, as well.

Strawberry rhubarb cobbler for two ready for the oven.

Bake Then Enjoy!

Place the foil on a middle rack in the oven and then place the ramekins on top of the foil. Bake at 350°F. for 30-35 minutes, uncovered.

When done, the juices should be bubbling around the edges and the top of the cobblers should be very lightly browned and slightly crispy to the touch.

Transfer the rhubarb strawberry cobbler for two to a wire rack and let them cool slightly before serving, because the fruit filling is VERY hot!

After baking, the strawberry rhubarb cobblers cool on a wire rack.The strawberry rhubarb cobbler is golden brown on top after baking.

Serve the cobbler warm or at room temperature, whichever way you prefer. You can top them with ice cream (if ya don’t mind the extra calories), or top room temperature cobblers with whipped cream, which we enjoy!

We LOVE this dessert, especially my husband who goes crazy over the strawberry-rhubarb combination. Sweet strawberries and slightly tangy rhubarb is a winning combination with both of us.

If you enjoy this flavor combo too, be sure to check out my recipes for Strawberry-Rhubarb Pie and Strawberry-Rhubarb Jam. They’re delicious, as well!

Whipped cream is added to the mini cobbler before serving.

I really hope you have the opportunity to make this absolutely delicious dessert, and trust you’ll enjoy it as much as we do!

Thanks for stopping by, and I invite you to come back soon for more family-friendly recipes. Take care, may God bless you… and have a GREAT day!

Looking For More FRUIT COBBLER and CRISPS Recipes?

You can find ALL of my recipes in the Recipe Index, which is located at the top of the page. I have a nice variety of delicious cobbler and crisp recipes to enjoy, including:

Want More Recipes? Get My FREE Newsletter!

I publish a newsletter 2 times per month (1st and 15th) with lots of recipes, tips, etc..
Would you like to join our growing list of subscribers?

There is a Newsletter subscription box on the top right (or bottom) of each blog post, depending on the device you use.
You can submit your e-mail address there, to be added to my mailing list.

Find Me On Social Media:

Facebook page: The Grateful Girl Cooks!
Pinterest:
The Grateful Girl Cooks!
Instagram:
jbatthegratefulgirlcooks

Author's signature

↓↓ PRINTABLE RECIPE BELOW ↓↓

0 from 0 votes
Strawberry Rhubarb Cobbler For Two
Prep Time
15 mins
Cook Time
30 mins
Total Time
45 mins
 

Hungry for a delicious dessert? Make Strawberry Rhubarb Cobbler For Two! With a crumbly, buttery topping, you'll LOVE this decadent treat!

Category: Dessert
Cuisine: American
Keyword: strawberry rhubarb cobbler
Servings: 2
Calories Per Serving: 603 kcal
Author: JB @ The Grateful Girl Cooks!
Ingredients
  • 1 cup rhubarb cut in 1" slices
  • 1 cup fresh strawberries cored and sliced in ⅓'s, lengthwise
  • cup granulated sugar
  • ½ teaspoon fresh lemon juice
  • ½ teaspoon lemon zest -finely grated yellow lemon peel
  • ½ teaspoon vanilla extract
  • 1 pinch salt
For Topping:
  • ¾ cup all purpose flour
  • 1 Tablespoon granulated sugar
  • ¾ teaspoon baking powder
  • ¼ teaspoon salt
  • 4 Tablespoons COLD butter = ½ stick, cut in chunks
  • ¼ cup sour cream
  • 2 teaspoons granulated sugar (TO TOP THE COBBLERS) ( 1 teaspoon per cobbler)
Instructions
  1. Preheat oven to 350℉. Spray/grease bottom & sides of 2 oven-safe 4" ramekins.

  2. Cut rhubarb into 1" slices. Core/slice strawberries into thirds (lengthwise). Measure after they're sliced. Place in a medium bowl. Add sugar, lemon juice, lemon zest, vanilla and salt. Stir to combine; set bowl aside.

  3. Combine flour, sugar, baking powder and salt in a medium bowl. Cut cold butter in chunks; add to flour mixture. Use a pastry blender or two forks to cut butter into the mixture. Continue until butter is the size of peas and mixture is crumbly. Stir in sour cream until fully incorporated.

  4. Divide fruit filling into prepared ramekins. Use fingers to pinch the topping mixture into small "clumps of dough". Place clumps of topping on each cobbler to cover fruit. Use all the topping! Sprinkle 1 t. sugar on top of each cobbler.

  5. Place foil on a middle rack in oven; place ramekins on top of foil. Bake at 350°F. for 30-35 minutes (uncovered). When done, juices should be bubbling around edges; topping should be lightly brown/slightly crispy. Transfer ramekins to a wire rack; cool slightly before serving. Serve warm, or at room temperature. Enjoy!

Nutrition Facts
Strawberry Rhubarb Cobbler For Two
Amount Per Serving (1 g)
Calories 603 Calories from Fat 243
% Daily Value*
Fat 27g42%
Saturated Fat 16g100%
Trans Fat 1g
Polyunsaturated Fat 1g
Monounsaturated Fat 7g
Cholesterol 70mg23%
Sodium 520mg23%
Potassium 560mg16%
Carbohydrates 86g29%
Fiber 4g17%
Sugar 44g49%
Protein 7g14%
Vitamin A 865IU17%
Vitamin C 49mg59%
Calcium 185mg19%
Iron 3mg17%
* Percent Daily Values are based on a 2000 calorie diet.

Here’s one more to pin on your Pinterest boards!Hungry for a delicious dessert? Make Strawberry Rhubarb Cobbler For Two! With a crumbly, buttery topping, you'll LOVE this decadent treat!

Teriyaki Shrimp Bowl

Teriyaki Shrimp Bowl is a delicious dish with shrimp, mushrooms, red, green and yellow bell peppers covered in an easy to make Asian sauce.

Last year I found a stir-fried shrimp recipe online and knew I had to try it! The original recipe was created using snow peas and peppers, and it looked fabulous, but I decided to “tweak” it just a little bit.

The best part of this recipe is it calls for 3 cups of fresh vegetables, which you can change to suit your taste. Even though I grow snow peas in our garden and had some available, I wanted to use some Baby bella mushrooms for this dish instead.

For this recipe, I used 1 cup of sliced mushrooms, and 2 cups of chopped bell peppers (a combination of red, green and yellow bell peppers) for great color and flavor.

You could use other veggies (total of 3 cups) like broccoli, bok choy, carrots, etc. to make this recipe “your own” and suit your personal taste. Here’s how to make this recipe for a Teriyaki Shrimp Bowl (shown served with white rice).

Scroll Down For A Printable Recipe Card At The Bottom Of The Page

Make The Teriyaki Sauce

Place water, soy sauce, brown sugar, minced garlic, honey, minced ginger, and toasted sesame oil into a small saucepan.

Turn the heat under the pan to Medium-High and stir until the brown sugar has dissolved (1-2 minutes). Once the sugar dissolves, turn the heat up to High, and let the sauce come to a boil, stirring often.

Ingredients for Asian sauce in saucepan, with a spoon.

In a separate bowl, whisk a bit more cold water with cornstarch until it is lump-free. Stir the cornstarch/water mixture into the sauce.

Let the sauce boil, stirring often, for 1-2 minutes or until the sauce thickens. Remove the pan from the heat source and set the pan aside.

The Asian style sauce thickens as it cooks and is shown on a spoon.

Stir-Fry The Veggies

Now it’s time to stir-fry the vegetables. You will need to use a large skillet, because the shrimp and sauce will be added to it later, as well.

Heat vegetable oil in the skillet on Medium-High. Once the oil is hot (but not smoking), add the chopped red, green and yellow bell peppers and sliced mushrooms. Stir to combine.

Season the veggies lightly with salt and black pepper (to suit your taste). Cook the veggies for 3-4 minutes, stirring often, until they begin to soften.

Baby Bella mushroom, and red, green and yellow bell peppers are stir-fried.

Now add a couple Tablespoons of water to the skillet, and continue to cook the veggies, stirring occasionally, until the water evaporates.

Transfer all the tender-crisp vegetables out of the skillet and into a bowl. Cover the bowl to keep the veggies warm, and set aside.

Water is added to the stir-fried veggies in skillet with a wooden spoon.

Cook The Shrimp

The shrimp I use when I make this recipe is one pound of large shrimp (approx. 31-40 count per pound). De-vein the shrimp and remove the shells but leave the tails on (to prevent shrimp from curling too much). If you prefer, you can easily remove the tails before cooking the shrimp (I’ve done both).

Grab some paper towels and give the skillet a quick wipe to clean it out. Pour in the remaining 2 teaspoons of vegetable oil and turn the heat to High.

Pat the shrimp dry with paper towels before adding them to the hot oil. When the oil is hot (but not smoking), add the shrimp to the skillet.

Season the shrimp well with salt and black pepper, then cook 2-3 minutes, stirring often, until they’ve turned pink in color, and are cooked through. NOTE: Don’t overcook them as overcooked shrimp can become “rubbery” in texture. 

Large shrimp are stir-fried in hot oil in a black skillet.

Place the cooked veggies back into the skillet with the shrimp. Pour the sauce on top, and stir to fully combine these ingredients.

Cook on Medium High heat only until the dish is re-heated (1-2 minutes, max). Stir, to ensure all veggies and shrimp are coated with the sauce. Remove the skillet from the heat source and serve immediately.

Cooked sauce and veggies are added back into skillet with the shrimp.

Garnish And Serve The Teriyaki Shrimp Bowl

The Teriyaki Shrimp Bowl is delicious and can be eaten “as is”, BUT I highly recommend serving it on top of steamed white or brown rice OR Asian noodles!

Garnish each serving with sliced green onions and sesame seeds for even more color and flavor. This garnish is optional, but we think it finishes this dish perfectly!

Our family enjoys the shrimp and veggies served on a bed of steamed white rice. The bland rice pairs very well with the teriyaki shrimp and veggies, and helps turn this into a very filling meal.

Teriyaki shrimp bowl is served on rice, with green onion/sesame seed garnish.A serving of Teriyaki Shrimp Bowl, served on a bed of rice in a white bowl.

I hope you (and those you love) enjoy eating Teriyaki Shrimp Bowls, and trust you’ll like them as much as we do! They are delicious, and full of great flavor.

Thanks for stopping by, and please come back soon for more family-friendly recipes. Take care, may God bless you, and I sincerely hope you have a GREAT day!

Looking For More SHRIMP Recipes?

You can find ALL of my recipes in the Recipe Index, which is located at the top of the page. I have some delicious recipes featuring shrimp  you might enjoy, including:

Interested In More Recipes? Get My FREE Newsletter!

I publish a newsletter 2 times per month (1st and 15th) with recipes, tips, etc..
 I would be honored to have you join our growing list of subscribers!

There is a Newsletter subscription box on the top right (or bottom) of each blog post, depending on the device you use, where you can submit your e-mail address to be added to my mailing list.

Find Me On Social Media:

Facebook page: The Grateful Girl Cooks!
Pinterest:
The Grateful Girl Cooks!
Instagram:
jbatthegratefulgirlcooks

Author's signature

Recipe adapted from (and with thanks to) Sara Welch, at: https://www.dinneratthezoo.com/shrimp-stir-fry/

↓↓ PRINTABLE RECIPE BELOW ↓↓

0 from 0 votes
Teriyaki Shrimp Bowl
Prep Time
10 mins
Cook Time
10 mins
Total Time
20 mins
 

Teriyaki Shrimp Bowl is a delicious dish with shrimp, mushrooms, red, green and yellow bell peppers covered in an easy to make Asian sauce.

Category: Main Dish
Cuisine: Asian
Keyword: teriyaki shrimp bowl
Servings: 4
Calories Per Serving: 208 kcal
Author: JB @ The Grateful Girl Cooks!
Ingredients
For Sauce:
  • 3 Tablespoons low-sodium soy sauce
  • 6 Tablespoons water
  • 2 Tablespoons brown sugar
  • 2 teaspoons honey
  • teaspoons minced garlic
  • teaspoons minced ginger
  • ¾ teaspoon toasted sesame oil
  • 1 Tablespoon cornstarch
  • Tablespoons cold water
For Stir-Fry:
  • 1 pound large shrimp (31-40 count per lb.) peeled/de-veined
  • 2 cups bell peppers (red, yellow and green) any combination making 2 cups total
  • 1 cup sliced mushrooms (I use baby bella)
  • salt and pepper, to taste
  • 2 Tablespoons water
  • 1 Tablespoon vegetable oil **DIVIDED USE**
Optional Garnish: sliced green onions and sesame seeds
    Instructions
    1. Heat soy sauce, 6 T. water, brown sugar, garlic, honey, ginger, and sesame oil on Medium-High in a small saucepan. Stir until brown sugar has dissolved (1-2 minutes); turn heat up to High. Let sauce come to a boil, stirring often.

    2. In separate bowl, whisk 1½ T. cold water with cornstarch until smooth. Stir cornstarch mixture into the sauce. Let sauce boil 1-2 minutes or until sauce thickens, stirring often. Remove pan from heat; set aside.

    3. Heat 1 t. vegetable oil in large skillet on Medium-High. Once oil is hot (but not smoking), add peppers and mushrooms; stir to combine. Season lightly with salt and pepper (to taste). Cook 3-4 minutes, stirring often, until they begin to soften. Add 2 T. water; cook veggies until water evaporates. Transfer veggies from skillet into a bowl. Cover bowl to keep veggies warm; set aside.

    4. Wipe skillet clean with paper towels. Add remaining 2 t. vegetable oil; turn heat to High. Pat shrimp dry before adding to hot oil. Add shrimp. Season well with salt and pepper; cook 2-3 minutes until pink in color, and cooked through. NOTE: Don't overcook because overcooked shrimp can become "rubbery" in texture. 

    5. Put veggies back into the skillet with shrimp. Add the sauce; stir to combine. Cook on Medium High only until re-heated (1-2 minutes). Stir, to ensure all shrimp/veggies are coated with sauce. Remove skillet from heat.

    6. Serve over rice or noodles. Garnish with green onions/sesame seeds (optional),

    Recipe Notes

    NOTE: Caloric calculation does not include white rice, brown rice or Asian noodles, as they are recommended, but optional (type or quantity) for serving with this recipe.

    Nutrition Facts
    Teriyaki Shrimp Bowl
    Amount Per Serving (1 (1/4 of total))
    Calories 208 Calories from Fat 45
    % Daily Value*
    Fat 5g8%
    Saturated Fat 1g6%
    Trans Fat 0.03g
    Polyunsaturated Fat 3g
    Monounsaturated Fat 1g
    Cholesterol 183mg61%
    Sodium 769mg33%
    Potassium 593mg17%
    Carbohydrates 17g6%
    Fiber 2g8%
    Sugar 12g13%
    Protein 25g50%
    Vitamin A 2333IU47%
    Vitamin C 96mg116%
    Calcium 91mg9%
    Iron 1mg6%
    * Percent Daily Values are based on a 2000 calorie diet.

    Here’s one more to pin on your Pinterest boards!

    Teriyaki Shrimp Bowl is a delicious dish with shrimp, mushrooms, red, green and yellow bell peppers covered in an easy to make Asian sauce.

    Sweet Potato Sage Noodles

    Spiralized Sweet Potato Sage Noodles are cooked in brown butter, and topped with toasted pecans and Parmesan for a tasty side dish.
    Spiralized Sweet Potato Sage Noodles are cooked in brown butter, and topped with toasted pecans and Parmesan for a tasty side dish.

    A few years ago I received a spiralizer appliance and experimented with quite a few recipes. I then set it aside (out of sight), and to be truthful, I forgot about it! Have you ever done that? Oh well.

    I finally dug it out of “storage” (ha ha) a few months ago, and used it to make sweet potato sage noodles, a very simple recipe for a yummy little veggie side dish. NOTE: I’ve included a way to make this recipe even if you don’t have access to a spiralizer.

    I found the original recipe in a Kindle cookbook I have, made a couple changes to the recipe to suit our taste, and enjoyed the results. Here’s how to make sweet potato sage noodles.

    Scroll Down For A Printable Recipe Card At The Bottom Of The Page

    Prep The Sweet Potatoes

    Peel two medium-large sweet potatoes, give them a quick rinse, and then pat them dry. Trim both ends flat with a knife (so they can be attached to the spiralizer).

    Two medium sweet potatoes on yellow mat, with a vegetable peeler.Two peeled sweet potatoes, with discarded peel, knife and vegetable peeler.

    Make The Sweet Potato “Noodles”

    Attach a “noodle” blade to your spiralizer appliance. Position a sweet potato into the spiralizer, lock into place, and turn the handle. Catch the spiralized noodles in a large bowl as they come out of the machine.

    TIP: If you don’t have a spiralizer, thinly peel the entire length (top to bottom) of the sweet potato using a vegetable peeler. The noodles should be as wide as the surface of the sweet potato. Once they’re peeled into wide, thin strips, slice them lengthwise into thin “noodle” sized shapes.

    A sweet potato, positioned in place on a spiralizer machine.Spiralized sweet potato noodles fall into a large white bowl.

    Melt 3 Tablespoons butter in a large skillet until it begins to foam, on Medium heat. Once it has stopped foaming, turn the heat to Low and stir in 1½ teaspoons of dried sage until combined.

    Continue to cook until the butter has browned and starts to smell “nutty”. This usually takes 3-4 minutes.

    Butter is cooked in large skillet until melted and browned.

    Cook The Sweet Potato Sage Noodles

    Add the sweet potato noodles to the browned butter and sage in the skillet. Cook the noodles on Medium heat, stirring often, until they become tender to the bite.

    The cooking time may vary depending on the thickness of the noodles you are cooking, but typically will become tender after 5-7 minutes.

    The spiralized sweet potato noodles are added to browned butter in skillet.Sweet potato noodles are tossed with browned butter and sage until combined.

    Season the tender noodles to taste with salt and black pepper, then add fresh, finely grated Parmesan cheese. Toss together until combined and the cheese melts.

    Once the sweet potato sage noodles are tender, hot, and the cheese has melted, they’re ready to garnish and serve while hot.

    Grated Parmesan cheese is added to the sweet potato noodles in skillet.

    Toasted Pecan Garnish

    Add chopped toasted pecans to the top of the hot sweet potato noodles as a garnish, for added crunch and flavor. TIP: Toast the pecans while the sweet potato noodles are cooking, to save time.

    To toast chopped pecans, place them in a separate (small) dry skillet, and cook on Medium-Low, stirring often, for 2-3 minutes or until they become fragrant. Remove the pecans from the skillet and let them cool.

    Chopped pecans are lightly toasted in a dry skillet.

    When you’re ready to serve the sweet potato sage noodles, transfer the hot noodles to a serving bowl and add garnish before serving.

    GARNISH: Sprinkle the hot noodles with toasted pecans AND additional Parmesan cheese, if desired. Serve immediately and enjoy. 

    Sweet potato sage noodles garnished with parmesan and toasted pecans.

    I hope you enjoy this sweet potato dish, and it’s unique noodle “twist” (see what I did there?). Thanks for stopping by, and please come back soon for more family-friendly recipes.

    Looking For More SWEET POTATO Or YAM Recipes?

    You can find ALL of my recipes in the Recipe Index, which is located at the top of the page. I have some nice sweet potato (and yam) recipes to choose from, including:

    Want More Recipes? Get My FREE Newsletter!

    I publish a newsletter 2 times per month (1st and 15th) with lots of recipes, tips, etc..
    Would you like to join our growing list of subscribers?

    There is a Newsletter subscription box on the top right (or bottom) of each blog post, depending on the device you use.
    You can submit your e-mail address there, to be added to my mailing list.

    Find Me On Social Media:

    Facebook page: The Grateful Girl Cooks!
    Pinterest:
    The Grateful Girl Cooks!
    Instagram:
    jbatthegratefulgirlcooks

    Author's signature

    Recipe adapted from: “5 Ingredient Cooking For Two” (Kindle version), by Robin Donovan, published by Rockridge Press in 2020

    ↓↓ PRINTABLE RECIPE BELOW ↓↓

    0 from 0 votes
    Sweet Potato Noodles
    Prep Time
    15 mins
    Cook Time
    12 mins
    Total Time
    27 mins
     

    Spiralized Sweet Potato Sage Noodles are cooked in brown butter, and topped with toasted pecans and Parmesan for a tasty side dish.

    Category: Side Dish, Vegetable
    Cuisine: All Cuisines
    Keyword: sweet potato noodles
    Servings: 4
    Calories Per Serving: 223 kcal
    Author: JB @ The Grateful Girl Cooks!
    Ingredients
    • 2 medium sweet potatoes peeled, spiralized
    • 3 Tablespoons butter
    • teaspoons dried sage
    • salt and black pepper season to taste
    • 3 Tablespoons freshly grated Parmesan cheese + more for garnish, if desired
    • 2 Tablespoons chopped pecans toasted
    Instructions
    1. Peel sweet potatoes; rinse, pat dry. Trim both ends flat with a knife.

    2. Attach "noodle" blade to spiralizer. Position a sweet potato in spiralizer; lock in place, and turn handle. Catch spiralized noodles in large bowl as they fall. TIP: No spiralizer? Thinly peel length of sweet potato with a vegetable peeler, Noodles should be as wide as the sweet potato. Once peeled into wide, thin strips, slice lengthwise into very thin strips or "noodles".

    3. Melt butter in large skillet on Medium heat until it begins to foam. When it stops foaming, turn heat to Low. Stir in sage until combined. Continue to cook until butter has browned and starts to smell "nutty" (about 3-4 minutes).

    4. Add sweet potato noodles to the skillet. Cook on Medium heat, stirring often, until noodles become tender to the bite. Cooking time may vary depending on thickness of noodles, but typically become tender after 5-7 minutes.

    5. Toast chopped pecans while noodles cook: place pecans in separate (small) dry skillet; cook on Medium-Low, stirring often, for 2-3 minutes or until fragrant. Remove pecans from skillet; let cool.

    6. Season hot cooked noodles to taste with salt/pepper. Top with fresh, finely grated Parmesan cheese. Toss until combined, cheese melts and noodles are heated through.

    7. To serve, transfer hot noodles to a bowl, garnish with toasted pecans and more grated Parmesan (if desired). Serve immediately. Enjoy!

    Recipe Notes

    NOTE: Salt/pepper was not given consideration in the nutrition calculation, as the noodles are seasoned to taste with these ingredients, and may vary with each user.

    Nutrition Facts
    Sweet Potato Noodles
    Amount Per Serving (1 g)
    Calories 223 Calories from Fat 117
    % Daily Value*
    Fat 13g20%
    Saturated Fat 6g38%
    Trans Fat 0.3g
    Polyunsaturated Fat 1g
    Monounsaturated Fat 4g
    Cholesterol 26mg9%
    Sodium 195mg8%
    Potassium 411mg12%
    Carbohydrates 24g8%
    Fiber 4g17%
    Sugar 5g6%
    Protein 3g6%
    Vitamin A 16331IU327%
    Vitamin C 3mg4%
    Calcium 74mg7%
    Iron 1mg6%
    * Percent Daily Values are based on a 2000 calorie diet.

    Here’s one more to pin on your Pinterest boards!Spiralized Sweet Potato Sage Noodles are cooked in brown butter, and topped with toasted pecans and Parmesan for a tasty side dish.

    Pear Pecan Shortbread Tart

    Pear Pecan Shortbread Tart is a yummy dessert with a shortbread crust and pear, cinnamon, brown sugar filling, topped with buttery streusel.
    Pear Pecan Shortbread Tart is a yummy dessert with a shortbread crust and pear, cinnamon, brown sugar filling, topped with buttery streusel.

    Many years ago a friend of mine gave me a recipe for an apple tart, and it has become one of my “go to” dessert recipes we love! Over the years I’ve created several other fruit tart recipes using that original “basic” recipe.

    Last summer I received a bag of ripe pears from one of our neighbors who has a pear tree. They were very ripe, so they had to be used fairly quickly. This recipe for a pear pecan shortbread tart is the result!

    I also made and canned jars of pear butter with them, which was also wonderful, as well. That gift of homegrown pears was such a welcome and generous surprise!

    This recipe creates a truly delicious dessert I’m confident you’ll enjoy, so I am sharing the recipe today. Here’s how to make a pear pecan shortbread tart.

    Scroll Down For A Printable Recipe Card At The Bottom Of The Page

    Make The Shortbread Crust

    The first thing you will need to do is preheat your oven to 400°F . While the oven is preheating, make the shortbread crust, using either a food processor OR a handheld pastry blender.

    Combine all purpose flour, granulated sugar, salt and cold butter chunks in a food processor OR a large mixing bowl.

    If you’re using a food processor, pulse the ingredients until the mixture is combined and the butter is reduced to the size of peas. If you’re using a pastry blender, cut the butter into the other ingredients until it’s about the size of peas.

    Add egg yolks and mix, to combine the yolks with the other ingredients. You should end up with a slightly crumbly mixture.

    Cold butter for the crust is mixed with sugar and salt in a food processor.Egg yolks are combined with the crust mixture in food processor.

    Make The Shortbread Crust

    Remove ¼ of this mixture and set it aside (it will be used later as a topping for the fruit). Take the remaining ¾ of the mixture and pat it firmly into a 9″ tart pan (with a removable bottom disc).

    Firmly compact the mixture with your fingers (or the bottom of a glass) to form a compacted, solid bottom crust and sides of the tart pan. When done, set the tart crust aside.

    Shortbread mixture is firmly compacted in tart pan to form a crust.

    Prepare The Pear Filling

    Peel 6 medium sized ripe pears. The riper they are, the sweeter the fruit will be. Peel the pears, cut them in half, remove the core, and then slice each pear into thin slices.

    Place the pear slices in a large bowl and add chopped pecans (or walnuts), brown sugar, all purpose flour, cinnamon and vanilla extract. 

    Ripe pears are peeled, cored then sliced to make the tart's fruit filling.Flour, brown sugar, pecans, cinnamon and vanilla are added to pear slices.

    Fill the Shortbread Crust

    Gently toss to fully combine the pears with these additional ingredients. This is the filling for your Pear Pecan Shortbread Tart.

    Carefully add the pear filling to the shortbread crust, mounding the pears up in the middle of the pan.

    After combining ingredients, the fruit filling is ready for the tart crust.Sliced pear filling is added to the shortbread tart crust in pan.

    Top The Tart With The Remaining Streusel

    Cover the entire surface of the fruit with the reserved streusel topping. Use a spoon to sprinkle it over all of the fruit filling.

    TIP: When sprinkling the topping around the edges of the crust, cup your other hand around that section, to help hold the streusel IN the tart. Use all of the streusel topping to fully cover the tart.

    Buttery topping is sprinkled over surface of the pear pecan shortbread tart.

    Time To Bake!

    Now it is time to bake the Pear Pecan Shortbread Tart! Place a sheet of aluminum foil on a middle oven rack. Carefully place the tart on the aluminum foil. The foil will help catch any drips and make cleanup much easier.

    Bake the pear pecan shortbread tart at 400°F. for 15 minutes, then reduce the heat to 350°F and continue baking for 25-30 minutes.

    When done, the tart should be slightly bubbly around the edges (from accumulated juices), and the topping should be golden brown in color. Carefully transfer the tart to a wire rack to cool (in pan) at least 15-20 minutes before removing the sides of the pan.

    Pear Pecan Shortbread Tart is ready to be baked.After baking, the tart is bubbly around edges and golden brown on top.

    Slice And Serve The Pear Pecan Shortbread Tart

    When the tart has cooled enough, carefully remove the tart from the pan by pressing up on the bottom disc (from underneath) and lifting up, to remove the tart from the outer ring.

    Slice the pear pecan shortbread tart into eight slices, and serve warm with a nice scoop of vanilla ice cream, if you have it!

    We prefer to eat this dessert war with ice cream, as opposed to blazing hot! It is also wonderful to eat it at room temperature, too.

    TIP: This tart is at its BEST eaten the 1st or 2nd day after making it (accumulated pear juices can cause the bottom crust to get slightly  “soggy” after the first couple days). 

    After tart pan edges are removed, the crust can be seen from this side view.Slice of pear pecan shortbread tart served with ice cream on a white plate.

    I hope you enjoy this delicious dessert as much as we do. I have made this recipe many times using other fruits as well, and they are all delicious!

    Thank you for stopping by, and I invite you to come back again soon for more family-friendly recipes. Take care, may God bless you, and I hope you have a GREAT day!

    Looking for More FRUIT TART OR PIE Recipes?

    You can find ALL of my recipes in the Recipe Index, which is located at the top of the page. I have a nice variety of fruit pies and tarts to choose from, including:

    Want More Recipes? Get My FREE Newsletter!

    I publish a newsletter 2 times per month (1st and 15th) with lots of recipes, tips, etc..
    Would you like to join our growing list of subscribers?

    There is a Newsletter subscription box on the top right (or bottom) of each blog post, depending on the device you use.
    You can submit your e-mail address there, to be added to my mailing list.

    Find Me On Social Media:

    Facebook page: The Grateful Girl Cooks!
    Pinterest:
    The Grateful Girl Cooks!
    Instagram:
    jbatthegratefulgirlcooks

    Author's signature

    ↓↓ PRINTABLE RECIPE BELOW ↓↓

    0 from 0 votes
    Pear Pecan Shortbread Tart
    Prep Time
    15 mins
    Cook Time
    45 mins
    Total Time
    1 hr
     

    Pear Pecan Shortbread Tart is a yummy dessert with a shortbread crust and pear, cinnamon, brown sugar filling, topped with buttery streusel.

    Category: Dessert
    Cuisine: American
    Keyword: pear pecan shortbread tart
    Servings: 8
    Calories Per Serving: 470 kcal
    Author: JB @ The Grateful Girl Cooks!
    Ingredients
    For Shortbread Crust:
    • 2 cups all purpose flour
    • ½ cup granulated sugar
    • ¼ teaspoon salt
    • ¾ cup COLD butter cut in chunks = 12 Tablespoons
    • 2 large egg yolks
    For Fruit Filling:
    • 6 medium ripe pears peeled, cored, thinly slices
    • ½ cup chopped pecans (or walnuts)
    • 3 Tablespoons dark brown sugar
    • ½ teaspoon cinnamon
    • ½ teaspoon vanilla extract
    Instructions
    1. Preheat your oven to 400°F.

    2. Make shortbread crust, using food processor OR pastry blender. Combine flour, sugar, salt and cold butter chunks in food processor OR large bowl. If using a food processor, pulse ingredients until combined and butter is size of peas. If using a pastry blender, cut butter into other ingredients until combined and butter is size of peas. Add egg yolks and mix, to combine. into a crumbly mixture.

    3. Remove ¼ of crust mixture; set it aside. Take remaining ¾ of the mixture and pat it firmly into a 9" tart pan (with removable bottom disc). Firmly compact mixture with fingers (or bottom of a glass) to form a solid bottom crust and sides of the tart pan. When done, set aside.

    4. Peel pears, cut them vertically in half, remove core; cut pears in thin slices. Place pear slices in large bowl; add pecans, brown sugar, flour, cinnamon and vanilla. Gently toss to combine. Carefully add pear filling to shortbread crust, mounding pears up in the middle of the pan.

    5. Cover fruit with reserved topping. Use a spoon to sprinkle it over all fruit filling. TIP: When sprinkling topping around edges of crust, cup other hand around that section, to help hold streusel IN the tart. Use all topping to fully cover the tart.

    6. Place foil on middle oven rack. Carefully place tart pan on foil. Bake at 400°F. for 15 minutes; then reduce heat to 350°F. Continue baking 25-30 minutes. Tart should be bubbly around edges and golden brown in color. Transfer tart pan to a wire rack to cool (in pan) for 15-20 minutes before removing sides of pan.

    7. Remove tart from the pan by pressing up on the bottom disc (from underneath) and lifting up, to remove tart from the outer ring. Slice the pear pecan shortbread tart into eight wedges. Serve warm with vanilla ice cream, if desired!

    Nutrition Facts
    Pear Pecan Shortbread Tart
    Amount Per Serving (1 slice (1/8 of total))
    Calories 470 Calories from Fat 216
    % Daily Value*
    Fat 24g37%
    Saturated Fat 12g75%
    Trans Fat 1g
    Polyunsaturated Fat 5g
    Monounsaturated Fat 6g
    Cholesterol 92mg31%
    Sodium 215mg9%
    Potassium 237mg7%
    Carbohydrates 62g21%
    Fiber 6g25%
    Sugar 30g33%
    Protein 6g12%
    Vitamin A 628IU13%
    Vitamin C 6mg7%
    Calcium 40mg4%
    Iron 2mg11%
    * Percent Daily Values are based on a 2000 calorie diet.

    Here’s one more to pin on your Pinterest boards!Pear Pecan Shortbread Tart is a yummy dessert with a shortbread crust and pear, cinnamon, brown sugar filling, topped with buttery streusel.

    Chicken Suizas Hand Pies

    Chicken Suizas Hand Pies are delicious, baked, hand-held pastries filled with chicken, cream cheese, green chiles, jack and cheddar cheeses.Chicken Suizas Hand Pies are delicious, baked, hand-held pastries filled with chicken, cream cheese, green chiles, jack and cheddar cheeses.

    Hand-held filled pastries filled with meat, vegetables or fruit are known and loved around the world. They are called by many titles such as empanadas, hand-pies, turnovers, pasties, pirozhki, calzones, etc., depending on which country they are from.

    The recipe I am sharing today is a hand-held pastry, filled with shredded chicken, green chiles, 3 cheeses, and spices. You can make them using homemade pie crust OR a box of store-bought pastry dough, enough for a double crust pie.

    I found this recipe online several years ago and made several changes to the original recipe, to suit our taste. The end result is 12 cute, filled hand pies (similar in taste to suizas enchiladas) that can be enjoyed as a hand-held snack or meal.

    They are fairly small in size (around 5″ wide), and are low in calories, so go ahead and eat a couple of them if you want! Here’s how to make chicken suizas hand pies.

    Scroll Down For A Printable Recipe Card At The Bottom Of The Page

    Make The Chicken Filling

    Place cooked shredded chicken, soft cream cheese, chopped green chiles, grated cheddar and Monterey jack cheeses and spices in a large bowl.

    Stir well to fully incorporate these ingredients. Be sure to use room temperature cream cheese to make this step MUCH easier!

    Shredded chicken, green chiles, cream cheese and grated cheese in metal bowl.Spices are added to the chicken cream cheese mixture in bowl.

    Cut Out Pastry Circles

    Lightly flour a work surface. Whether you’re using purchased or homemade pie dough, lay one crust at a time on the floured surface. Cut 5″ circles out of the dough. I use the top of a 5″ jar to do this!

    NOTE: You don’t want to buy pie crusts pre-formed in aluminum pie tins. The dough needs to be flat and round. If purchasing, buy a box of ready made pie pastry (for a double crust pie, like Pillsbury). 

    Try to get as many 5″ circles out of the two crusts as possible (re-rolling the scraps as necessary). Typically I end up with 12 circles, using the dough from 2  homemade pie crusts.

    Circles are cut out of pie dough using overturned jar.Five inch circles are cut out of the pie dough.

    Fill The Hand Pies

    Once the pastry dough has been cut into 5″ circles, place them on an ungreased large cookie sheet (or sheets), leaving space between each one.

    Place a couple Tablespoonfuls of the chicken filling on one half of the circle, being careful to NOT add too much filling. Leave the edge free of filling (as shown below).

    Carefully fold the empty half of the pastry dough up and over the filling until it meets the opposite edge. Use a fork (or your fingers) to crimp the edges of the hand pie together to seal.

    Try your best to make sure the pies are sealed tightly, so the filling doesn’t run out of them while they bake.

    Half of each dough circle is covered with chicken suizas filling.Hand pies are filled, sealed, and rest on baking sheets.

    Brush the pastry dough with a lightly beaten egg. This step will help the pastry dough to brown slightly while baking.

    Each hand pie is brushed with beaten egg before baking.

    Bake The Chicken Suizas Hand Pies

    Bake the Chicken Suizas Hand Pies on an ungreased, large baking sheet (or 2 sheets) at 425°F. for 15-17 minutes. TIP: Oven temperatures can vary slightly, so I recommend checking on them after 14 minutes.

    When done, the crust should be lightly crisp/flaky on the outside and golden brown in color. Remove the baking sheet(s) from the oven and transfer the hand pies to a wire rack using a spatula.  

    Chicken Suizas Hand Pies rest on wire rack after baking.

    Serve The Chicken Suizas Hand Pies

    Let them cool 1-2 minutes, then serve. I’m confident you’ll enjoy the creamy seasoned chicken and cheese filling, and the flaky, golden crust on the outside!

    These hand pies are at their best eaten on the same day they are baked, but you can reheat them in a microwave oven the next day, if necessary.

    White plate holding a few of the chicken suizas hand pies stacked on top.One of the hand pies cut open, revealing the chicken filling inside.

    I hope you have the opportunity to make these absolutely delicious Chicken Suizas Hand Pies, because they’re so GOOD!

    Thanks for taking time out of your busy day to stop by. I invite you to come back again soon for more family-friendly recipes. Take care, and have a GREAT day!

    Looking For More CHICKEN Recipes?

    You can find ALL of my recipes in the Recipe Index, which is located at the top of the page. I have many delicious recipes featuring chicken, including:

    Want More Recipes? Get My FREE Newsletter!

    I publish a newsletter 2 times per month (1st and 15th) with lots of recipes, tips, etc..
    Would you like to join our growing list of subscribers?

    There is a Newsletter subscription box on the top right (or bottom) of each blog post, depending on the device you use.
    You can submit your e-mail address there, to be added to my mailing list.

    Find Me On Social Media:

    Facebook page: The Grateful Girl Cooks!
    Pinterest:
    The Grateful Girl Cooks!
    Instagram:
    jbatthegratefulgirlcooks

    Author's signature

    Recipe adapted from (and with thanks to) Rebekah at: https://www.kitchengidget.com/2016/03/09/green-chile-chicken-enchilada-hand-pies/

    ↓↓ PRINTABLE RECIPE BELOW ↓↓

    0 from 0 votes
    Chicken Suizas Hand Pies
    Prep Time
    20 mins
    Cook Time
    15 mins
    Total Time
    35 mins
     

    Chicken Suizas Hand Pies are delicious, baked, hand-held pastries filled with chicken, cream cheese, green chiles, jack and cheddar cheeses.

    Category: Lunch, Main Dish
    Cuisine: American
    Keyword: chicken suizas hand pies
    Servings: 12
    Calories Per Serving: 109 kcal
    Author: JB @ The Grateful Girl Cooks!
    Ingredients
    • cups cooked, shredded chicken breast approx. 2 small breasts
    • 8 ounces cream cheese softened (room temp.)
    • ½ cup shredded cheddar cheese
    • ½ cup shredded jack cheese
    • 4.5 ounces chopped green chiles (canned) = 1 can
    • ¼ teaspoon salt and pepper (each)
    • ¼ teaspoon ground cumin
    • ¼ teaspoon garlic powder
    • ¼ teaspoon onion powder
    • 2 unbaked pie crusts purchased pastry dough or homemade
    • 1 large egg lightly beaten
    Instructions
    1. Preheat oven to 425℉.

    2. Place chicken, cream cheese, green chiles, cheddar cheese, jack cheese and spices in a large bowl. Stir well until combined.

    3. Roll out and/ or lay pie crust dough on a lightly floured surface. Cut 5" circles out of the dough, cutting 12 circles out (re-rolling scraps as necessary).

    4. Place pastry rounds on ungreased cookie sheets, leaving space between each. Spoon 2 T. of filling on ½ of each circle; DO NOT over fill! Leave filled edge free of filling. Carefully fold the empty side of dough up and over filling until it meets the opposite edge. Use a fork (or fingers) to crimp edges of dough together to seal completely, so filling doesn't escape while baking. Brush dough with beaten egg.

    5. Bake for 15-17 minutes. TIP: Oven temperatures can vary so I recommend checking on them after 14 minutes. When done, crust should be crisp/flaky on the outside and golden brown. 

    6. Remove pan(s) from oven; transfer hand pies to a wire rack. Let cool 1-2 minutes, then serve and enjoy.

    Nutrition Facts
    Chicken Suizas Hand Pies
    Amount Per Serving (1 hand pie)
    Calories 109 Calories from Fat 63
    % Daily Value*
    Fat 7g11%
    Saturated Fat 4g25%
    Trans Fat 0.004g
    Polyunsaturated Fat 0.4g
    Monounsaturated Fat 2g
    Cholesterol 49mg16%
    Sodium 250mg11%
    Potassium 155mg4%
    Carbohydrates 2g1%
    Fiber 0.2g1%
    Sugar 1g1%
    Protein 9g18%
    Vitamin A 231IU5%
    Vitamin C 4mg5%
    Calcium 104mg10%
    Iron 0.4mg2%
    * Percent Daily Values are based on a 2000 calorie diet.

    Here’s one more to pin on your Pinterest boards!Chicken Suizas Hand Pies are delicious, baked, hand-held pastries filled with chicken, cream cheese, green chiles, jack and cheddar cheeses.

    Cloverleaf Dinner Rolls

    Cloverleaf Dinner Rolls are classic “pull apart” yeast rolls shaped like leaves of a clover plant. This delicious recipe makes 2 dozen rolls.
    Cloverleaf Dinner Rolls are classic "pull apart" yeast rolls shaped like leaves of a clover plant. This delicious recipe makes 2 dozen rolls.

    Today I want to share a recipe for cloverleaf dinner rolls I found many years ago in one of my old cooking magazines. They are a classic “pull apart” dinner roll, easily identified by the 3 sections found in each one.

    These traditional rolls are called “cloverleaf” because the 3 sections resemble the 3 leaves (or lobes) of a clover plant. Yeast dough is made and shaped into small balls. Muffin tins are filled with three balls each, baked, and the finished butter-topped rolls pull apart easily!

    These yeast rolls rise 2 different times, so there is a bit of inactive time involved, but the results are worth it! Cloverleaf dinner rolls are delicious and slightly addicting, especially if you enjoy homemade bread! Here’s how to make them.

    Scroll Down For A Printable Recipe Card At The Bottom Of The Page

    Make The Bread Dough

    Combine one package of active dry yeast, 3 Tablespoons granulated sugar, and 1¼ cups of warm milk (110°F) in a large mixing bowl or the bowl of a stand mixer.

    IMPORTANT: The temperature of the milk is very important! If the milk is too hot, it can “kill off” the yeast (and you really do NOT want that to happen).

    Stir until combined, then let it rest 4-5 minutes until the mixture develops bubbles on the surface. This indicates the yeast is alive and well. Once bubbly, mix these 3 ingredients together using an electric mixer.

    Add ¼ cup softened butter, 1 egg, and 1 teaspoon of salt to the yeast mixture. Mix well, until they have been fully incorporated.

    Butter, egg, and salt are mixed into yeast, sugar and milk mixture.

    Add 3 cups of all purpose flour to the bowl and continue beating until the “dough” becomes fairly smooth in texture.

    Slowly beat in 1 more cup of flour. You will want this mixture to form into a “soft dough”. If necessary, add the remaining ½ cup of flour to do so.

    Flour is added to the dough a small amount at a time.

    Knead And Let The Dough Rise

    Generously sprinkle additional flour on a work surface. Place the “ball of soft dough” on the flour. Sprinkle with a bit more flour on top, then knead the dough for 6-8 minutes, using the palm of your hand.

    Rotate the dough often, and sprinkle with a small amount more flour if necessary, to prevent sticking. Shape the dough into a ball.

    TIP: If you have a stand mixer, you can attach the dough hook to knead the bread dough by machine, if desired.

    Soft dough on floured surface, ready to be kneaded.After kneading for 6-8 minutes, the dough is a nice round ball shape.

    Spray a large bowl with non-stick baking spray. Place the dough ball in the bowl, then turn it over to also grease the top of the dough.

    Cover the bowl with plastic wrap, then a dish towel. Set the bowl in a warm place (free of drafts) and let the dough rise until it has doubled in size (about an hour).

    Bread dough placed in a large greased bowl to rise.

    Shape The Cloverleaf Rolls

    When the dough has doubled in size, use your fist and punch the dough down. Divide the dough in HALF, then divide each half piece of dough into 36 pieces.

    You should end up with 72 pieces, as close to the same size as possible. If you have a food scale, it is helpful to weigh the dough pieces.

    IMPORTANT: You need two stand sized muffin pans for the entire recipe. If you only have one, keep the second half of the dough wrapped tightly while you bake the first batch (then repeat process).

    Roll each piece of dough between your palms to form a ball. Set the dough balls on a piece of parchment paper, wax paper or foil after you form them. Spray muffin cups with baking spray, then place THREE balls into each muffin cup. 

    The dough is divided into 72 small balls and placed on parchment paper.Three balls of dough are put in each greased muffin cup.

    Second Rise

    Cover the dough, and let rise again until doubled (approx. 30 minutes). Brush the top of the rolls generously with melted butter and preheat your oven to 375°F.

    Melted butter is brushed on the cloverleaf dinner rolls before baking.

    Bake The Cloverleaf Dinner Rolls

    Bake the cloverleaf dinner rolls at 375°F. for 15-18 minutes. When done, they should be golden brown in color and cooked through.

    After the dough rises again, cloverleaf dinner rolls are ready to bake.

    Let the rolls rest for a minute in the pan, then remove them out of the muffin pan onto a wire rack to cool slightly.

    Golden brown rolls on a wire rack after baking.

    Serve the cloverleaf dinner rolls warm, with butter, honey and/or jam. They are a wonderful addition to any main dish!

    The rolls easily pull apart into 3 pieces, are light and fluffy on the inside, and are dangerously good! I’m confident you’re going to like them.

    Pull apart cloverleaf dinner rolls with butter and honey, on a white plate.

    I hope you have the opportunity to make cloverleaf dinner rolls, especially if you’ve never made them before. They’re delicious, and I trust you’ll enjoy them as much as our family does.

    Thanks for stopping by, and I invite you to come back again soon for more family-friendly recipes. Take care, may God bless you, and I hope you have a GREAT day!

    Looking For More Recipes For BREAD ROLLS?

    You can find ALL of my recipes in the Recipe Index, which is located at the top of the page. I have some bread roll recipes you may enjoy, including:

    Want More Recipes? Get My FREE Newsletter!

    I publish a newsletter 2 times per month (1st and 15th) with lots of recipes, tips, etc..
    Would you like to join our growing list of subscribers?

    There is a Newsletter subscription box on the top right (or bottom) of each blog post, depending on the device you use.
    You can submit your e-mail address there, to be added to my mailing list.

    Find Me On Social Media:

    Facebook page: The Grateful Girl Cooks!
    Pinterest:
    The Grateful Girl Cooks!
    Instagram:
    jbatthegratefulgirlcooks

    Author's signature

    Original recipe source: “Taste of Home” magazine, Aug./Sept/ 1998 edition, pages 35-36, by Reiman Publications

    ↓↓ PRINTABLE RECIPE BELOW ↓↓

    0 from 0 votes
    Cloverleaf Dinner Rolls
    Prep Time
    30 mins
    Cook Time
    15 mins
    Dough Rising Time (total- inactive)
    1 hr 30 mins
    Total Time
    2 hrs 15 mins
     

    Cloverleaf Dinner Rolls are classic "pull apart" yeast rolls shaped like leaves of a clover plant. This delicious recipe makes 2 dozen rolls.

    Category: Bread
    Cuisine: All Cuisines
    Keyword: cloverleaf dinner rolls
    Servings: 24 rolls
    Calories Per Serving: 126 kcal
    Author: JB @ The Grateful Girl Cooks!
    Ingredients
    • teaspoons active yeast = 1 envelope
    • 3 Tablespoons granulated sugar
    • cups warm milk (110℉.)
    • ¼ cup butter (softened) = ½ stick
    • 1 large egg
    • 1 teaspoon salt
    • cups all purpose flour + extra, if needed to prevent sticking
    • 2 Tablespoons melted butter or more (as needed), to brush on rolls
    Instructions
    1. Place yeast, sugar, and warm milk (110°F) in a large bowl or bowl of a stand mixer. Stir to combine. IMPORTANT: If milk is too hot, it can "kill" the yeast. Stir until combined; let rest 4-5 minutes until bubbles form (indicating yeast is alive).

    2. Add soft butter, egg, and salt to yeast mixture. Mix well, until fully incorporated.

    3. Add 3 cups flour; continue beating until "dough" is smooth in texture. Slowly beat in 1 more cup of flour. You want to form a "soft dough". Add remaining ½ cup of flour, if necessary.

    4. Generously sprinkle additional flour on a work surface. Place "ball of soft dough" on the flour. Lightly sprinkle more flour on top, then knead the dough for 6-8 minutes, using the palm of your hand. Rotate dough often; sprinkle with more flour (if necessary), to prevent sticking. Shape dough into a ball. TIP: If you have a stand mixer, attach dough hook to knead dough by machine, if desired.

    5. Grease a large bowl with non-stick baking spray. Add dough; turn it over to grease the top of the dough. Cover bowl with plastic wrap, then a dish towel. Set bowl in a warm place; let dough rise until doubled in size (about 1 hour).

    6. Once doubled in size, use your fist to punch down the dough. Divide dough in HALF, then divide each half into 36 equal-sized pieces (72 total). TIP: If you have a food scale, it helps to weigh the pieces. **SEE NOTE SECTION BELOW!

      Roll each piece between palms to form a 1" ball. Set dough balls on parchment paper. Grease muffin cups; place 3 balls in each muffin cup. 

    7. Cover muffin pan; let dough rise again until doubled (approx. 30 minutes). After rising, brush tops of rolls generously with melted butter.

    8. Bake at 375°F. for 15-18 minutes. When done, rolls should be golden brown in color and cooked through. Let rolls rest for 1 minute, then transfer them out of the pan to a wire rack to cool slightly. Serve warm, and enjoy!

    Recipe Notes

    IMPORTANT: You need 2 standard muffin pans for this recipe. If you only have 1, keep the second half of the dough wrapped tightly while you shape and bake the first batch.

    Nutrition Facts
    Cloverleaf Dinner Rolls
    Amount Per Serving (1 roll)
    Calories 126 Calories from Fat 27
    % Daily Value*
    Fat 3g5%
    Saturated Fat 2g13%
    Trans Fat 0.1g
    Polyunsaturated Fat 0.2g
    Monounsaturated Fat 1g
    Cholesterol 16mg5%
    Sodium 128mg6%
    Potassium 51mg1%
    Carbohydrates 20g7%
    Fiber 1g4%
    Sugar 2g2%
    Protein 3g6%
    Vitamin A 124IU2%
    Vitamin C 0.001mg0%
    Calcium 21mg2%
    Iron 1mg6%
    * Percent Daily Values are based on a 2000 calorie diet.

    Here’s one more to pin on your Pinterest boards!Cloverleaf Dinner Rolls are classic "pull apart" yeast rolls shaped like leaves of a clover plant. This delicious recipe makes 2 dozen rolls.

    Slow Cooker Veggie Curry

    Slow Cooker Veggie Curry is a meatless dish (with 7 veggies) cooked in a coconut/curry sauce. Serve with rice for a delicious, filling meal.
    Slow Cooker Veggie Curry is a meatless dish (with 7 veggies) cooked in a coconut/curry sauce. Serve with rice for a delicious, filling meal.

    Are you trying to eat more vegetables this year or are you looking for a new meatless dish with lots of flavor? Well today I want to share a recipe for vegetable curry that is cooked in a slow cooker.

    I originally saw the recipe in a monthly mailer that came through the mail to our home, and thought it sounded good. I only made a couple minor changes to suit our taste, and now we love this dish!

    Honestly this is such an EASY meal to make. The “hardest” part (if you want to call it that) is chopping and slicing the veggies. There’s seven different vegetables in this dish (2 are from cans), so if you can handle that little bit of prep, you’re good to go!

    After the veggies are prepped, the rest of the ingredients are combined with them in a slow cooker. The veggie curry cooks on LOW for 4 hours, and then it’s ready to be served (with rice). That’s it – you can paint your home, watch a movie, or crochet a keepsake quilt while it’s cooking (ha ha).

    I am not a vegetarian, but I LOVE this vegetable-based main dish. It’s easy to make, so that’s a win-win in my book. Here’s how to make slow cooker veggie curry.

    Prep Veggies For Crockpot

    You will use cauliflower, canned green beans, sweet potato, red onion, tomato, canned garbanzo beans (chickpeas), and shredded carrots for this veggie curry.

    Almost all of the prep work for this dish is simply chopping, slicing and shredding the vegetables! Toss them into your slow cooker after you prep each one.

    Even though this is a meatless dish, the addition of the garbanzo beans add a nice dose of plant-based protein, which is wonderful news!

    Seven types of vegetables are prepped then put in a slow cooker.

    Once the veggies have been added to the slow cooker, add one can of coconut milk and 3 cups of vegetable broth. TIP: Stir the thick coconut milk IN THE CAN before adding it to the slow cooker.

    NOTE: If you use vegetable broth in the curry sauce, this dish is entirely vegetarian. However, if that’s not an issue (or it’s more convenient), you can substitute 3 cups of chicken broth.

    Coconut milk and vegetable broth are added to the slow cooker.

    Build The Sauce

    Now it’s time to add the seasonings which give the slow cooker veggie curry GREAT flavor!  Add curry powder, ground turmeric, salt and pepper to the slow cooker.

    Stir all the ingredients together very well in the slow cooker. The coconut milk, broth and spices will combine to form a creamy, mildly spiced curry sauce.

    Curry powder, turmeric, salt and pepper are added to the slow cooker.

    Time To Let It Cook!

    Lock the lid in place, and cook the slow cooker veggie curry for 4 hours on LOW HEAT. This will cook it low and slow, so the vegetables become tender and well-seasoned with the curry sauce.

    All ingredients are combined in the slow cooker and cooked 4 hours.

    When it is finished cooking, open the lid and give everything a stir. The sauce will have become golden in color and the veggies should be really hot and fork-tender.

    The slow cooker veggie curry is colorful when the dish is finished cooking.

    Serve The Slow Cooker Veggie Curry

    I totally recommend serving this veggie curry with cooked rice (white or brown). For each serving, pack cooked rice into a half cup measuring cup, then carefully turn it over in the middle of an individual serving bowl. This forms a mound of rice in the center of each bowl.

    Use a slotted spoon to remove veggies from the slow cooker and arrange them around each mound of rice in the bowls. Spoon curry sauce over the veggies in each bowl, so there’s plenty of sauce to enjoy.

    Garnish the rice with fresh cilantro for a nice pop of added color! Serve hot, and enjoy this delicious meal.

    Slow Cooker Veggie Curry is served with white rice in the middle of the bowl.A filling meal of slow cooker veggie curry, with white steamed rice.

    I really hope you give this recipe a try because it tastes wonderful, and with the added rice it is a filling main dish I believe you’ll enjoy.

    The leftovers can be stored for several days in an airtight container in the refrigerator. Any leftovers can also be easily reheated in a microwave.

    Thanks for stopping by, and I invite you to come back soon for more family-friendly recipes. Take care, may God bless you, and I hope you have a GREAT day!

    Looking For More Recipes For MEATLESS MEALS?

    You can find ALL of my recipes in the Recipe Index, which is located at the top of the page. I have some wonderfully delicious MEATLESS meals you might enjoy, including:

    Want More Recipes? Get My FREE Newsletter!

    I publish a newsletter 2 times per month (1st and 15th) with lots of recipes, tips, etc..
    Would you like to join our growing list of subscribers?

    There is a Newsletter subscription box on the top right (or bottom) of each blog post, depending on the device you use.
    You can submit your e-mail address there, to be added to my mailing list.

    Find Me On Social Media:

    Facebook page: The Grateful Girl Cooks!
    Pinterest:
    The Grateful Girl Cooks!
    Instagram:
    jbatthegratefulgirlcooks

    Author's signature

    Original source: Chef John, via Kroger’s monthly mailer “mymagazine” (January edition-cut out the recipe-year unknown)

    ↓↓ PRINTABLE RECIPE BELOW ↓↓

    0 from 0 votes
    Slow Cooker Veggie Curry
    Prep Time
    15 mins
    Cook Time
    4 hrs
    Total Time
    4 hrs 15 mins
     

    Slow Cooker Veggie Curry is a meatless dish (with 7 veggies) cooked in a coconut/curry sauce. Serve with rice for a delicious, filling meal.

    Category: Entree, Main Dish
    Cuisine: All Cuisines
    Keyword: slow cooker, veggie curry
    Servings: 4 servings
    Calories Per Serving: 324 kcal
    Author: JB @ The Grateful Girl Cooks!
    Ingredients
    • 1 head cauliflower cut in florets
    • 14 ounces canned garbanzo beans (chickpeas) =1 can, drained/rinsed
    • 14.5 ounces green beans (canned) = 1 can, drained
    • 1 medium sweet potato peeled, chopped in 1" pieces
    • 1 medium red onion cut in half, sliced thin
    • 1 medium tomato diced
    • ½ cup shredded carrot
    • 3 cups low sodium vegetable broth use chicken broth if desired
    • 13.5 ounces light coconut milk (canned) use full fat if desired
    • teaspoons curry powder
    • teaspoons turmeric
    • 1 teaspoon salt
    • 1 teaspoon black pepper
    • fresh cilantro (for garnish-optional)
    To serve: fresh cilantro and steamed rice (optional, but good!)
      Instructions
      1. Prep all 7 veggies and place them into a slow cooker.

      2. Add coconut milk and vegetable broth. TIP: Stir the thick coconut milk IN THE CAN before adding it to the slow cooker.

      3. Add curry powder, turmeric, salt and pepper. Stir all ingredients together very well. The coconut milk, broth and spices will form a creamy curry sauce.

      4. Lock lid in place; cook 4 hours on LOW HEAT. Stir once, halfway through the cooking time (if it is convenient for you to do so). When done, remove lid and give everything another good stir. Sauce will be golden in color and veggies should be tender.

      5. Serve with a side of rice, and garnish with a sprig of cilantro, if desired. (see blog post for suggested presentation). Enjoy!

      Recipe Notes

      NOTE: The caloric calculation does not include the rice.

      Nutrition Facts
      Slow Cooker Veggie Curry
      Amount Per Serving (1 (1/4 of total))
      Calories 324 Calories from Fat 81
      % Daily Value*
      Fat 9g14%
      Saturated Fat 7g44%
      Polyunsaturated Fat 1g
      Monounsaturated Fat 1g
      Sodium 1032mg45%
      Potassium 1181mg34%
      Carbohydrates 51g17%
      Fiber 14g58%
      Sugar 12g13%
      Protein 12g24%
      Vitamin A 11679IU234%
      Vitamin C 91mg110%
      Calcium 144mg14%
      Iron 4mg22%
      * Percent Daily Values are based on a 2000 calorie diet.

      Here’s one more to pin on your Pinterest boards!Slow Cooker Veggie Curry is a meatless dish (with 7 veggies) cooked in a coconut/curry sauce. Serve with rice for a delicious, filling meal.