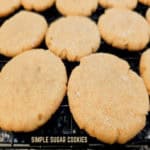
Make 3 dozen Simple Sugar Cookies! These old-fashioned cookies are easy-to-make delicious treats your family and friends will enjoy.

I don’t know about you, but I still enjoy good ol’ simple sugar cookies. My mom used to make them when I was growing up, so they bring back great memories of my childhood.
Sugar cookies may sound rather plain and boring to some people, but I think they have great flavor, especially when they’re not overly sweet. I love to gobble them up OR lightly dip them in a mug of hot coffee (like you would a doughnut). That may sound weird, but trust me, they’re really good that way!
This classic recipe is simple and straightforward, and will yield 3 dozen cookies, perfect for a quick snack or lunchbox treat.
I’ve had this handwritten recipe in an old recipe box for many years and don’t have a clue who the original author was or who I got it from. Oh well. Here’s how to make simple sugar cookies, and I hope you enjoy them.
Scroll Down For A Printable Recipe Card At The Bottom Of The Page
Make The Cookie Dough
Using an electric mixer, beat together vegetable shortening, granulated sugar and brown sugar for a few minutes until creamy and well-combined.
Add vanilla extract and one egg to the mixture, and beat again, until fully incorporated into the dough batter.


Stir in the remaining ingredients (all purpose flour, baking soda and salt), until they are fully combined. The dough for the simple sugar cookies will be compact, yet slightly “crumbly”.


Time For The Sugar Topping
Now it’s time to give the cookies their trademark sugar topping. First, pour additional granulated sugar onto a flat plate, and grab a flat-bottomed glass from your cupboard (you can use colored sugar, if desired). Set them aside while you shape the cookie dough balls.
Begin forming the dough into balls. Pinch off a small piece of dough, and roll it between the palms of your hands until it is a round ball, 1″ wide. Continue until you have 36 dough balls of equal size.
This dough is very forgiving, so if you need to make the balls smaller in order to make 36 cookies, just pinch some dough off, then re-roll, as needed!
Place the cookie dough balls about 2″ apart on ungreased cookie sheets. Now add the sugar topping. Lightly moisten the bottom of the glass and dip it into the sugar on the plate. Lightly press the sugar onto each cookie, pressing the glass down slightly so the sugar attaches to the cookie and the dough ball flattens slightly.
NOTE: You will need to re-moisten and re-sugar the glass bottom several times until all the cookies are topped with sugar.


Bake The Cookies
Bake the simple sugar cookies at 350°F for 7-10 minutes. Oven temps can vary quite a bit, so I suggest checking them beginning at the 7 minute mark.
When done, the cookies should be slightly brown around the bottom edges and light golden brown on top. You can see in the second photo below what colored sugar looks like, should you decide to do that for a colorful topping.


Let the simple sugar cookies cool for two minutes on the baking sheet, then transfer them onto a wire rack to finish cooling. As they cool, the cookies will continue to get firm.

Time To Enjoy Some Simple Sugar Cookies!
Once the cookies have completely cooled, they are ready to be served and enjoyed! Grab a couple of these yummy cookies and dig in!
These cookies also freeze very well, if they’re wrapped and stored in an airtight container. When you’re ready to enjoy them once again, simply thaw and serve.


I hope you enjoy making (and eating) these old-fashioned, simple sugar cookies, and trust you’ll like them as much as we do.
Thanks for stopping by, and I invite you to come back soon for more family-friendly recipes. Take care, may God bless you… and have a GREAT day!
Looking For More COOKIE Recipes?
You can find ALL of my recipes in the Recipe Index, which is located at the top of the page. I have LOTS of yummy cookie recipes you can check out, including:
- Date Roll Cookies
- Lemon Meltaway Cookies
- Cinnamon Crinkle Cookies
- Oatmeal Raisin Cookies
- Peppermint Pinwheel Cookies
Want More Recipes? Get My FREE Newsletter!
I publish a newsletter 2 times per month (1st and 15th) with lots of recipes, tips, etc..
Would you like to join our growing list of subscribers?
There is a Newsletter subscription box on the top right (or bottom) of each blog post, depending on the device you use.
You can submit your e-mail address there, to be added to my mailing list.
Find Me On Social Media:
Facebook page: The Grateful Girl Cooks!
Pinterest: The Grateful Girl Cooks!
Instagram: jbatthegratefulgirlcooks

↓↓ PRINTABLE RECIPE BELOW ↓↓
Make 3 dozen Simple Sugar Cookies! These old-fashioned cookies are easy-to-make delicious treats your family and friends will enjoy.
- 1 cup vegetable shortening
- ½ cup granulated sugar
- ½ cup brown sugar light or dark
- 1 teaspoon vanilla extract
- 1 large egg
- 2 cups all purpose flour
- ½ teaspoon baking soda
- ½ teaspoon salt
Preheat oven to 350℉.
Using an electric mixer, beat vegetable shortening, granulated sugar and brown sugar for 2-3 minutes until creamy/well-combined. Add vanilla and egg; beat until incorporated.
Stir in flour, baking soda and salt until combined. Cookie dough will be compact, yet slightly "crumbly".
Pour additional granulated sugar (start with ¼ cup) onto a flat plate, and get a flat-bottomed glass . Set them aside while you shape the cookie dough balls.
Begin forming dough into balls. Pinch off a small piece of dough; roll it between your hands until it is a round ball, 1" wide. Continue until you have 36 dough balls of equal size. Dough is very forgiving, so if you need to make the balls smaller in order to get 36 cookies, pinch some dough off a ball, then re-roll, as needed!
Place dough balls 2" apart on ungreased cookie sheets. For sugar topping, lightly moisten bottom of the glass with water, then dip it into the sugar on the plate. Lightly press sugar onto each cookie, pressing glass down slightly so sugar attaches to the cookie and the dough ball flattens slightly. NOTE: You will need to re-moisten and re-sugar the glass bottom several times until all the cookies are topped with sugar.
Bake at 350°F for 7-9 minutes. Oven temps can vary, so check them beginning at the 7 minute mark. When done, the cookies should be slightly brown around the bottom edges and light golden brown on top.
Let cookies cool on baking sheets for 2 minutes, then transfer to wire racks to cool completely, then serve and enjoy!
NOTE: Sugar used to top the cookies is not added to the caloric calculation, as this amount may vary per user.
Here’s one more to pin on your Pinterest boards!


 - The Grateful Girl Cooks!")
 - The Grateful Girl Cooks!")
 - The Grateful Girl Cooks!")
 - The Grateful Girl Cooks!")
 - The Grateful Girl Cooks!")
 - The Grateful Girl Cooks!")
 - The Grateful Girl Cooks!")
 - The Grateful Girl Cooks!")
 - The Grateful Girl Cooks!")
 - The Grateful Girl Cooks!")
 - The Grateful Girl Cooks!")
 - The Grateful Girl Cooks!")
 - The Grateful Girl Cooks!")

 - The Grateful Girl Cooks!")