Month: October 2024

Instant Pot Rice Pudding

Instant Pot Rice Pudding is an easy dessert to make! This classic recipe yields 8 yummy servings, with raisins, cinnamon and nutmeg!

Do you enjoy rice pudding? This simple dessert has been around for many centuries, and it’s origins are unclear. Many people believe it originated in China, others argue it was created in India! Others insist it was created and used by the Romans for medicinal purposes…so who really knows?

At its very core, modern day rice pudding is typically made with rice that is combined with milk (or cream) and water. The mixture is typically sweetened before cooking it on the stovetop or in the oven, and sometimes dried fruits are added.

Today I want to share a fantastic way to make Rice Pudding using an Instant Pot. This method is easy because there’s no need to heat the house using an oven (especially in warm months), AND there’s no need to stir it constantly on the stove while it cooks.

Using an Instant Pot for this creamy dessert is a game-changer, for sure! If you are fortunate enough to own this kitchen appliance, I hope you will check out this simple recipe for Instant Pot Rice Pudding!

Scroll Down For A Printable Recipe Card At The Bottom Of The Page

Prepare The Rice Pudding

Place one cup of Arborio rice into a fine mesh strainer. TIP: I highly recommend using Arborio rice, but if you don’t have it, you can substitute the same amount of long grain white rice.

Rinse the rice very well, then drain the water off the rice. Place the rinsed, drained rice into the inner pot of the Instant Pot.

The rice is rinsed and drained well before it is cooked.After rinsing, white rice is put into the inner pan of the Instant Pot.

Add milk, water, ground cinnamon, raisins, salt, and a pinch of nutmeg to the rice in the pot. Use a whisk to combine these ingredients well.

It will not blend perfectly (because of the raisins, rice and cinnamon!), but mix it together as best as possible.

Milk, water, cinnamon, salt, rice and raisins are put into the Instant Pot.Ingredients for the rice pudding are whisked together before cooking.

Cooking The Rice Pudding

Lock the lid of the Instant Pot in place, and turn the knob on top to the SEALING position. Push the MANUAL button (High heat) and set the timer for 11 minutes.

It will take about 15 minutes for the Instant Pot to reach full pressure, then the pressure button on top will pop up and the cooking timer will begin.

When the rice pudding has finished cooking, let the pressure release NATURALLY for 10 minutes (do nothing while it does this!). AFTER the 10 minute natural release takes place, flip the pressure release knob to VENTING to allow any remaining steam to escape.

Cooking the rice pudding for 11 minutes on Manual setting in the Instant Pot.

Add Remaining Ingredients

Once all pressure has been released (and the pressure button drops back down), it is safe to unlock and open the lid.

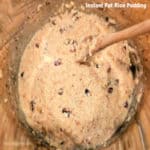
The mixture inside will be quite thick, so give it a quick stir. Add a can of sweetened condensed milk and vanilla extract to the rice pudding in the pot.

After cooking the Instant Pot Rice Pudding is very thick in the pot.Condensed milk is poured into the rice pudding in the Instant Pot.

Stir well, until the condensed milk and vanilla have been fully combined into the rice pudding. Once combined, the rice pudding is ready to be served.

We transfer the rice pudding out of the Instant Pot straight into small serving dishes. Rice pudding can be eaten warm or cold. If you enjoy your rice pudding warm, simply let it cool down a bit before digging in.

Rice pudding in the Instant Pot is ready to be transferred into dishes.

Serve The Instant Pot Rice Pudding

If you like your rice pudding cold, cover the pudding with plastic wrap AFTER it has cooled to room temperature. Place the pudding in the refrigerator until it is fully chilled.

Eight servings of Instant Pot Rice Pudding, ready to be eaten.

We enjoy our Instant Pot Rice Pudding best served cold, and sometimes we top each serving with a dollop of whipped cream! This dessert is a thick and delicious treat we gobble up… any time of day!

A serving of Instant Pot Rice Pudding with whipped cream on top.A close up photo of a spoonful of the Instant Pot Rice Pudding.

I really hope you have the opportunity to make this simple, classic dessert for those you love. Using an Instant Pot really helps make this a very simple dessert to prepare.

Thank you for stopping by, and I invite you to come back again soon for more family-friendly recipes. Take care, may God bless you… and have a wonderful day!

Looking For More INSTANT POT Recipes?

You can find ALL of my recipes in the Recipe Index, which is located at the top of the page. I have some delicious Instant Pot recipes, including:

Want More Recipes? Get My FREE Newsletter!

I publish a newsletter 2 times per month (1st and 15th) with lots of recipes, tips, etc..
Would you like to join our growing list of subscribers?

There is a Newsletter subscription box on the top right (or bottom) of each blog post, depending on the device you use.
You can submit your e-mail address there, to be added to my mailing list.

Find Me On Social Media:

Facebook page: The Grateful Girl Cooks!
Pinterest:
The Grateful Girl Cooks!
Instagram:
jbatthegratefulgirlcooks

Author's signature

Recipe adapted from: Kelsey, at: bakemesomesugar.com/instant-pot-rice-pudding

↓↓ PRINTABLE RECIPE BELOW ↓↓

0 from 0 votes
Instant Pot Rice Pudding
Prep Time
5 mins
Cook Time
11 mins
Inactive Instant Pot time (creating pressure)
15 mins
Total Time
31 mins
 

Instant Pot Rice Pudding is an easy dessert to make! This classic recipe yields 8 yummy servings, with raisins, cinnamon and nutmeg!

Category: Dessert
Cuisine: All Cuisines
Keyword: Instant Pot, rice pudding
Servings: 8
Calories Per Serving: 308 kcal
Author: JB @ The Grateful Girl Cooks!
Ingredients
  • 1 cup Arborio rice can substitute long grain white rice
  • 2 cups low-fat milk can substitute whole milk, if desired
  • cups water
  • ½ cup raisins
  • 2 teaspoons ground cinnamon
  • ¼ teaspoon salt
  • 1 pinch ground nutmeg
  • 14 ounces sweetened condensed milk =1 can- (NOT evaporated milk!)
  • 1 teaspoon vanilla extract
Instructions
  1. Place rice into a fine mesh strainer. Rinse it very well, then drain rice. Place rice into the inner pot of the Instant Pot.

  2. Add milk, water, cinnamon, raisins, salt, and nutmeg. Use a whisk to combine these ingredients. mixing them as much as possible.

  3. Lock lid in place; turn knob on top to SEALING position. Push MANUAL button (High heat); set timer for 11 minutes. It takes about 15 minutes to reach full pressure, then pressure button on top will pop up and cooking timer will begin. When finished cooking, let pressure release NATURALLY for 10 minutes (do nothing). AFTER 10 minute natural release takes place, flip pressure release knob to VENTING to allow remaining steam to escape.

  4. Once all pressure is released (and pressure button drops down), it's safe to unlock/open the lid. Pudding will be thick, so give it a stir. Add sweetened condensed milk and vanilla. Stir until they're fully incorporated.

  5. Transfer rice pudding into serving dishes. Serve warm or cold. If chilling, let it cool to room temperature, cover with plastic wrap; refrigerate until cold. Enjoy!

Nutrition Facts
Instant Pot Rice Pudding
Amount Per Serving (1 (1/8 of total))
Calories 308 Calories from Fat 54
% Daily Value*
Fat 6g9%
Saturated Fat 4g25%
Trans Fat 0.1g
Polyunsaturated Fat 0.3g
Monounsaturated Fat 2g
Cholesterol 22mg7%
Sodium 168mg7%
Potassium 364mg10%
Carbohydrates 57g19%
Fiber 2g8%
Sugar 30g33%
Protein 8g16%
Vitamin A 194IU4%
Vitamin C 2mg2%
Calcium 221mg22%
Iron 1mg6%
* Percent Daily Values are based on a 2000 calorie diet.

Instant Pot Rice Pudding is an easy dessert to make! This classic recipe yields 8 yummy servings, with raisins, cinnamon and nutmeg!


Grilled Lemon Herb Swordfish

Make Grilled Lemon Herb Swordfish on a gas or charcoal BBQ. Fish marinates in a simple sauce before grilling, which creates amazing flavor!

Do you enjoy swordfish? We really love this dense, firm and mild fish, but honestly… most of the time it is simply too expensive! Can you relate? Every now and then we buy swordfish as a special treat, but we split a large piece to reduce the portion size AND help make it worth our hard-earned bucks!

Since it was only my husband and I for dinner, we opted to split a large swordfish steak, which cost $10. Because we split it, that brought our cost down to $5 per serving (cheaper than a Big Mac at McDonalds)! Imagine that! A delicious, healthy portion of delicious, grilled swordfish that cost less than a fast food entree!

My husband searched online for a new recipe to try, found this one, and asked me if I would make it for dinner for the two of us.So I prepped it, my husband grilled it… and we both LOVED it! I think you will, too!

I’ve made quite a few recipes using swordfish over the years, and this one may be a new favorite! Here’s how to make grilled lemon herb swordfish (it’s easy and so delicious!).

Scroll Down For A Printable Recipe Card At The Bottom Of The Page

Make The Lemon Herb Marinade

Combine extra virgin olive oil, soy sauce, red wine vinegar, minced garlic, oregano, lemon juice and lemon zest in a bowl. Whisk these ingredients well until they are well blended, and oil and vinegar have been fully incorporated.

Oil, vinegar, soy sauce, lemon juice, zest and spices for marinade in a bowl.

IMPORTANT TIP: If you’re making the full recipe (using 4 swordfish steaks), pour the marinade into a large shallow dish. Make sure the dish is large enough to place the swordfish in it in a single layer.

If you’re making only 1 or 2 pieces of swordfish, pour the marinade on a large, shallow dinner plate, big enough to hold the fish steak(s).

Lemon herb marinade is placed in a shallow dish or plate.

Marinade The Swordfish

Place the swordfish in the lemon herb marinade, and then turn it over, so all sides are covered with the marinade. Allow the fish to marinate for 15 minutes total (flipping it over halfway through the marinating time), then remove the fish from the marinade.

IMPORTANT: Be sure to remove the swordfish from the marinade at the 15 minute mark. The fish will already be well-seasoned by this time. More time spent sitting in the acidic marinade (from the lemons) can cause the fish to begin to break down and “pre-cook”. You do not want that, for best results!

A piece of swordfish is placed in lemon herb marinade for flavoring.Swordfish is covered with the lemon herb marinade before cooking.

Grill The Swordfish and Lemon Halves

Prepare your gas or charcoal grill by cleaning the metal grill grates clean, then oiling them well so the swordfish doesn’t stick while cooking.

Heat the grill to a Medium-High temperature (on a gas grill the temperature should be around 375°- 400°F.). Place the swordfish directly onto the hot, oiled grill.

Cook the swordfish for about 4-5 minutes, without disturbing or moving the fish, to give the grill time for good sear marks and browning.

The marinated swordfish cooks on a hot BBQ grill before turning it over.

Halfway Through Cooking

Carefully turn the fish to the other side and continue cooking it for another 4-5 minutes OR until it reaches an internal temperature of 135°F. on a digital thermometer. TIP: If you have a digital thermometer, use it! It’s the best way to not end up overcooking (and drying out) the fish!

When you flip the fish over, add the cut lemon halves to the grill (with the cut side facing down). Let them sear (and get charred) while the second side of the swordfish cooks.

Once the swordfish is finished cooking, remove the fish and lemons from the grill and place on a platter, and cover loosely with aluminum foil. Let the fish “rest” 5 minutes before serving, to let the internal juices “resettle”.        

A swordfish steak and half a lemon cooking on the BBQ grill over hot coals.One piece of grilled swordfish cooking over hot coals on a BBQ.

Serve The Grilled Lemon Herb Swordfish

Serve the grilled lemon herb swordfish with the seared lemon halves on the side. Garnish the swordfish with chopped parsley (if using). Squeeze the lemon juice from the grill-seared lemon halves over the cooked fish for an extra pop of flavor, if desired!

We love to serve the swordfish with buttered, seasoned pasta on the side. It is a perfect pairing for this delicious, grilled swordfish!

A piece of grilled lemon herb swordfish on a white plate with pasta.Grilled Lemon Herb Swordfish on a plate with pasta, peas and grilled lemon.

I hope you have the chance to try this delicious recipe for grilled lemon herb swordfish, and trust you will enjoy it as much as we do!

Thank you for stopping by, and I invite you to come back again soon for more family-friendly recipes. Take care, may God bless you… and have a wonderful day!

Looking For More SEAFOOD Recipes?

You can find ALL of my recipes n the Recipe Index, which is located at the top of the page. I have a large variety of seafood recipes to choose from, including:

Want More Recipes? Get My FREE Newsletter!

I publish a newsletter 2 times per month (1st and 15th) with lots of recipes, tips, etc..
Would you like to join our growing list of subscribers?

There is a Newsletter subscription box on the top right (or bottom) of each blog post, depending on the device you use.
You can submit your e-mail address there, to be added to my mailing list.

Find Me On Social Media:

Facebook page: The Grateful Girl Cooks!
Pinterest:
The Grateful Girl Cooks!
Instagram:
jbatthegratefulgirlcooks

Author's signature

Original recipe source and with thanks to Erin Clarke, at https://www.wellplated.com/grilled-swordfish/

↓↓ PRINTABLE RECIPE BELOW ↓↓

0 from 0 votes
Grilled Lemon Herb Swordfish
Prep Time
15 mins
Cook Time
10 mins
Total Time
25 mins
 

Make Grilled Lemon Herb Swordfish on a gas or charcoal BBQ. Fish marinates in a simple sauce before grilling, which creates amazing flavor!

Category: Dinner, Entree-Seafood, Main Dish
Cuisine: All Cuisines
Keyword: grilled lemon herb swordfish
Servings: 4
Calories Per Serving: 361 kcal
Author: JB @ The Grateful Girl Cooks!
Ingredients
  • 4 swordfish steaks each between 6-8 ounces, as desired
  • 3 Tablespoons extra virgin olive oil
  • 1 Tablespoon red wine vinegar
  • 1 Tablespoon low sodium soy sauce
  • 1 Tablespoon minced garlic (approx. 3 cloves)
  • 1 teaspoon dried oregano
  • 2 medium lemons (for juice, zest, etc.)** **divided use
Extras: oil (for the BBQ grill grate) / chopped fresh parsley (optional), for serving
    Instructions
    1. Make The Marinade: Combine olive oil, red wine vinegar, soy sauce, garlic, oregano, lemon juice and zest (from 1 lemon) in a bowl. Whisk until blended, and oil and vinegar are fully incorporated. (**Cut remaining lemon in half crosswise and set aside for grilling and garnishing dish later).

    2. IMPORTANT TIP: If you're making the full recipe (using 4 swordfish steaks), pour marinade into a large, shallow dish. Make sure dish is large enough to place the swordfish in it, in a single layer. If you're making only 1 or 2 swordfish steaks, pour marinade on a large, shallow plate, big enough to hold the fish steak(s).

    3. Place swordfish steak(s) in marinade; turn them over so all sides are lightly coated. Let fish marinate for 15 minutes total (no longer!), turning it over halfway through the marinating time, then remove fish from the marinade.

    4. Prepare gas or charcoal grill by cleaning grill grates, then oiling them well so fish doesn't stick. Heat grill to Medium-High temp. (on gas grill temp. should be 375°- 400°F.). Place swordfish directly onto hot, oiled grill. Cook for 4-5 minutes, without moving the fish, to get good sear marks and browning.

    5. Carefully turn fish to the other side; continue cooking it another 4-5 minutes OR until fish reaches an internal temp. of 135°F. on a digital thermometer. When you flip the fish over, add reserved cut lemon halves to the grill (cut side facing down). Let them sear while second side of swordfish cooks. Once done, remove fish and lemons from the grill; place on a platter. Cover loosely with foil. Let fish "rest" 5 minutes before serving.

    Recipe Notes

    NOTE: Caloric calculation was made, using a 6 ounce swordfish steak per serving.

    Nutrition Facts
    Grilled Lemon Herb Swordfish
    Amount Per Serving (1 (1/4 of total))
    Calories 361 Calories from Fat 198
    % Daily Value*
    Fat 22g34%
    Saturated Fat 4g25%
    Trans Fat 0.1g
    Polyunsaturated Fat 3g
    Monounsaturated Fat 13g
    Cholesterol 112mg37%
    Sodium 284mg12%
    Potassium 815mg23%
    Carbohydrates 6g2%
    Fiber 2g8%
    Sugar 1g1%
    Protein 35g70%
    Vitamin A 225IU5%
    Vitamin C 29mg35%
    Calcium 36mg4%
    Iron 1mg6%
    * Percent Daily Values are based on a 2000 calorie diet.

    Here’s one more to pin on your Pinterest boards!Make Grilled Lemon Herb Swordfish on a gas or charcoal BBQ. Fish marinates in a simple sauce before grilling, which creates amazing flavor!


    Chocolate Dipped Fall Pretzels

    Make a batch of Chocolate Dipped Fall Pretzels! Fall colors are highlighted in this simple, sweet snack for kids of all ages!Make a batch of Chocolate Dipped Fall Pretzels! Fall colors are highlighted in this simple, sweet snack for kids of all ages!

    It’s Fall (hooray!), and today I want to share a simple way to make chocolate dipped Fall pretzels! These delicious, colorful snacks are perfect for the Fall season, snacks for football games, harvest parties, etc.

    You will need a bag of mini pretzel twists (only used 60 pretzels), bags of colored chocolate candy wafers, decorative sprinkles… and a tiny bit of patience, because each pretzel is hand-dipped! They’re not hard to make at all- they just take a small amount of your time (about 30 minutes).

    If you have a little extra time to make these, go for it! Put on some great music in the background, and have fun making these festive Fall treats! They’re delicious! Here’s how to make chocolate dipped Fall pretzels.

    Scroll Down For A Printable Recipe Card At The Bottom Of The Page

    Melt The Chocolate Candy Wafers

    I used vanilla flavored chocolate “candy wafers” for this batch of chocolate dipped Fall pretzels. The colors I bought were yellow, orange and white. Most craft store carry these and you can also buy them online, if desired.

    I bought three 12 oz. bags ($2.57 each) at Hobby Lobby, but only used ½ of the bag of yellow, ½ of the bag of orange, and ¼ of the bag of white wafers to make 60 dipped pretzels.

    Two white bowls with yellow and orange melting candy wafers in them.

    Place each color of wafers in a separate microwave-safe bowl. Working with only one color at a time, place the bowl in the microwave and heat for 30 seconds at half-power (50-60%).

    Remove, and “stir” the wafers, then repeat. *At first you may not notice any change*. Continue to heat in 30 second increments, then stir. Gradually the wafers will begin to melt (you have to stir them each time!).

    IMPORTANT: Microwaving them on too high of a heat level may burn them, so it’s important to take your time with them. When ready for dipping, the chocolate should be smooth and free of any lumps.

    After a quick microwave, the wafers are stirred, then re-heated in microwave.Melted wafers are smooth and lump-free, and ready for dipping pretzels.

    Dip The Pretzels Then Add Sprinkles

    Now it’s time to dip the pretzels (one at a time) in the melted chocolate, covering all sides. Let excess chocolate drip back into the bowl. You can do a small “touch up” with tiny bit of chocolate to cover where you held (or lifted) the pretzel during dipping (once it’s placed on parchment paper).

    TIP: I’ve found it helpful to use a chopstick to poke through the holes in the pretzels to let the excess chocolate drip back into the bowl. If the chocolate thickens and begins hardening while dipping, pop it back in the microwave for a quick reheat, stir, and continue.

    After dipping a pretzel, place it on a large sheet of parchment paper. Immediately add decorative sprinkles to the “wet” chocolate before it hardens (fairly quickly). 

    Do this for each pretzel. Dip.. sprinkle…then repeat with the next pretzel. Use one hand for dipping, and your other clean hand to add the sprinkles!

    Pretzels are dipped, one at a time, to cover with colored chocolate.Pretzels are garnished with sprinkles, once dipped in colored chocolate.

    Move On To The Next Color

    Once a batch of one color is completed, repeat the process with another color. Melt chocolate, dip pretzels, add sprinkles and let them sit. Continue until you have used all your colors and as many pretzels as you want (I didn’t even use HALF a bag of pretzels for this amount).

    For this “recipe” I used vanilla flavored candy wafers in white, yellow and orange, but most craft stores (or online) sell a variety of colors (and flavors) to choose from.

    A pretzel is being dipped in yellow melted chocolate candy wafers.Chocolate dipped Fall pretzels drying on parchment paper.

    When all the pretzels have been dipped, let them sit for about 15 minutes to let the chocolate coating harden, then pull them off the parchment paper, and mix the colored pretzels together.

    TIP: Be sure to verify the chocolate has hardened completely before removing and combining the pretzels.

    A close up photo of orange colored Fall pretzels.Chocolate dipped Fall pretzels are combined on a wire rack.

    Serve The Chocolate Dipped Fall Pretzels

    Once the chocolate coating has completely hardened, the pretzels can be served! Place them on a decorative platter, and stack the pretzels, combining the various colors.

    You can also mix them and place the chocolate dipped Fall pretzels in a cellophane bag, and tie it with a pretty Fall ribbon. This makes a cute snacking gift for a friend or family members.

    A gift bag full of colorful chocolate covered pretzels can also be a cute little seasonal hostess gift! The possibilities are endless, especially if you experiment with various colors and sprinkles for other seasons!

    The chocolate dipped Fall pretzels are served on a Fall-inspired platter.The pretzels, decorated with colored chocolate and sprinkles are served.

    I hope you have the opportunity to make these chocolate dipped Fall pretzels! Yes, they do take a little bit of hands-on time to make, but they are such a yummy, fun snack for the Fall season!

    It took about 30 minutes for me to make 60 chocolate covered pretzels, but I think they are delicious, so cute… and well worth my time!

    I couldn’t find any Fall-themed decorative sprinkles in 3 different stores I visited (sigh), so I learned how to make my own (black, orange and white), and used them for this recipe. It’s easier than I thought, and I’ll post the recipe for how to make them as soon as possible.

    Thank you for stopping by, and i invite you to come back soon for more family-friendly recipes. Take care, may God bless you… and have a wonderful day!

    Looking for More SNACK Recipes?

    You can find ALL of my recipes in the Recipe Index, which is located at the top of the page. I have some fun and delicious snacks to choose from, including:

    Want More Recipes? Get My FREE Newsletter!

    I publish a newsletter 2 times per month (1st and 15th) with lots of recipes, tips, etc..
    Would you like to join our growing list of subscribers?

    There is a Newsletter subscription box on the top right (or bottom) of each blog post, depending on the device you use.
    You can submit your e-mail address there, to be added to my mailing list.

    Find Me On Social Media:

    Facebook page: The Grateful Girl Cooks!
    Pinterest:
    The Grateful Girl Cooks!
    Instagram:
    jbatthegratefulgirlcooks

    Author's signature

    ↓↓ PRINTABLE RECIPE BELOW ↓↓

    0 from 0 votes
    Chocolate Dipped Fall Pretzels
    Prep Time
    30 mins
    Cook Time
    0 mins
    Total Time
    30 mins
     

    Make a batch of Chocolate Dipped Fall Pretzels! Fall colors are highlighted in this simple, sweet snack for kids of all ages!

    Category: Appetizer/Snack, Desssert
    Cuisine: All Cuisines
    Keyword: chocolate dipped Fall pretzels
    Servings: 12 (about 5 per serving)
    Calories Per Serving: 336 kcal
    Author: JB @ The Grateful Girl Cooks!
    Ingredients
    • 60 Pretzel Mini Twists
    • 15 ounces chocolate candy wafers =total amount used (yellow/orange/white)
    • cup decorative sprinkles
    Instructions
    1. Place each color of wafers in a separate microwave-safe bowl. Working with one color at a time, place bowl in microwave; heat 30 seconds at half-power (50-60%). Remove, and "stir" wafers, then repeat. At first you may not notice any melting. Continue to heat in 30 second increments, stirring after each time. When ready for dipping, chocolate should be smooth and lump-free. IMPORTANT: Microwaving at too high of a heat level may burn them, so it's important to take your time and trust the process.

    2. Dip pretzels (one at a time) in melted chocolate, covering completely. Let excess chocolate drip into bowl. TIP: Use a chopstick to poke through holes in the pretzels so excess chocolate drips back into bowl. If chocolate begins hardening while dipping, pop it back in the microwave for a quick reheat; stir, and continue.

    3. After dipping a pretzel, place it on parchment paper. "Touch up" pretzel (if needed) with chocolate to cover where you held it during dipping. Immediately add sprinkles to the "wet" chocolate before it hardens. Use one hand for dipping, and your other hand to add sprinkles! Once a batch of one color is completed, repeat process with other colors.

    4. Let dipped pretzels rest 15-20 minutes to let chocolate harden, then pull them off the parchment paper, and mix pretzels together. TIP: Make sure chocolate has hardened completely before removing/ combining pretzels. Store leftover pretzels in an airtight container. Enjoy!

    Recipe Notes

    NOTES: The amount or pretzels and candy wafers is used as a baseline only. I only made 60 dipped pretzels, using a PARTIAL amount of the candy wafers from each bag.

    Nutrition Facts
    Chocolate Dipped Fall Pretzels
    Amount Per Serving (5 pretzels)
    Calories 336 Calories from Fat 99
    % Daily Value*
    Fat 11g17%
    Saturated Fat 10g63%
    Polyunsaturated Fat 0.4g
    Monounsaturated Fat 0.2g
    Sodium 382mg17%
    Potassium 67mg2%
    Carbohydrates 54g18%
    Fiber 1g4%
    Sugar 30g33%
    Protein 3g6%
    Vitamin C 1mg1%
    Calcium 8mg1%
    Iron 1mg6%
    * Percent Daily Values are based on a 2000 calorie diet.

    Here’s one more to pin on your Pinterest boards!Make a batch of Chocolate Dipped Fall Pretzels! Fall colors are highlighted in this simple, sweet snack for kids of all ages!

    Instant Pot Beef Stew

    Instant Pot Beef Stew is delicious, satisfying, and full of tender beef, potatoes, carrots, celery and onions in a savory thick broth.
    Instant Pot Beef Stew is delicious, satisfying, and full of tender beef, potatoes, carrots, celery and onions in a savory thick broth.

    I have really enjoyed using the Instant Pot I received this year from our son! It’s been pretty HOT here in Oregon this summer, so I’ve loved not having to heat up our house by using our oven much, because I’m using this handy appliance!

    I grew up eating my Mom’s beef stew and I’ve been making Classic Beef Stew (oven-baked) for many, many years. It’s such a comforting and filling meal! When I saw a recipe in one of the cookbooks I own for Instant Pot Beef Stew, I KNEW I had to try it!

    After making several changes to the original recipe, this recipe for Instant Pot Beef Stew was the final result. It’s delicious, and I hope you enjoy it, too. Here’s how to make it.

    Scroll Down For A Printable Recipe Card At The Bottom Of The Page

    A Little Prep

    Pat two pounds of beef stew meat dry using paper towels, then lightly season the meat on all sides with salt and pepper. Set the beef aside.

    Beef stew meat is lightly seasoned with salt and pepper.

    Press the SAUTÉ button on your Instant Pot. Heat the oil, then once it is hot add chopped onions, celery, and minced garlic. Cook these ingredients, stirring often for 4-5 minutes, until the onions become translucent in color and have softened.

    Chopped onions, celery and minced garlic are sautéed in the Instant Pot.

    Add beef broth, red wine, Dijon mustard, tomato sauce, dried rosemary and one bay leaf to the vegetables in the pot. Stir in the seasoned stew meat until all ingredients have been combined.

    Beef broth, red wine, etc. are added to the cooked veggies in the Instant Pot.Seasoned beef stew meat is added to the pot and stirred until combined.

    Cooking Instant Pot Beef Stew

    Lock the lid on the Instant Pot and turn the Pressure Release knob on top to SEALING. Press the CANCEL button to turn off the sauté function.

    Press the MANUAL (high heat) button (or the MEAT/STEW button, if your machine has one). Set the timer for 30 minutes of cooking at high pressure.

    The Instant Pot will take between 10-15 minutes to reach full internal pressure. The Pressure valve/button on top will pop up, and the cooking timer will begin.

    Instant Pot cooks the stew in a short amount of time.

    Add Potatoes And Carrots

    When the beef stew has cooked for 30 minutes, carefully flip the Pressure Release knob to VENTING to do a quick release of pressure/steam. **Once all the pressure has been released, the pressure valve/button on top will drop back down, indicating it is safe to remove the lid**.

    Open the lid, find and discard the bay leaf. Add the potatoes and carrots to the pot, and quickly stir them in, until combined.

    Lock the lid back on again. Turn the pressure release knob on top to SEALING. Press the CANCEL button to reset the timer, then press the MANUAL button (or Pressure Cook button) and re-set the cooking time for 4 minutes on High pressure. You will need to wait another 10-15 minutes for the Instant Pot to reach full pressure again and the cooking time to begin.

    Once the cooking time has ended (again), turn the Pressure Release knob to VENTING to quickly release the pressure/steam from the pot. Keep the lid ON, once all pressure has been released.

    Raw carrot chunks and potatoes are added into the stew and then cooked.Potatoes and carrot chunks have now been cooked with the stew.

    Add A “Slurry” To Help Thicken The Stew

    The final step is to slightly thicken the stew. Make a “slurry” by mixing cornstarch and water in a small bowl or container until it is smooth and lump-free.

    Remove the lid from the stew, and very quickly stir the “slurry” into the liquid in the pot. Put the lid back on the pot and let the Instant Pot Beef Stew stand for 5 minutes (covered), in order for the stew liquid to thicken.

    Open the lid and take a tiny bite. Add additional salt and/or pepper, if necessary, to suit your taste.

    A slurry of water and cornstarch is added to the beef stew, to thicken sauce.After slurry has been added, the beef stew is ready to be served.

    Time To Enjoy Instant Pot Beef Stew

    Use a ladle to scoop out portions of the beef stew into serving bowls while it is really hot. There should be enough stew for 6 servings.

    White bowl, filled with hot and delicious beef stew.

    The beef, potatoes and carrots should be incredibly tender, and the flavor of the sauce is wonderful! Any alcohol that was in the red wine will have cooked off, so no worries for your children there!

    Enjoy this hearty, delicious Instant Pot Beef Stew with those you love! Any leftovers will keep up to 3-4 days in the refrigerator, if stored in an airtight container. Microwave the stew to reheat.

    A close up photo of the beef, potatoes and carrots in the beef stew.Two white bowls, filled with Instant Pot Beef Stew, ready to be enjoyed.

    I hope you have the chance to make this Instant Pot Beef Stew, and trust you (and those you love) will enjoy it as much as we do. 

    Thank you for stopping by, and I invite you to come back again soon for more family-friendly recipes. Take care, may God bless you… and have a wonderful day!

    Looking For More INSTANT POT Recipes?

    You can find ALL of my recipes in the Recipe Index, which is located at the top of the page. I have begun adding Instant Pot recipes to my website, and already have already published several you may enjoy, including:

    Want More Recipes? Get My FREE Newsletter!

    I publish a newsletter 2 times per month (1st and 15th) with lots of recipes, tips, etc..
    Would you like to join our growing list of subscribers?

    There is a Newsletter subscription box on the top right (or bottom) of each blog post, depending on the device you use.
    You can submit your e-mail address there, to be added to my mailing list.

    Find Me On Social Media:

    Facebook page: The Grateful Girl Cooks!
    Pinterest:
    The Grateful Girl Cooks!
    Instagram:
    jbatthegratefulgirlcooks

    Author's signature

    Recipe adapted from: “The Ultimate Instant Pot Cookbook”, by Coco Morante, page 207, published in 2018 by TenSpeed Press

    ↓↓ PRINTABLE RECIPE BELOW ↓↓

    0 from 0 votes
    Instant Pot Beef Stew
    Prep Time
    10 mins
    Cook Time
    40 mins
    Time To Reach Full Pressure (inactive)
    30 mins
    Total Time
    1 hr 20 mins
     

    Instant Pot Beef Stew is delicious, satisfying, and full of tender beef, potatoes, carrots, celery and onions in a savory thick broth.

    Category: Main Dish
    Cuisine: American
    Keyword: instant pot, beef stew
    Servings: 6
    Calories Per Serving: 378 kcal
    Author: JB @ The Grateful Girl Cooks!
    Ingredients
    • 2 pounds beef stew meat
    • 1 teaspoon salt
    • 1 teaspoon black pepper
    • 2 Tablespoons vegetable oil
    • 1 medium yellow onion finely chopped
    • 2 stalks celery diced
    • Tablespoons minced garlic
    • ¾ cup beef broth
    • ¾ cup red wine
    • Tablespoons Worcestershire sauce
    • ¾ Tablespoon Dijon mustard
    • 2 Tablespoons tomato sauce
    • ¾ teaspoons dried rosemary crumbled
    • 1 bay leaf
    • 4 medium carrots peeled, sliced in 1" rounds
    • 2 medium russet potatoes (or Yukon Gold) peeled, cut in 1" cubes
    • 1 Tablespoon cornstarch
    • 1 Tablespoon water
    Instructions
    1. Pat beef dry with paper towels; season on all sides with salt and pepper. Set aside.

    2. Press SAUTÉ button on Instant Pot. Heat oil; once hot add onions, celery, garlic. Cook, stirring often for 4-5 minutes, until onions are translucent and soft. Add broth, wine, Dijon, tomato sauce, rosemary, bay leaf and the beef. Stir to combine.

    3. Lock lid on; turn Pressure Release knob on top to SEALING. Press CANCEL button to turn off Sauté setting. Press the MANUAL (high heat) button (or MEAT/STEW button, if your machine has one). Set timer for 30 minutes at high pressure. The Instant Pot will take between 10-15 minutes to reach full pressure, then pressure valve/button on top will pop up, and cooking timer will begin.

    4. When cooking time ends, carefully flip Pressure Release knob on top to VENTING to do a quick release of pressure/steam. *Once all pressure is released, the pressure valve/button on top will drop down, indicating it's safe to remove the lid.* Open the lid, find/discard bay leaf. Add potatoes and carrots; quickly stir until combined. Lock lid on again. Turn pressure release knob to SEALING. Press CANCEL button to reset timer, then press MANUAL button (or Pressure Cook button) and re-set cooking time for 4 minutes on High pressure. You'll need to wait 10-15 minutes for the Instant Pot to reach full pressure again and cooking time to begin. Once cooking program ends, flip Pressure Release knob to VENTING to quickly release pressure/steam. Keep the lid ON, once all pressure is released.

    5. Mix cornstarch and water in a small bowl until it's smooth/lump-free. Remove Instant Pot lid; quickly stir cornstarch mixture into stew. Put the lid back on the pot. Let the stew rest for 5 minutes (covered), in order for sauce to thicken. Open lid; taste stew. Add additional salt and/or pepper if necessary.

    6. Ladle stew into individual bowls. Serve immediately, while hot. Enjoy!

    Recipe Notes

    NOTE: You can substitute boneless beef chuck, cut into 1" cubes and trimmed of excess fat, if desired.

    Nutrition Facts
    Instant Pot Beef Stew
    Amount Per Serving (1 (1/6 of total))
    Calories 378 Calories from Fat 108
    % Daily Value*
    Fat 12g18%
    Saturated Fat 3g19%
    Trans Fat 0.03g
    Polyunsaturated Fat 3g
    Monounsaturated Fat 4g
    Cholesterol 94mg31%
    Sodium 765mg33%
    Potassium 1145mg33%
    Carbohydrates 23g8%
    Fiber 3g13%
    Sugar 4g4%
    Protein 36g72%
    Vitamin A 6887IU138%
    Vitamin C 10mg12%
    Calcium 80mg8%
    Iron 5mg28%
    * Percent Daily Values are based on a 2000 calorie diet.

    Here’s one more to pin on your Pinterest boards!Instant Pot Beef Stew is delicious, satisfying, and full of tender beef, potatoes, carrots, celery and onions in a savory thick broth.

    Pumpkin Risotto

    Creamy Pumpkin Risotto is a delicious, meatless dish made with Arborio rice, veggie broth, white wine, butter, pumpkin, ginger and basil.
    Creamy Pumpkin Risotto is a delicious, meatless dish made with Arborio rice, veggie broth, white wine, butter, pumpkin, ginger and basil.

    Today I want to share a yummy recipe I found years ago for a creamy, meatless pumpkin risotto. I think it’s a fun meal to make during the Fall when everything seems to be pumpkin this, and pumpkin that!

    However, since the pumpkin used to make the risotto is canned pumpkin puree which can be bought in almost any grocery store, it is a convenient dish that can be made and enjoyed as a MAIN dish or SIDE dish ANY TIME of the year! Whoo Hoo!

    Even if you have never made risotto before, please give this recipe a try. You only need to be able to add ingredients and continuously stir the risotto as it cooks. It’s EASY! Here’s how to make pumpkin risotto.

    Scroll Down For A Printable Recipe Card At The Bottom Of The Page

    Heat The Veggie Broth

    Place about 4 cups of vegetable broth in a large saucepan. Heat the broth on LOW heat and continue to simmer while you make the risotto.

    You will be adding the hot vegetable broth a little at a time to the rice as it cooks, which is why you keep it simmering on the stove.

    Vegetable broth simmering on a stove while cooking risotto.

    Let’s Make The Risotto

    In a separate large saucepan, heat extra virgin olive oil on Medium heat, then add chopped onions. Cook the onions, stirring often, for about 3-4 minutes, until the onions are translucent and soft.

    Stir in uncooked Arborio rice, and continue to cook on Medium heat for about 1-2 minutes until the rice is coated with the olive oil.

    Chopped onions are cooked in olive oil in a large saucepan until tender.Arborio rice is added into the cooked onions and olive oil.

    Adding Liquid When Making Risotto

    The secret to making a good, creamy risotto is to add liquids a little at a time, then cook until that liquid is absorbed into the rice, then add more liquid.

    To do this, add “some” of the vegetable broth (a couple of ladles) and half of the white wine to the rice and onion mixture. Only add enough liquid to just barely cover the rice.

    Bring the liquid to a boil, then reduce the heat to LOW. Continue to stir constantly and cook, until the liquid has been absorbed.

    A small amount of white wine and vegetable broth are added to the rice.

    Add the remaining wine and a bit more of the veggie broth (a couple of ladles) again. Stir and continue cooking on LOW until this liquid has been absorbed.

    Continue cooking the risotto, stirring constantly, until all the remaining veggie broth has been added in batches, cooking each “batch” until the liquid has been absorbed. This usually takes between 15-20 minutes, on average.

    After liquid has been absorbed, a little more broth is added to rice and cooked.

    Time To Make It “Pumpkin” Risotto

    When all the remaining broth has been incorporated into the risotto, it should be fairly creamy in texture.

    Stir in pumpkin puree, finely minced ginger, nutmeg, and dried basil. Stir to fully incorporate these ingredients into the risotto. Take a little taste, then season lightly with salt and black pepper (to suit your taste).

    Risotto is creamy after all wine and broth has been cooked into the rice.Pumpkin puree, ginger, nutmeg, and dried basil are added to the risotto.

    Simmer the pumpkin risotto on LOW heat, stirring constantly until everything is fully heated through.

    Remove the pan from the heat, and stir in 2 Tablespoons of butter, to finish the dish. Stir until the butter is fully melted and incorporated into the pumpkin risotto.

    Butter is added to hot pumpkin risotto and stirred until melted.

    Serve The Pumpkin Risotto

    Now the hot pumpkin risotto is ready to be served. Spoon portions of the risotto onto plates or into serving bowls.

    If desired, sprinkle a very small amount of dried basil over the top of each portion (optional). Serve the pumpkin risotto immediately while very hot… and enjoy!

    Dried basil is sprinkled on top of the risotto before serving.A large white bowl, full of pumpkin risotto is served.

    The risotto should be very creamy in texture, and it has great flavor! I really hope you enjoy this meatless main dish. It is very filling but is also absolutely delicious!

    A fork lifting out a bite of the pumpkin risotto from a white bowl.

    Thanks for stopping by, and I trust you (and those you love) will enjoy this meatless recipe. Please come back again soon for more family-friendly recipes. Take care, may God bless you… and have a wonderful day.

    Looking For More MEATLESS MAIN DISH Recipes?

    You can find ALL of my recipes in the Recipe Index, which is located at the top of the page. I have quite a few meatless meal recipes you can check out, including:

    Want More Recipes? Get My FREE Newsletter!

    I publish a newsletter 2 times per month (1st and 15th) with lots of recipes, tips, etc..
    Would you like to join our growing list of subscribers?

    There is a Newsletter subscription box on the top right (or bottom) of each blog post, depending on the device you use.
    You can submit your e-mail address there, to be added to my mailing list.

    Find Me On Social Media:

    Facebook page: The Grateful Girl Cooks!
    Pinterest:
    The Grateful Girl Cooks!
    Instagram:
    jbatthegratefulgirlcooks

    Author's signature

    Recipe adapted from Patti, at: comfycook.com/2013/09/pumpkin-risotto.html

    ↓↓ PRINTABLE RECIPE BELOW ↓↓

    0 from 0 votes
    Pumpkin Risotto
    Prep Time
    10 mins
    Cook Time
    30 mins
    Total Time
    40 mins
     

    Creamy Pumpkin Risotto is a delicious, meatless dish made with Arborio rice, veggie broth, white wine, butter, pumpkin, ginger and basil.

    Category: Main Dish, Meatless Entree
    Cuisine: All Cuisines
    Keyword: pumpkin risotto
    Servings: 6
    Calories Per Serving: 377 kcal
    Author: JB @ The Grateful Girl Cooks!
    Ingredients
    • 4 cups vegetable broth (or more, if needed)
    • 1 Tablespoon extra virgin olive oil
    • 1 cup diced yellow onion
    • 2 cups arborio rice
    • 1 cup dry white wine
    • 1 cup canned pumpkin puree (NOT pie filling!)
    • 1 teaspoon finely minced fresh ginger
    • ½ teaspoon nutmeg
    • ¼ teaspoon dried basil
    • 2 Tablespoons butter
    • salt and black pepper, to taste
    Instructions
    1. Heat vegetable broth on LOW heat in a large saucepan. Continue simmering- you add the hot liquid in small amounts as you cook the risotto.

    2. In a separate large saucepan, heat olive oil on Medium; add chopped onions. Cook onions, stirring often, for 3-4 minutes, until onions are translucent/soft.

    3. Stir in uncooked Arborio rice; cook on Medium heat 1-2 minutes until rice is coated with olive oil.

    4. Add "some" of the vegetable broth (a couple of ladles) and half the wine to the rice/onion mixture. Only add enough liquid to barely cover the rice. Bring liquid to a boil; reduce heat to LOW. Cook, stirring constantly, until liquid is absorbed.

    5. Add remaining wine and more veggie broth (a couple of ladles). Stir; continue cooking on LOW until liquid is absorbed. Continue cooking risotto, stirring constantly, until all veggie broth has been added in batches, cooking each "batch" until liquid is absorbed and risotto is soft/creamy in texture (15-20 minutes).

    6. Stir in pumpkin, ginger, nutmeg, and basil. Stir to fully incorporate them into the risotto. Take a taste; season with salt and black pepper (to suit your taste).

    7. Sprinkle risotto with additional basil (optional). Serve immediately while hot.

    Nutrition Facts
    Pumpkin Risotto
    Amount Per Serving (1 (1/6 of total))
    Calories 377 Calories from Fat 72
    % Daily Value*
    Fat 8g12%
    Saturated Fat 3g19%
    Trans Fat 0.2g
    Polyunsaturated Fat 1g
    Monounsaturated Fat 3g
    Cholesterol 10mg3%
    Sodium 83mg4%
    Potassium 342mg10%
    Carbohydrates 62g21%
    Fiber 4g17%
    Sugar 3g3%
    Protein 8g16%
    Vitamin A 6473IU129%
    Vitamin C 4mg5%
    Calcium 31mg3%
    Iron 4mg22%
    * Percent Daily Values are based on a 2000 calorie diet.

    Here’s one more to pin on your Pinterest boards!Creamy Pumpkin Risotto is a delicious, meatless dish made with Arborio rice, veggie broth, white wine, butter, pumpkin, ginger and basil.

    Pineapple Walnut Bread

    Pineapple Walnut Bread is a delicious quick bread that is easy to make! It’s not too sweet, and is perfect to serve with hot tea or coffee!
    Pineapple Walnut Bread is a delicious quick bread that is easy to make! It's not too sweet, and is perfect to serve with hot tea or coffee!

    I love to make loaves of bread, whether it is a savory bread or a sweet bread! There are so many varieties out there! Today I want to share a recipe for a sweet loaf of bread, called Pineapple Walnut Bread.

    I found the recipe in one of my old cookbooks, and I finally got around to photographing the steps for making it, and sharing it here with you today.

    The bread has canned pineapple tidbits in it, but honestly, it’s not too “pineapple-y” (if that’s even a word – ha ha!). It’s not an overly sweet bread either, which makes it wonderful to nibble on with a hot cup of tea or coffee for breakfast or snack time.

    Here’s a step by step guide to make this simple loaf of pineapple walnut bread.

    Scroll Down For A Printable Recipe Card At The Bottom Of The Page

    Make The Batter For the Bread

    Place a stick of soft butter and granulated sugar in a large mixing bowl, or in the bowl of a stand mixer. Using an electric mixer, beat these two ingredients together on high speed until creamy.

    Add two eggs, one at a time, beating the mixture very well after each addition. Set the bowl aside while you mix the “dry” ingredients.

    Soft butter and granulated sugar are beaten until creamy.Eggs are added to butter and sugar mixture and beaten, one at a time.

    Sift all purpose flour, baking powder and a pinch of salt into a separate bowl. These are the “dry” ingredients.

    Add HALF of the dry ingredients, along with HALF cup of well-drained canned pineapple tidbits to the butter/sugar batter. Beat well using the electric mixer until they’ve been incorporated into the batter.

    Now add the remaining HALF of the “dry” ingredients and the remaining HALF of the pineapple tidbits to the batter. Beat them, until they are also incorporated into the batter.

    Flour, baking powder and a pinch of salt are combined in a bowl.Flour mixture and pineapple tidbits are added to the bread batter.

    Final Steps

    STIR chopped walnuts into the batter until they are well-combined and distributed throughout the batter.

    Chopped walnuts are added to the pineapple walnut bread batter.

    Evenly distribute the bread batter into a generously greased and floured 9″ x 5″ loaf pan. If desired (optional), sprinkle the top of the loaf with additional chopped walnuts. Now the loaf of Pineapple Walnut Bread is ready to bake!

    Chopped walnuts are sprinkled on top of the bread loaf before baking.

    Bake The Pineapple Walnut Bread

    Bake the bread in a preheated 350°F. oven for 45-55 minutes. Oven temps can vary quite a bit, so I recommend testing the bread for doneness at the 45 minute mark.

    Insert a toothpick down into the top/center of the pineapple walnut bread. If it comes out free of batter, the bread is done. The surface of the loaf should be beautifully golden brown, as well.

    Now What?

    When it’s done, transfer the loaf pan to a wire rack, and let the bread cool for about 5 minutes (IN THE PAN) before removing it. Run a butter knife all around the edges, and slightly lift the edges.

    Place a large plate or platter face down on top of the pan. Holding both pans tightly together, invert the loaf pan (turn it upside down) onto the plate. The loaf should release easily onto the plate. Turn the bread right side up, and place it on a wire rack, to finish cooling.

    A loaf of pineapple walnut bread, in the pan after baking.A side view of pineapple walnut bread, cooling on a wire rack.

    Enjoy A Slice Of Pineapple Walnut Bread

    Slice the bread after it has cooled sufficiently, because it will cut easier. The loaf should yield 9 slices, each about 1″ wide. Serve the bread as is, or warm with a bit of softened butter spread on top, and enjoy it!

    Slices are cut from the loaf of pineapple walnut bread.

    I hope you have the chance to make a loaf of Pineapple Walnut Bread, and trust you’ll enjoy it! It is really delicious, especially when served with a cup of hot tea or coffee on the side. YUM!

    Thanks for stopping by, and I invite you to come back soon for more family-friendly recipes. Take care, may God bless you… and have a wonderful day!

    Looking For More BREAD Recipes?

    You can find ALL of my recipes in the Recipe Index, which is located at the top of the page. I have lots of delicious,  “sweet” bread loaf recipes to choose from, including:

    Want More Recipes? Get My FREE Newsletter!

    I publish a newsletter 2 times per month (1st and 15th) with lots of recipes, tips, etc..
    Would you like to join our growing list of subscribers?

    There is a Newsletter subscription box on the top right (or bottom) of each blog post, depending on the device you use.
    You can submit your e-mail address there, to be added to my mailing list.

    Find Me On Social Media:

    Facebook page: The Grateful Girl Cooks!
    Pinterest:
    The Grateful Girl Cooks!
    Instagram:
    jbatthegratefulgirlcooks

    Author's signature

    Recipe adapted from: “New Red Lion Inn Cookbook”, page 61, by Suzi Forbes Chase, published in 1992 by Berkshire House Publishers

    ↓↓ PRINTABLE RECIPE BELOW ↓↓

    0 from 0 votes
    Pineapple Walnut Bread
    Prep Time
    10 mins
    Cook Time
    45 mins
    Total Time
    55 mins
     

    Pineapple Walnut Bread is a delicious quick bread that is easy to make! It's not too sweet, and is perfect to serve with hot tea or coffee!

    Category: Bread/Breakfast, Snack
    Cuisine: All Cuisines
    Keyword: pineapple walnut bread
    Servings: 9 (1" slices)
    Calories Per Serving: 352 kcal
    Author: JB @ The Grateful Girl Cooks!
    Ingredients
    • ½ cup butter (1 stick) room temperature
    • 1 cup granulated sugar
    • 2 large eggs
    • 2 cups all purpose flour
    • 1 teaspoon baking powder
    • 1 pinch salt
    • 1 cup canned pineapple tidbits, drained well can substitute crushed pineapple
    • ½ cup chopped walnuts
    OPTIONAL: additional chopped walnuts to sprinkle on top of loaf before baking
      Instructions
      1. Preheat oven to 350℉. Grease and flour bottom and sides of a 9x5" loaf pan.

      2. In a large bowl, beat butter and sugar using an electric mixer until creamy. Add eggs, one at a time, beating well after each addition. Set the bowl aside.

      3. In a separate bowl, sift flour, baking powder and salt ("dry" ingredients). Add HALF of the dry ingredients, along with HALF of the pineapple tidbits to the butter/sugar batter. Beat well with mixer until incorporated. Now add remaining HALF of "dry" ingredients and remaining HALF of pineapple tidbits. Beat until fully incorporated in the batter. Add chopped walnuts- STIR them into the batter.

      4. Evenly distribute batter into prepared loaf pan. If desired (optional), sprinkle the top of the loaf with additional chopped walnuts.

      5. Bake at 350°F. for 45-55 minutes. Test for doneness at the 45 minute mark. Insert a toothpick into the top/center of the bread. If it comes out batter-free, bread is done. Bread should be golden brown, as well. Transfer pan to wire rack.

      6. Let bread cool 5 minutes (IN THE PAN) before removing. Run a butter knife around pan edges. Place a large plate face down on top of the pan. Holding both pans tightly together, invert the loaf pan (turn it upside down) onto the plate. Loaf should release easily onto the plate. Turn bread right side up on a wire rack, to finish cooling. Once cooled, slice and serve. Enjoy!

      Nutrition Facts
      Pineapple Walnut Bread
      Amount Per Serving (1 slice (1/9 of total))
      Calories 352 Calories from Fat 144
      % Daily Value*
      Fat 16g25%
      Saturated Fat 7g44%
      Trans Fat 0.4g
      Polyunsaturated Fat 4g
      Monounsaturated Fat 4g
      Cholesterol 68mg23%
      Sodium 103mg4%
      Potassium 155mg4%
      Carbohydrates 49g16%
      Fiber 2g8%
      Sugar 26g29%
      Protein 5g10%
      Vitamin A 390IU8%
      Vitamin C 3mg4%
      Calcium 43mg4%
      Iron 2mg11%
      * Percent Daily Values are based on a 2000 calorie diet.

      Here’s one more to pin on your Pinterest boards!Pineapple Walnut Bread is a delicious quick bread that is easy to make! It's not too sweet, and is perfect to serve with hot tea or coffee!