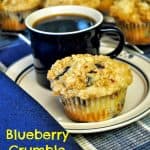
Blueberry crumble muffins are delicious breakfast treats, packed with blueberries (fresh or frozen) and a streusel topping! Perfect “on the go” breakfast! and a streusel topping! Perfect \"on the go\" breakfast! / The Grateful Girl Cooks!")
I recently found this recipe for Blueberry Crumble Muffins on Pinterest, or as I love to call it…”My Online Recipe Box”. These muffins are absolutely FANTASTIC! Pass the coffee!
The recipe comes from Ashton, at “Something Swanky”, and I am grateful she shared her recipe with all of us. I made these delicious muffins a few days ago for breakfast for my husband and I, and am happy to report that they were delicious…and EASY…and did I mention delicious?
I’ve tried various blueberry muffin recipes over the years, some were good, some not so good. This one is GREAT! The recipe makes 12 muffins, which is practically enough to feed a small village, and they freeze well, so I wrapped half of them up really well and threw them in our freezer for another morning’s dining! I hope you will give this recipe a try. Mix them up and bake them when you have some extra time and enjoy them for days! Here’s a few pics from when I made them:
Scroll Down For A Printable Recipe Card At The Bottom Of The Page
Making Blueberry Crumble Muffins
The batter for the muffins is extremely simple to make. Seriously… it’s so very EASY!

You can use fresh or frozen blueberries for this recipe. I used frozen berries (threw them into the muffin batter completely frozen) with no problem.

Divide the batter into muffin cups (in my beat up, but dearly loved muffin tin). I like to think of my grungy muffin tin as “well-used, and well-loved”.

Get Ready For Baking
Add the crumble (streusel) topping to the top of each of the muffins before baking. Divide the topping evenly between the muffin cups.

After the blueberry crumble muffins are done baking, let them cool on a wire rack for several minutes, then remove them from the pan.

Time To Eat Some Blueberry Crumble Muffins
Here are the blueberry crumble muffins, right out of the oven, cooling on a wire rack. Let them cool down a bit before serving.

Here’s a peek at the inside of one of the blueberry crumble muffins. Look at those blueberries! This yummy muffin is ready to eat!

Hope you will try making these delicious blueberry crumble muffins… they are so easy to make, and they really taste wonderful! Thanks for stopping by. Have a great day, and come back soon!
Looking For More MUFFIN Recipes?
You can find all of my recipes in the Recipe Index, located at the top of the page. I have lots of yummy muffin recipes you’re gonna love, including:
- Blueberry Lemon Muffins
- Cranberry Orange Muffins
- Dark Chocolate Almond Chia Muffins
- Apple Raisin Muffins
- Banana Crumb Muffins
Interested In More Recipes?
Thank you for visiting this website. I appreciate you using some of your valuable time to do so. If you’re interested, I publish a newsletter 2 times per month (1st and 15th) with all the latest recipes, and other fun info. I would be honored to have you join our growing list of subscribers, so you never miss a great recipe!
There is a Newsletter subscription box on the top right side (or bottom) of each blog post, depending on the device you use, where you can easily submit your e-mail address (only) to be included in my mailing list.
You Can Also Find Me On Social Media:
Facebook page: The Grateful Girl Cooks!
Pinterest: The Grateful Girl Cooks!
Instagram: jbatthegratefulgirlcooks
 Recipe Source: http://www.somethingswanky.com/blueberry-crumble-muffins/?utm_source=rss&utm_medium=rss&utm_campaign=blueberry-crumble-muffins
Blueberry crumble muffins are delicious breakfast treats, packed with blueberries (fresh or frozen) and a streusel topping! Perfect "on the go" breakfast!
- 3/4 cup milk
- 1/4 cup vegetable oil
- 1 large egg
- 2 cups all-purpose flour
- 1/2 cup granulated sugar
- 2 teaspoon baking powder
- 1/2 teaspoon salt
- 1 cup fresh , frozen, or canned blueberries (I used frozen ones I picked last summer!)
- 3/4 cup all-purpose flour
- 1/2 cup (1 cube) cold butter, cut into small pieces
- 3 Tablespoons brown sugar
- Preheat your oven to 400 degrees.
- Line a standard size muffin tin with paper cupcake liners. Lightly spray the muffin paper holders with non-stick cooking spray. (Yes...spray the paper, also!)
- Beat the milk, oil and egg together in a medium sized bowl.
- In a separate bowl, combine the flour, sugar, baking powder and salt. Whisk these dry ingredients together, then add to the milk and egg mixture. Stir this only until the batter forms (the batter will be lumpy).
- Gently fold the blueberries into the batter with a large spoon or spatula. So far so good, right?
- Divide your batter evenly into the 12 prepared muffin cups.
- Place the flour, cold butter pieces and brown sugar in a bowl. Using a pastry blender or a fork, cut (or "mash") these ingredients together until you end up with a crumbly mixture the size of small peas (now you know why it is called a "crumble". Brilliant).
- Sprinkle the crumble over the top of each muffin batter thingy (now I'm just getting technical...)
- Bake at 400 degrees for 20-25 minutes, or until a toothpick comes out clean.
- Remove muffins from oven; let them cool for 5-10 minutes before attempting to remove the paper wrappers. Then slice that warm blueberry muffin in half, slather some butter on that bad boy and dig in! Enjoy!
Here is one more to pin on your Pinterest boards! and a streusel topping! Perfect \"on the go\" breakfast! / The Grateful Girl Cooks!")


 and save money! / The Grateful Girl Cooks!")


 and save money! / The Grateful Girl Cooks!")


