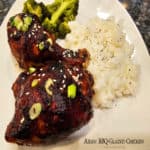
You’ll enjoy Asian BBQ-Glazed Chicken, a delicious, easy dish featuring chicken thighs and legs coated in Asian-style BBQ sauce and baked!

Today I’m sharing a simple recipe for delicious BBQ chicken (with an Asian twist) and hope you will find it interesting enough to make it and enjoy with those you love.
The chicken’s flavor is enhanced by a very easy to make Asian-inspired barbeque sauce which is added to the chicken in two stages while baking. The chicken itself is simply seasoned with a few common spices (salt, pepper, garlic and onion powders) and the finished dish is garnished with sesame seeds and sliced green onions.
All in all, this dish is easy to prepare and tastes great, especially when served with steamed rice on the side. I think you’re going to like it, so here’s how to make Asian BBQ-Glazed Chicken.
Scroll Down For A Printable Recipe Card At The Bottom Of The Page
Make The Asian BBQ Sauce
The ingredients you’ll need to make the Asian-Style BBQ sauce are ketchup, soy sauce (regular or low-sodium), hoisin sauce, rice vinegar, red chili flakes, fresh ginger, and toasted sesame oil.
All of these ingredients for the sauce can easily be found in most grocery stores. Hoisin sauce, sesame sauce, and sesame oil can typically be located in the Asian food section.

Measure all the sauce ingredients into a small saucepan and stir very well to combine them. Turn the heat to LOW, and simmer the sauce, for 3-4 minutes.

Stir occasionally as the sauce simmers. After 3-4 minutes, the sauce will thicken slightly. Remove the saucepan from the heat source and set aside.

Prepare The Chicken
Pat the pieces of chicken dry using paper towels, then place each piece on a parchment paper-lined rimmed baking sheet. Leave a small amount of space between each piece of chicken.
Lightly season both sides of each piece of chicken with salt, pepper, garlic powder and onion powder. NOTE: The recipe (as written below) calls for 4 thighs and 4 legs (to serve 4 people), however when I photographed this, I only used 3 thighs and 3 legs (just an FYI).

Use a pastry brush to THINLY brush some of the BBQ sauce on both sides of each piece of chicken. Add only enough sauce to barely cover the chicken pieces on all sides for the first half of the baking time.
You should have plenty of sauce left over for later when you will thickly apply it halfway through the baking time!

Bake The Chicken
Place the Asian BBQ-Glazed chicken on a middle rack in your preheated oven. Bake it at 400°F. for 20 minutes, then carefully remove the pan of chicken from the oven.
Using your pastry brush, apply a THICK coating of BBQ sauce to each piece of chicken, using up the remaining BBQ sauce to do this. Now the chicken is ready to finish baking!


Put the chicken back into the oven and continue to bake it for 20 more minutes OR until the chicken reaches a safe internal temperature of 165°F. You can check the inner temperature of the chicken by inserting a meat thermometer into the thickest part.
Once the chicken is done, remove it from the oven and let it rest for a minute, then transfer the chicken pieces to a serving plate. Garnish the Asian BBQ-Glazed Chicken with sliced green onions and sesame seeds, if desired.

Serve The Asian BBQ-Glazed Chicken
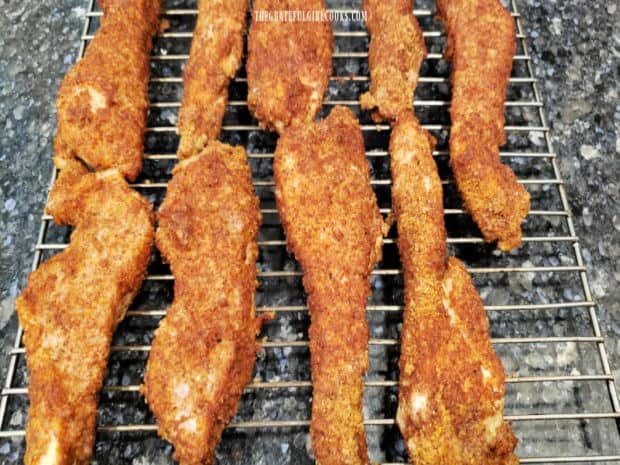
When the chicken has been garnished, it is ready to be served and enjoyed! The outside of the chicken will be really darkened and browned, and the skin should be moderately crispy.

We always enjoy having steamed rice served with the chicken and I added steamed broccoli this time to go along with it. The chicken tastes amazing and is juicy on the inside and a bit crisp on the outside.

I hope you have the chance to try this delicious Asian-inspired chicken, and trust you’ll enjoy it, too! It’s a simple meal to prepare without a lot of work which makes it a “good choice” in my book.
Thank you for taking time to visit here today, and I invite you to come back again soon for more family-friendly recipes. Take care, may God bless you, and have a wonderful day!
Looking For More CHICKEN Recipes?
You can find ALL of my recipes in the Recipe Index, which is located at the top of the page. I have LOTS of fabulous chicken recipes to choose from, including:
- Easy Cashew Chicken
- Chicken Cutlets in Pan Sauce
- Creamy Lemon Tarragon Chicken
- Crunchy Buttermilk Fried Chicken
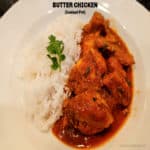
- Butter Chicken (Instant Pot)
Want More Recipes? Get My FREE Newsletter!
I publish a newsletter 2 times per month (1st and 15th) with lots of recipes, tips, etc..
Would you like to join our growing list of subscribers?
There is a Newsletter subscription box on the top right (or bottom) of each blog post, depending on the device you use.
You can submit your e-mail address there, to be added to my mailing list.
Find Me On Social Media:
Facebook page: The Grateful Girl Cooks!
Pinterest: The Grateful Girl Cooks!
Instagram: jbatthegratefulgirlcooks

↓↓ PRINTABLE RECIPE BELOW ↓↓
You'll enjoy Asian BBQ-Glazed Chicken, a delicious, easy dish featuring chicken thighs and legs coated in Asian-style BBQ sauce and baked!
- ¼ cup ketchup
- ¼ cup Hoisin sauce
- 2 Tbsp. rice vinegar
- 1 Tbsp. toasted sesame oil
- 1 Tbsp. soy sauce
- 1 Tbsp. finely grated fresh ginger
- 2 teaspoons water
- 1 pinch red chili flakes
- 4 medium chicken thighs (bone in-skin on)
- 4 medium chicken legs (bone in-skin on)
Preheat oven to 400℉ (or 204.44℃). Line a baking sheet with parchment paper.
Measure sauce ingredients into a small saucepan; stir well to combine. Simmer on LOW heat for 3-4 minutes, stirring occasionally. After 3-4 minutes, sauce will thicken slightly. Remove pan from heat source; set aside.
Pat chicken dry with paper towels; place each piece on prepared baking sheet, leaving space between each piece. Lightly season both sides of chicken pieces with salt, pepper, garlic powder and onion powder.
Use a pastry brush to THINLY brush BBQ sauce to chicken on both sides, adding only enough sauce to barely cover the chicken (remaining sauce is for later).
Bake chicken (on a middle rack) at 400°F. for 20 minutes, then remove pan from oven. Brush a THICK coating of BBQ sauce on each piece of chicken, using all the remaining BBQ sauce. Put chicken back in oven; bake it for 15-20 more minutes (time will depend on size of chicken pieces) OR until chicken reaches a safe internal temp. of 165°F. Insert meat thermometer into thickest part to check.
When chicken is done, let it rest a minute, then transfer pieces to a serving plate. Garnish chicken with sliced green onions and sesame seeds. Serve and enjoy!
NOTE: The caloric calculation for the chicken is an estimate only using a software tracker, because the weight/size of the chicken pieces will vary per user. It is also based on each person consuming one chicken thigh AND one chicken leg (this amount or combination of pieces eaten may also vary per your needs). The ingredients used for the sauce may vary calorically as well, depending on the brands used.
Here’s one more to pin on your Pinterest boards!


 - The Grateful Girl Cooks!")
 - The Grateful Girl Cooks!")
 - The Grateful Girl Cooks!")
 - The Grateful Girl Cooks!")
 - The Grateful Girl Cooks!")
 - The Grateful Girl Cooks!")
 - The Grateful Girl Cooks!")
 - The Grateful Girl Cooks!")
 - The Grateful Girl Cooks!")
 - The Grateful Girl Cooks!")
 - The Grateful Girl Cooks!")

 - The Grateful Girl Cooks!")


 - The Grateful Girl Cooks!")
 - The Grateful Girl Cooks!")
 - The Grateful Girl Cooks!")
 - The Grateful Girl Cooks!")
 - The Grateful Girl Cooks!")
 - The Grateful Girl Cooks!")
 - The Grateful Girl Cooks!")
 - The Grateful Girl Cooks!")
 - The Grateful Girl Cooks!")
 - The Grateful Girl Cooks!")
 - The Grateful Girl Cooks!")
 - The Grateful Girl Cooks!")
 - The Grateful Girl Cooks!")
 - The Grateful Girl Cooks!")


