Category: Main Dishes

Mexican Stuffed Pasta Shells

Mexican Stuffed Pasta Shells, with seasoned beef, cheese and onion, are baked and topped with cheese, cilantro, tomatoes, and sour cream!Mexican Stuffed Pasta Shells, with seasoned beef, cheese and onion, are baked and topped with cheese, cilantro, tomatoes, and sour cream!
Mexican Stuffed Pasta Shells are a delicious twist on traditional stuffed pasta. Ground beef, cheese and onion filled pasta shells are baked in enchilada sauce, then topped with cheese, cilantro, tomatoes, and garnished with a dollop of sour cream, for a flavor-filled dinner!

Last Spring I made Chicken and Broccoli Alfredo Stuffed Shells and we really enjoyed them.  Now fast forward to about 4 months later when I started thinking about how much my husband and I absolutely LOVE Mexican food. A light bulb went off in my head and I decided to experiment and make more stuffed shells, but this time create a recipe with a Mexican twist!  We really enjoyed them, so am sharing the details on the ol’ blog today.

Scroll Down For A Printable Recipe Card At The Bottom Of The Page

How Do You Make Mexican Stuffed Pasta Shells?

These Mexican stuffed pasta shells are really easy to prepare.  Start by cooking 1 pound of ground beef with sliced green onions in large skillet on medium heat. Once the meat is cooked, drain grease from pan (discard grease). Add one taco seasoning packet and cook according to seasoning package instructions.

When the meat has been cooked and seasoned, transfer it to a large mixing bowl and let it cool for 4-5 minutes.  Add 3 Tablespoons of enchilada sauce, grated cheddar and jack cheeses; and stir to combine. Set aside.

Cooking ground beef and onions to stuff into pasta shells.

Grated cheeses are added to ground beef for the stuffed pasta shells.

Cook The Pasta Shells

In a large pot of boiling salted water, cook the jumbo pasta shells according to package directions.  When the pasta shells are finished cooking, drain them well. Place the drained shells in a single layer on wax paper or parchment paper.

Jumbo pasta shells are cooked before being stuffed with Mexican flavored filling.

Prepare The Filled Mexican Stuffed Pasta Shells For Baking

Place several heaping spoonfuls of enchilada sauce on the bottom of a baking dish (enough to just barely cover the bottom of dish). Fill the cooked pasta shells with the ground beef mixture, then place them into a baking dish in a single layer.

Seasoned meat is stuffed into cooked pasta shells.

Mexican Stuffed Pasta Shells are arranged in dish before baking.

Once all shells are filled and in the baking dish, spoon the rest of the enchilada sauce over the shells to cover.  Sprinkle with the remaining half of the cheddar and jack cheeses.

Mexican Stuffed Pasta Shells are covered with grated cheese before baking.

Bake The Mexican Stuffed Pasta Shells

Cover dish with aluminum foil and bake in preheated 350 degree oven for 25-30 minutes total.  Remove the foil for the last 10 minutes of baking.  Sauce and cheese should be bubbly when done.  Remove dish from oven.

Mexican Stuffed Pasta Shells , right after removing them from oven.

Garnish And Serve The Stuffed Shells!

To serve, top with additional cheese, tomato, cilantro and green onions, for a great splash of color (and added flavor)! This dish will not only taste good… it will look good, too!

Mexican Stuffed Pasta Shells are garnished with tomatoes, cilantro before serving.

Mexican Stuffed Pasta Shells are ready to serve and eat!

Place 2-3 shells onto each individual serving plate, and top each shell with a small dollop of sour cream. Serve… and enjoy!

Mexican Stuffed Pasta Shells are served with a dollop of sour cream on top!

Hope you will consider making these flavor-filled Mexican stuffed pasta shells for an upcoming meal.  I served them with a simple mixed green salad on the side, and they were quite filling. Have a great day!

Looking For More Mexican-Inspired Recipes?

You can find ALL my recipes in the Recipe Index, located at the top of the page. I have lots of delicious, Mexican-inspired recipes you might want to check out, including:

Interested In More Recipes?

Thank you for visiting this website. I appreciate you using some of your valuable time to do soIf you’re interested, I publish a newsletter 2 times per month (1st and 15th) with all the latest recipes, and other fun info. I would be honored to have you join our growing list of subscribers, so you never miss a great recipe!
There is a Newsletter subscription box on the top right side (or bottom) of each blog post, depending on the device you use, where you can easily submit your e-mail address (only) to be included in my mailing list.

You Can Also Find Me On Social Media:

Facebook page: The Grateful Girl Cooks!
Pinterest:
The Grateful Girl Cooks!
Instagram:
jbatthegratefulgirlcooks

Author's signature

0 from 0 votes
Mexican Stuffed Pasta Shells
Prep Time
20 mins
Cook Time
25 mins
Total Time
45 mins
 
Mexican Stuffed Pasta Shells, with seasoned beef, cheese and onion, are baked and topped with cheese, cilantro, tomatoes, and sour cream!
Category: Entree
Cuisine: Mexican
Keyword: Mexican stuffed pasta shells
Servings: 6 servings (3 shells per serving)
Calories Per Serving: 445 kcal
Author: JB @ The Grateful Girl Cooks!
Ingredients
  • 1 pound ground beef
  • 2 green onions (sliced, use green stalk and white bulb)
  • 1 envelope taco seasoning
  • 3 Tablespoons chopped cilantro
  • 1/2 cup grated cheddar cheese , DIVIDED
  • 1/2 cup grated jack cheese , DIVIDED
  • 1 can (19 ounces) red enchilada sauce
  • Approx. 1/2 box jumbo pasta shells (I used 18 shells)
For Garnish (use as little or as much as you desire)
  • Chopped tomato, green onion, cilantro, grated cheddar, and sour cream
Instructions
  1. Preheat oven to 350 degrees. Place several large spoonfuls of enchilada sauce on the bottom of a baking dish (enough to just cover the bottom). Set aside.
  2. Cook ground beef with chopped green onions in large skillet on medium heat. When meat is cooked, drain and discard grease. Add taco seasoning packet and cook according to seasoning package instructions. Once meat has finished cooking, transfer it to a bowl, and let cool down for 4-5 minutes. Discard grease from pan. Add 3 Tablespoons enchilada sauce and HALF of the grated cheddar and jack cheeses to the meat; stir to combine. Set aside.
  3. In a large pot of boiling salted water, cook jumbo pasta shells according to package directions. When pasta is done cooking, drain, then place shells in a single layer on wax paper or parchment paper. Fill cooked pasta shells with the ground beef mixture, then place into baking dish (on top of sauce) in a single layer.
  4. Once all shells are filled and in baking dish, spoon the rest of the enchilada sauce over shells to cover. Sprinkle with the remaining half of the cheddar and jack cheeses.
  5. Cover dish with aluminum foil and bake in preheated 350 degree oven for 25-30 minutes total. Remove foil for the last 10 minutes of baking. Sauce and cheese should be bubbly when done. Remove dish from oven.
  6. To serve, garnish with additional cheese, chopped tomato, chopped cilantro, and green onions, for a great splash of color and flavor! Place 2-3 shells onto each person's plate; top each shell with a small dollop of sour cream. Serve and enjoy!
Nutrition Facts
Mexican Stuffed Pasta Shells
Amount Per Serving (1 serving)
Calories 445
* Percent Daily Values are based on a 2000 calorie diet.

Here’s one more to pin on your Pinterest boards!Mexican Stuffed Pasta Shells, with seasoned beef, cheese and onion, are baked and topped with cheese, cilantro, tomatoes, and sour cream!


Save

Save

Save

Save

Easy Stovetop Macaroni and Cheese

Easy Stovetop Macaroni and cheese is a creamy, delicious, family-friendly comfort food – quick and easy to make in 15 minutes!
Easy Stovetop Macaroni and cheese is a creamy, delicious, family-friendly comfort food - quick and easy to make in 15 minutes!

A friend of ours had surgery recently and I was grateful for the opportunity to take her family dinner once she returned home from the hospital.  My husband grilled some chicken and one of the side dishes I made was this easy macaroni and cheese. I really hoped her two children would enjoy this creamy, cheesy side dish!

A second batch was made for my husband and I because it tasted so GOOD (Yep… I sampled it when I made it for my friends… quality-control)!  The recipe is incredibly simple to make, and if you enjoy satisfying comfort foods, you’ll enjoy this mac and cheese.

My theory is that you can never go wrong with a basic cheese sauce and pasta! Creamy, cheesy, satisfying and delicious are words used to describe this family-friendly recipe for macaroni and cheese! Here’s how easy it is to make this simple dish!

Scroll Down For A Printable Recipe Card At The Bottom Of The Page

How To Make Easy Stovetop Macaroni and Cheese

Cook elbow macaroni (or other small shaped pasta) according to package directions.  While pasta is cooking, in a separate sauce pan, melt butter and stir in flour, salt, onion and garlic powders until well blended.

Melting butter to begin making sauce for macaroni and cheese.

Add milk to pan. Cook on medium-high heat, stirring (or whisking) often, until the mixture comes to a boil.  Turn heat down to low, and continue to simmer (stirring often), until the sauce has thickened. This should take about 2 minutes.

Once sauce has thickened, remove pan from heat. Immediately stir in the grated cheddar cheese and a couple dashes of hot pepper sauce (or more if you like the heat). Stir until cheese has completely melted.

Cooking sauce for macaroni and cheese.

When the pasta has finished cooking, drain, then immediately place hot pasta back into the pan you used to cook it.

Macaroni noodles are cooked before adding cheese sauce.

Time to Add the Sauce

Pour hot, thickened cheese sauce over the hot drained pasta, and stir well to combine.

Cheese sauce is poured over hot macaroni in pan.

Taste test…add additional salt (and pepper), if desired.  I added an extra handful of cheddar cheese at this point, as well (but that is completely optional… we are big cheese lovers!). Stir well to make sure the easy stovetop macaroni and cheese is fully coated with the yummy sauce.

Macaroni and cheese is stirred well, to coat everything with sauce.

That’s all there is to it!  Serve the macaroni and cheese while it is hot… and enjoy a bowl of this creamy, satisfying comfort food! If you like mac and cheese, perhaps you would also be interested in a Pasta, Ham and Gruyere Cheese Casserole (baked), or a Cheesy Ham, Spinach and Macaroni Bake.

NOTE: The leftovers are really good, too. Store in an air-tight container in refrigerator. Before you reheat, you might need to add a tiny bit of milk and stir, to “re-vitalize” it!

Easy Stovetop Macaroni and Cheese served hot, in a bowl.

I hope you can see how EASY it is to make this side dish OR main dish in no time at all!  If you cook the pasta at the same time you’re making the sauce, the whole “cheesy” meal can be ready in about 15 minutes… perfect for a main course, a side dish, or a quick lunch!

I hope you will consider giving this recipe a try!  Be sure to check out ALL my recipes in the Recipe Index, which is located at the top of the page. Have a great day.

Interested In More Recipes?

   Thank you for visiting this website. I appreciate you using some of your valuable time to do soIf you’re interested, I publish a newsletter 2 times per month (1st and 15th) with all the latest recipes, and other fun info. I would be honored to have you join our growing list of subscribers, so you never miss a great recipe!
   There is a Newsletter subscription box on the top right side (or bottom) of each blog post, depending on the device you use, where you can easily submit your e-mail address (only) to be included in my mailing list.

You Can Also Find Me On Social Media:

Facebook page: The Grateful Girl Cooks!
Pinterest:
The Grateful Girl Cooks!
Instagram:
jbatthegratefulgirlcooks

Author's signature

0 from 0 votes
Easy Stovetop Macaroni and Cheese
Prep Time
15 mins
Cook Time
0 mins
Total Time
15 mins
 

Easy Stovetop Macaroni and cheese is a creamy, delicious, family-friendly comfort food - quick and easy to make in 15 minutes!

Category: Entree
Cuisine: American
Keyword: macaroni and cheese
Servings: 6 small servings
Calories Per Serving: 449 kcal
Author: JB @ The Grateful Girl Cooks!
Ingredients
  • 3 cups uncooked elbow macaroni
  • 1 Tablespoon butter
  • 1/4 cup all purpose flour
  • 3/4 teaspoon salt
  • 1/2 teaspoon onion powder
  • 1/4 teaspoon garlic powder
  • 2 cups low-fat milk
  • 1½ cups shredded sharp cheddar cheese
  • couple dashes of hot pepper sauce (approx 1/8 teaspoon)
Instructions
  1. Cook elbow macaroni (or other small shaped pasta) according to package directions.
  2. While pasta is cooking, in a separate sauce pan, melt butter; stir in flour, salt, onion and garlic powders until well blended. Add milk to pan. Cook on medium-high heat, stirring (or whisking) often, until mixture comes to a boil. Turn heat down to low; continue to simmer (stirring often), until sauce has thickened. This should take about 2 minutes. Once sauce has thickened, remove pan from heat. Immediately stir in grated cheese and a couple dashes of hot pepper sauce (or more if you like the heat). Stir until cheese has completely melted.
  3. When pasta has finished cooking, drain, then immediately place pasta back into the pan you used to cook it. Pour the hot, thickened cheese sauce over the hot drained pasta, and stir well to combine. Taste test...add additional salt, if desired. I added an extra handful of cheddar cheese at this point, as well (but that is optional. Stir well to make sure pasta is fully coated with cheese sauce. Serve the macaroni and cheese while it's hot... and enjoy!
Recipe Notes

Serving size is about a cup. If you wish to make this dish lower in calories, consider substituting fat-free skim milk and low-fat cheddar cheese for the ingredients listed.

Nutrition Facts
Easy Stovetop Macaroni and Cheese
Amount Per Serving (1 serving)
Calories 449 Calories from Fat 117
% Daily Value*
Fat 13g20%
Saturated Fat 8g50%
Cholesterol 40mg13%
Sodium 524mg23%
Potassium 293mg8%
Carbohydrates 60g20%
Fiber 2g8%
Sugar 6g7%
Protein 19g38%
Vitamin A 420IU8%
Vitamin C 0.2mg0%
Calcium 313mg31%
Iron 1.4mg8%
* Percent Daily Values are based on a 2000 calorie diet.

Here’s one more to pin on your Pinterest boards!Easy Stovetop Macaroni and cheese is a creamy, delicious, family-friendly comfort food - quick and easy to make in 15 minutes!

Garlic Parmesan Pasta and Shrimp

Garlic Parmesan Pasta and Shrimp is a 30 minute, easy to make dish, with pan-seared shrimp and fettucine noodles in a creamy garlic Parmesan sauce.

Garlic Parmesan Pasta and Shrimp is totally DELICIOUS! I found the recipe for the pasta sauce on Pinterest, and because it was fairly similar to the sauce I usually make, I decided to try it. Pan-seared shrimp were added to the pasta, for a bit of protein and all around flavor!

Once you’ve quickly pan-cooked the shrimp, the rest of the dish is cooked in one pan on the stove top. And guess what? It’s scrumptious! Here’s how easy it is to make this dish:

Scroll down for A Printable Recipe Card At The Bottom Of The Page

Pan-Sear The Shrimp

Peel and de-vein the shrimp, and then season them lightly with salt and pepper. Heat olive oil in a large skillet on medium heat, and add the shrimp.

Sear the shrimp on both sides of olive until done, turning to cook both sides. This will take about 3-5 minutes total, and they will turn pink as they cook. Set the cooked shrimp aside and cover.

Shrimp is pan-seared in olive oil before adding to sauce.

Make The Garlic Parmesan Sauce For The Pasta

Heat olive oil on medium-high in a large skillet. Add the minced garlic to the hot oil, and cook for about a minute, stirring often to prevent burning.  Now add the butter, chicken broth and milk, and whisk these together while the butter melts.

Cooking the garlic parmesan sauce for the pasta.

Add UNCOOKED Fettucine to The Sauce

Place the uncooked fettucine noodles into the sauce, in the skillet. I used my fresh homemade pasta, made from scratch (yippee!). Season to taste, with salt and pepper. Stir in the noodles and simmer (on medium-low heat) until the pasta has completely cooked through. This will take about 15-18 minutes for commercially prepared pasta). 

Stir the pasta and sauce occasionally while it cooks! Once the pasta is cooked through, add some fresh grated Parmesan cheese. Stir well, to combine.  If you find the sauce has thickened too much, simply add a bit more milk, until it’s the thickness you desire.

Uncooked fettucine noodles are added to the sauce and cooked until done.

Add The Cooked Shrimp To The Garlic Parmesan Pasta

Add the cooked shrimp to the pasta and sauce in the skillet. Stir to combine, and cook only until the shrimp are heated through (1-2 minutes).

The pan-seared shrimp are added to the pasta and sauce in a skillet.

Time To Serve The Garlic Parmesan Pasta and Shrimp!

Sprinkle fresh or dried parsley on top of dish before serving, and serve it immediately, while very hot!

Garlic parmesan pasta and shrimp is garnished with parsley and served.

A serving of garlic parmesan pasta and shrimp, in a white bowl.

The sauce is very creamy, with a wonderful garlic and Parmesan flavor, and the pan-seared shrimp adds delicious flavor AND protein to this dish!  We really enjoyed it, and I hope you will give this dish a try!

Looking For More PASTA Recipes?

You can find all of my recipes in the Recipe Index, located at the top of the page. I have lots of pasta recipes, including:

Interested In More Recipes?

Thank you for visiting this website. I appreciate you using some of your valuable time to do soIf you’re interested, I publish a newsletter 2 times per month (1st and 15th) with all the latest recipes, and other fun info. I would be honored to have you join our growing list of subscribers, so you never miss a great recipe!
There is a Newsletter subscription box on the top right side (or bottom) of each blog post, depending on the device you use, where you can easily submit your e-mail address (only) to be included in my mailing list.

You Can Also Find Me On Social Media:
Facebook page: The Grateful Girl Cooks!
Pinterest: The Grateful Girl Cooks!
Instagram: jbatthegratefulgirlcooks
Author's signature

Pasta recipe adapted from: http://damndelicious.net/2014/10/11/one-pot-garlic-parmesan-pasta

0 from 0 votes
Garlic Parmesan Pasta and Shrimp
Prep Time
10 mins
Cook Time
20 mins
Total Time
30 mins
 

Garlic Parmesan Pasta and Shrimp is a 30 minute, easy to make dish, with pan-seared shrimp and fettucine noodles in a creamy garlic Parmesan sauce.

Category: Entree
Cuisine: Italian
Keyword: parmesan pasta and shrimp
Servings: 4 servings
Calories Per Serving: 506 kcal
Author: JB @ The Grateful Girl Cooks!
Ingredients
For Shrimp:
  • 1 Tablespoon olive oil
  • 1 pound large shrimp , peeled, de-veined (lightly seasoned with salt/pepper)
For Pasta and Sauce:
  • 1 Tablespoon olive oil
  • 4 cloves garlic , minced
  • 2 Tablespoons butter
  • 1 cup milk (or more, if needed to thin out sauce later)
  • 2 cups chicken broth
  • Salt/Pepper , to taste
  • 8 ounces uncooked fettucine pasta
  • 1/4 cup fresh grated Parmesan cheese
  • 1 Tablespoon Chopped fresh or dried parsley flakes (approx. 1 T. for garnish, if desired)
Instructions
  1. Heat 1 Tablespoon olive oil in large skillet on medium heat. When oil is hot, add shrimp. Cook on both sides until done (approx 4-5 minutes total time). Transfer shrimp from skillet when done. Cover/keep warm.
  2. To make pasta sauce, heat olive oil on medium-high in a large skillet. Add minced garlic to hot oil; cook for about a minute, stirring often to prevent burning. Add butter, chicken broth and milk; whisk together while butter melts. Season sauce with salt and pepper, to taste.
  3. Stir in the UNCOOKED noodles and simmer (on medium-low heat) until the pasta has completely cooked through (this will take about 15-18 minutes for commercially prepared pasta). Stir mixture occasionally while it cooks!
  4. Once pasta is cooked through, add fresh grated Parmesan cheese. Stir well, to combine. If you find the sauce has thickened too much, simply add a touch more milk until it's the thickness you desire. Add the cooked shrimp to the skillet, stir to combine, and cook only until shrimp are heated through. Garnish hot pasta with a sprinkle of fresh or dried parsley before serving, and serve hot!
Nutrition Facts
Garlic Parmesan Pasta and Shrimp
Amount Per Serving (1 serving)
Calories 506 Calories from Fat 171
% Daily Value*
Fat 19g29%
Saturated Fat 6g38%
Cholesterol 356mg119%
Sodium 1497mg65%
Potassium 437mg12%
Carbohydrates 45g15%
Fiber 2g8%
Sugar 4g4%
Protein 36g72%
Vitamin A 380IU8%
Vitamin C 14.4mg17%
Calcium 346mg35%
Iron 3.9mg22%
* Percent Daily Values are based on a 2000 calorie diet.

Here’s one more to pin on your Pinterest boards!Garlic Parmesan Pasta and Shrimp is a 30 minute, easy to make dish, with pan-seared shrimp and fettucine noodles in a creamy garlic Parmesan sauce.

Hoisin Sriracha Chicken

Chicken thighs get an easy, Asian-inspired twist with sweet, mildly spicy Hoisin Sriracha Chicken! Chicken is quickly marinated, then pan-seared to finish.

I found this Hoisin sriracha chicken recipe on Pinterest and it sounded quite good, so I decided to try it! YUM! This delicious dish only takes about 25 minutes to cook!

Hoisin sauce, honey, soy sauce, and Sriracha sauce, garlic and ginger form the base for a slightly sweet, slightly spicy marinade for plump chicken thighs. Once marinated for 15 minutes, chicken is pan-cooked until done. That’s it! See how easy this recipe is? And wow, it sure tastes GOOD!
Scroll Down for A Printable Recipe Card At the Bottom Of The Page

How To Make Hoisin Sriracha Chicken

Bone-in and skin on chicken thighs were used for this recipe, but you are welcome to use boneless, skinless if you want. Usually I remove the skin from chicken, but found that for this particular recipe, the skin crisps up nicely and really added to the flavor!

If you are using boneless thighs, the cooking time might be a bit less, so keep that in mind while cooking the chicken!

Chicken thighs are ready to go in marinade for Hoisin Sriracha Chicken.

Make Marinade For The Chicken

The Hoisin sriracha marinade is mixed up, and chicken is covered with the sauce.  Let the chicken marinade in the sauce for at least 15 minutes. TIP: Short on time at the end of the day? Mix up the marinade ahead of time. Let hoisin sriracha chicken marinate all day, to make it easier and quicker to prepare this dish at dinner time!

If you’re interested, you might also want to check out my blog post on how to make Homemade Hoisin Sauce (it’s easy, also!). I used it in this recipe!

Marinade for Hoisin sriracha chicken is poured over the thighs.

Cooking Hoisin Sriracha Chicken

Heat oil on MEDIUM heat in a large skillet. Once oil is very hot, remove the chicken from the  from marinade, and let the excess drain off. NOTE: MAKE SURE TO SAVE THE MARINADE!

Add the marinated Hoisin sriracha chicken thighs to the hot skillet, with the skin side facing DOWN. Cook the chicken on both sides, making sure the skin side gets browned very well.

Hoisin Sriracha Chicken pieces are browned in a large skillet.

Add Reserved Marinade To the Skillet

Once both sides of the hoisin sriracha chicken have browned, turn the heat on stove down to LOW. Pour the reserved marinade back into your skillet. Spoon this sauce over the chicken thighs, and continue to cook. As the hoisin sriracha chicken cooks, the sauce will slightly reduce in volume and thicken up  a bit.

Hoisin Sriracha Chicken thighs are cooked in sauce in skillet.

Cook hoisin sriracha chicken until fully cooked through or reaches an internal temp. of 165° F. If using bone-in thighs, the cooking time will be approximately 25 minutes total. The time is slightly less if you’re using boneless thighs. Occasionally spoon some of the sauce over each piece of chicken during the cooking process.

Hoisin Sriracha Chicken are finished cooking when they reach internal temperature of 165 degrees.

Serve The Hoisin Sriracha Chicken

Once chicken is done, remove the pan from the heat. Transfer the chicken to individual serving dishes.  Sprinkle each piece of chicken with white sesame seeds, to garnish.

Two pieces of Hoisin Sriracha Chicken, on plate with broccoli on the side.

Serve immediately while hot, and enjoy the wonderful Asian-inspired flavors of this Hoisin Sriracha Chicken! We enjoy it with steamed brown rice and veggies on the side. YUM!

Hoisin Sriracha Chicken, served on plate with brown rice and steamed vegetables on the side.

I really hope you will consider making Hoisin Sriracha Chicken. The dish was easy to make and was REALLY tasty! I’ve added the Weight Watcher Smart Points per serving in the Notes section of the printable recipe below, for those following their nutrition plan.

We really did enjoy this meal!  Hope you and your family do, too! Have a wonderful day.

Looking For More CHICKEN Recipes?

You can find ALL my recipes in the Recipe Index, located at the top of the page. I have LOTS of delicious chicken recipes you might enjoy, including:

Interested In More Recipes?

Thank you for visiting this website. I appreciate you using some of your valuable time to do soIf you’re interested, I publish a newsletter 2 times per month (1st and 15th) with all the latest recipes, and other fun info. I would be honored to have you join our growing list of subscribers, so you never miss a great recipe!
There is a Newsletter subscription box on the top right side (or bottom) of each blog post, depending on the device you use, where you can easily submit your e-mail address (only) to be included in my mailing list.

You Can Also Find Me On Social Media:

Facebook page: The Grateful Girl Cooks!
Pinterest:
The Grateful Girl Cooks!
Instagram:
jbatthegratefulgirlcooks

Author's signature

Recipe Source:  http://rasamalaysia.com/hoisin-sriracha-chicken/

0 from 0 votes
Hoisin Sriracha Chicken
Prep Time
15 mins
Cook Time
25 mins
Total Time
40 mins
 
Chicken thighs get an easy, Asian-inspired twist with sweet, mildly spicy Hoisin Sriracha Chicken! Chicken is quickly marinated, then pan-seared to finish.
Category: Entree
Cuisine: Asian
Keyword: hoisin sriracha chicken
Servings: 4 servings
Calories Per Serving: 314 kcal
Author: JB @ The Grateful Girl Cooks!
Ingredients
  • 4 large chicken thighs , with bone in and skin on (optional-see note)
  • 1½ Tablespoons hoisin sauce
  • 1 Tablespoon soy sauce
  • 1/2 Tablespoon Sriracha sauce
  • 1 Tablespoon honey
  • 3 cloves garlic (minced)
  • 1 inch piece of fresh ginger (peeled, minced)
  • 1 pinch salt
  • 1 Tablespoon oil
  • White sesame seeds for garnish (optional)
Instructions
  1. Mix hoisin, soy, sriracha, honey, garlic, ginger and salt in a medium bowl; stir to fully combine ingredients. Add chicken to marinade and turn to fully cover; let chicken marinate for 15 minutes.
  2. Heat oil on MEDIUM heat in a large skillet. Once oil is very hot, remove chicken from marinade (**MAKE SURE TO SAVE THE MARINADE), and add to hot skillet with the skin side facing down. Cook chicken on both sides; make sure the skin side gets browned very well.
  3. Once both sides of the chicken have been browned, turn the heat down to LOW. Pour the reserved marinade into skillet. Spoon sauce over chicken thighs, and continue to cook. As chicken cooks, the sauce will slightly reduce in volume and thicken up a bit. Cook until chicken is fully cooked through, or reaches an internal temperature of 165° F. If using bone-in thighs, cooking time will be approximately 25 minutes total... slightly less if no bone. Occasionally spoon a bit of sauce over each piece of chicken during the cooking process.
  4. Once chicken is done, remove pan from heat, and transfer chicken to individual serving plates. Garnish chicken with white sesame seeds, if desired. Serve, and enjoy!
Recipe Notes

Boneless, skinless thighs may be substituted. Cooking time will be slightly less. Cook to internal temperature of 165 degrees (approx. 20 minutes).
Weight Watchers? Bone in with skin = 11 Smart Points per serving. Boneless skinless = 7 Smart Points

Nutrition Facts
Hoisin Sriracha Chicken
Amount Per Serving (1 piece)
Calories 314 Calories from Fat 198
% Daily Value*
Fat 22g34%
Saturated Fat 7g44%
Cholesterol 110mg37%
Sodium 479mg21%
Potassium 250mg7%
Carbohydrates 8g3%
Sugar 6g7%
Protein 19g38%
Vitamin A 90IU2%
Vitamin C 1.9mg2%
Calcium 13mg1%
Iron 0.9mg5%
* Percent Daily Values are based on a 2000 calorie diet.

Here’s one more to pin on your Pinterest boards!Chicken thighs get an easy, Asian-inspired twist with sweet, mildly spicy Hoisin Sriracha Chicken! Chicken is quickly marinated, then pan-seared to finish.

BBQ Chicken Tortilla Pizza

You’re gonna LOVE this BBQ Chicken Tortilla Pizza! Chicken, BBQ sauce, red onion, cilantro and cheese on a baked flour tortilla make a yummy thin crust pizza!You're gonna LOVE this BBQ Chicken Tortilla Pizza! Chicken, BBQ sauce, red onion, cilantro and cheese on a baked flour tortilla make a yummy thin crust pizza!

If you enjoy thin-crust pizza, chances are you will LOVE this BBQ Chicken Tortilla Pizza!  That’s right… the crust is a baked flour tortilla! Tender chunks of chicken, sweet and spicy  BBQ sauce, red onions, cilantro and cheeses combine to make this one amazing tasting dish!

Recently I had an idea to try using a flour tortilla to make a pizza.  I also knew I wanted to make a BBQ sauce based pizza with chicken, red onion, etc. There was no recipe for me to use, but I just made it up as I went along.

Guess what? This BBQ chicken tortilla pizza turned out ABSOLUTELY FANTASTIC! I’m not kidding, we LOVED this pizza! Who knew? Here’s how to make this yummy meal:

Scroll Down For A Printable Recipe Card At the Bottom Of The Page

How To Make A BBQ Chicken Tortilla Pizza

Begin by baking medium sized flour tortillas at 350 degrees on the middle rack of an oven until they are fairly crisp all over. This will take about 10 minutes. Make sure to flip each one over halfway through baking to ensure each tortilla is crisp all over, including in the middle.

Turn the oven to broil. Place the crisp tortillas on the middle rack, about 6 inches from the broiler for 1 minute to slightly brown them.

Tortillas are baked until crispy for pizza crust.

Assembling The BBQ Chicken Tortilla Pizza

Once the tortillas are crisp, spread each tortilla with BBQ sauce (about 1½ to 2 Tablespoons sauce per tortilla). Spread the sauce to within an inch of the edge of the tortilla. This is the BBQ sauce I used to make the BBQ chicken tortilla pizza (photo below), but your favorite BBQ sauce  will be just fine!

Baked tortillas are spread with BBQ sauce first for pizza topping.

Place thin slices of cooked chicken and red onion slices on top of the BBQ sauce. I used leftover cooked chicken breast for the pizza (thighs would also be fantastic).

Cooked chicken pieces and red onion slices top the tortilla pizza.

Sprinkle grated Mozzarella cheese and some sharp cheddar cheese on top of each BBQ chicken tortilla pizza, then garnish with a few cilantro leaves.

BBQ chicken tortilla pizza topped with cheeses and cilantro.

Bake The Pizza

Put the pizzas on a large baking sheet on the middle rack of a preheated 350 degree oven. Bake the BBQ chicken tortilla pizza for 5-6 minutes, until the cheese has melted.

BBQ Chicken Tortilla Pizza hot from the oven.

Carefully slide the pizzas off of the baking sheet, and slice each one into 4 pieces with a pizza cutter. Now the BBQ chicken tortilla pizza is ready to EAT!

We gobbled them up like little piggies because they were sooooo good! The slices will hold their shape easily if the tortillas are nice and crisp before baking.  Go ahead… grab a slice!

BBQ Chicken Tortilla Pizza is sliced with a pizza cutter.

The slightly sweet and spicy taste of the BBQ sauce lends itself well to chicken, red onions and cilantro.  My husband and I were both completely thrilled with the taste of this crazy tortilla pizza!

I really hope you will consider trying this simple recipe… for me it was ridiculously easy and super quick to make, due in part to leftover cooked chicken and extra flour tortillas!  I can hardly wait to make these again for a quick dinner! Have a GREAT day!

Looking For More Pizza Recipes?

You can find all of my recipes in the Recipe Index, located at the top of the page.  You may enjoy a few pizza recipes I have published on my blog, including:

Interested In More Recipes?

Thank you for visiting this website. I appreciate you using some of your valuable time to do soIf you’re interested, I publish a newsletter 2 times per month (1st and 15th) with all the latest recipes, and other fun info. I would be honored to have you join our growing list of subscribers, so you never miss a great recipe!
There is a Newsletter subscription box on the top right side (or bottom) of each blog post, depending on the device you use, where you can easily submit your e-mail address (only) to be included in my mailing list.

You Can Also Find Me On Social Media:

Facebook page: The Grateful Girl Cooks!
Pinterest:
The Grateful Girl Cooks!
Instagram:
jbatthegratefulgirlcooks

Author's signature

0 from 0 votes
BBQ Chicken Tortilla Pizza
Prep Time
10 mins
Cook Time
5 mins
Total Time
15 mins
 
You're gonna LOVE this BBQ Chicken Tortilla Pizza! Chicken, BBQ sauce, red onion, cilantro and cheese on a baked flour tortilla make a yummy thin crust pizza!
Category: Entree
Cuisine: Italian
Keyword: bbq chicken tortilla pizza
Servings: 2 servings
Calories Per Serving: 484 kcal
Author: JB @ The Grateful Girl Cooks!
Ingredients
  • 2 medium flour tortillas
  • 3-4 Tablespoons BBQ sauce , divided
  • 1 large COOKED chicken breast , seasoned with salt/pepper, cut in thin slices, divided
  • thin slices red onion (as many as desired)
  • 1 cup grated mozzarella cheese , divided
  • 1/2 cup grated sharp cheddar cheese , divided
  • 1/4 cup (approximately a handful) cilantro leaves, divided
Instructions
  1. Preheat oven to 350 degrees. Bake flour tortillas on middle rack of oven until fairly crisp all over (approx 10 min) Flip over halfway through baking to ensure each tortilla is crisp all over (especially the middle). Put them under broiler for 1 minute to slightly brown (keeping them on the middle rack not too close to heating element).
  2. Once crisp, remove from oven. Spread each tortilla with BBQ sauce to about an inch from the edge (about 1½-2 Tablespoons sauce per tortilla, or more if desired). Add thin slices of cooked chicken and red onion slices, add grated Mozzarella and cheddar cheese, then sprinkle with a few cilantro leaves.
  3. Place pizzas on a large baking sheet on middle rack of oven; bake at 350 degrees for 5-6 minutes, until cheese has melted. Remove from heat, and cut into slices. Serve and enjoy!
Recipe Notes

May substitute two cooked chicken thighs thinly sliced, for chicken breast.

Nutrition Facts
BBQ Chicken Tortilla Pizza
Amount Per Serving (1 pizza)
Calories 484 Calories from Fat 216
% Daily Value*
Fat 24g37%
Saturated Fat 12g75%
Cholesterol 96mg32%
Sodium 1085mg47%
Potassium 397mg11%
Carbohydrates 28g9%
Sugar 10g11%
Protein 36g72%
Vitamin A 820IU16%
Vitamin C 1.2mg1%
Calcium 657mg66%
Iron 1.7mg9%
* Percent Daily Values are based on a 2000 calorie diet.

Here’s one more to pin on your Pinterest boards!You're gonna LOVE this BBQ Chicken Tortilla Pizza! Chicken, BBQ sauce, red onion, cilantro and cheese on a baked flour tortilla make a yummy thin crust pizza!

Chicken Fajita Rice Bowl

Enjoy this yummy chicken fajita rice bowl, with seasoned chicken, bell peppers, onion, avocado, pico de gallo, cilantro and lime juice on a bed of brown rice.
Enjoy this yummy chicken fajita rice bowl, with seasoned chicken, bell peppers, onion, avocado, pico de gallo, cilantro and lime juice on brown rice.

I recently made a Chicken Fajita Rice Bowl… it was amazing, so I want to share the recipe with you!  I’m sure you’ll love this Weight Watchers meal, too! My favorite type of food is Mexican, so you can imagine how excited I was to try this chicken fajita rice bowl (with a few minor tweaks of my own!).  The best part? Knowing that a delicious, healthy meal can also be loaded with flavor, as this chicken fajita rice bowl is. It’s an entire meal in one bowl! We truly LOVED this dinner.

Seasoned chicken breast, grilled onions and bell peppers, avocado, pico de gallo, cilantro and a  squeeze of fresh lime juice on a bed of brown rice really puts this chicken fajita rice bowl over the top! Yum! There is a LOT of flavor going on here! The recipe has a few steps, but can be easily shortened by using leftover chicken breast and store bought salsa (in place of the homemade pico de gallo).

Scroll Down For A Printable Recipe Card At The Bottom Of The Page

How To Make A Chicken Fajita Rice Bowl

Lightly spray a skillet with non-stick spray.  Sauté the bell pepper and onion on medium-high heat; cook for 4-5 minutes, or until tender.

Cooking onions and peppers in a skillet, for the chicken fajita rice bowl.

Prepare brown rice according to the package directions and set aside, once fully cooked. If you have leftover rice, go ahead and use it (another timesaver!).

Brown rice is cooked for the chicken fajita rice bowl.

Mix the Southwestern spices for the chicken in a small bowl. These spices include chili powder, paprika, garlic powder, cumin, oregano, salt and pepper.

Sprinkle the spices evenly over the chicken slices, and toss to coat. Make sure the chicken is lightly seasoned with the spices on each side.

Spices mixed in bowl to coat chicken for the chicken fajita rice bowl.

Spices are added to chicken breast strips for the chicken fajita rice bowl.

Cook The Seasoned Chicken

Heat a teaspoon of olive oil in skillet on medium heat. When the oil is very hot, add the chicken strips. Cook the chicken for 4-5 minutes on medium heat, turning occasionally. Cook the chicken nicely browned on all sides, and is cooked through. Transfer the cooked chicken to a plate, and set aside.

Seasoned chicken strips are cooked in skillet for the chicken fajita rice bowl.

Make The Pico de Gallo

Prepare pico de gallo (if making homemade or NOT using salsa). I make a simple vesion easily by chopping tomatoes, brown onion, cilantro, a squeeze of lime juice. I season this mixture with salt and pepper, and it only takes a couple minutes to make.

TIMESAVER TIP: Looking to save a little time fixing this dish? Simply use store-bought chunky salsa or pico de gallo.

Pico de gallo in bowl, ready to add to the chicken fajita rice bowl.

When you’re ready to put the chicken fajita rice bowl together, gather the ingredients. You should have grilled peppers and onions, pan-seared chicken, brown rice, pico de gallo (or chunky salsa), avocado, cilantro, diced green chiles, and lime!

Ingredients (peppers, salsa, rice, chicken, avocado, chiles, and lime) are ready to build the chicken fajita rice bowl.

Assemble Each Chicken Fajita Rice Bowl In This Order

  1. Divide brown rice between two bowls.
  2. Top each with half the bell pepper and onions, and 1/4 of the avocado chunks.
  3. Top each bowl with half the chicken and 1 teaspoon chopped green chiles.
  4. Garnish each bowl with pico de gallo (or salsa), a couple lime wedges, and a couple sprigs fresh cilantro.

Photo showing the 4 steps to build the chicken fajita rice bowl.

Time To Eat!

That’s it!  Serve the chicken fajita rice bowl immediately, and enjoy this amazing tasting dinner entree! Doesn’t it look delicious?!

The chicken fajita rice bowl is served in a white bowl, with a lime and cilantro garnish.

This chicken fajita rice bowl tastes GREAT! Even better is knowing that this meal is a fairly low calorie one bowl meal, with chicken, rice and veggies! If you follow a Weight Watchers plan, this Chicken Fajita Rice Bowl (when prepared as written) has a Smart Point total of 7! You can’t beat that, especially when you see and taste how fantastic this dish really is!

Hope you enjoy your chicken fajita rice bowl, because we sure do. Have a GREAT day!

Looking For More ENTREE SALAD Recipes?

You can find all of my recipes in the Recipe Index, which is located at the top of the page. I have some delicious main course salad recipes you might enjoy, including:

Interested In More Recipes?

Thank you for visiting this website. I appreciate you using some of your valuable time to do soIf you’re interested, I publish a newsletter 2 times per month (1st and 15th) with all the latest recipes, and other fun info. I would be honored to have you join our growing list of subscribers, so you never miss a great recipe!
There is a Newsletter subscription box on the top right side (or bottom) of each blog post, depending on the device you use, where you can easily submit your e-mail address (only) to be included in my mailing list.

You Can Also Find Me On Social Media:
Facebook page: The Grateful Girl Cooks!
Pinterest: The Grateful Girl Cooks!
Instagram: jbatthegratefulgirlcooks

Author's signature

Recipe Adapted From:  https://cmx.weightwatchers.com/nui/explore/details2/WWRECIPE:58c0753485fb70cc179c5fb6

0 from 0 votes
Chicken Fajita Rice Bowl
Prep Time
20 mins
Cook Time
5 mins
Total Time
25 mins
 
Enjoy this yummy chicken fajita rice bowl, with seasoned chicken, bell peppers, onion, avocado, pico de gallo, cilantro and lime juice on a bed of brown rice.
Category: Entree
Cuisine: Southwestern
Keyword: chicken fajita rice bowl
Servings: 2 servings
Calories Per Serving: 326 kcal
Author: JB @ The Grateful Girl Cooks!
Ingredients
  • 1 large boneless , skinless chicken breast, halved horizontally, then cut into thin strips
  • 1 teaspoon olive oil
Spices For Chicken:
  • 1/2 teaspoon chili powder
  • 1/2 teaspoon paprika
  • 1/2 teaspoon ground cumin
  • 1/2 teaspoon garlic powder
  • 1/4 teaspoon dried oregano
  • 1/2 teaspoon salt
  • 1/8 teaspoon black pepper
For Salad:
  • 1 cup cooked brown rice
  • 1/4 cup thinly sliced brown onion
  • 1/4 cup EACH uncooked red and green bell pepper , chopped
  • 1/2 Hass avocado , diced
  • 2 teaspoons diced green chiles
  • 1/2 medium fresh lime , cut into 4 wedges
  • 1/2 cup pico de gallo OR fresh salsa
  • 4 sprigs fresh cilantro
Instructions
  1. Lightly spray a skillet with non-stick spray. Saute the bell pepper and onion on medium-high heat; cook for 4-5 minutes, or until tender.
  2. Mix spices for chicken in a small bowl (chili powder, paprika, garlic powder, cumin, oregano, salt and pepper). Sprinkle evenly over chicken slices, and toss to coat. Heat a teaspoon of olive oil in skillet on medium heat. When oil is very hot, add chicken. Cook chicken 4-5 minutes, turning occasionally, until done and nicely browned. Transfer chicken to a plate. Set aside.
  3. Prepare pico de gallo (if making homemade or NOT using salsa). I made some very easily by chopping tomatoes, brown onion, cilantro, a squeeze of lime juice, and seasoned with salt and pepper. Looking to save a little time? Simply use store-bought chunky salsa.
  4. Assemble bowls like this: 1) Divide brown rice between two bowls. 2) Top each with half the bell pepper and onions, and 1/2 of the avocado chunks. 3) Top each bowl with half the chicken and 1 teaspoon chopped green chiles. 4) Garnish each bowl with pico de gallo (or salsa), a couple lime wedges, and a couple sprigs fresh cilantro.
Recipe Notes

If you follow a Weight Watchers plan, this Chicken Fajita Rice Bowl (when prepared as written) has a Smart Point total of 7!

Nutrition Facts
Chicken Fajita Rice Bowl
Amount Per Serving (1 serving)
Calories 326 Calories from Fat 108
% Daily Value*
Fat 12g18%
Saturated Fat 1g6%
Cholesterol 36mg12%
Sodium 1083mg47%
Potassium 619mg18%
Carbohydrates 41g14%
Fiber 6g25%
Sugar 7g8%
Protein 16g32%
Vitamin A 1585IU32%
Vitamin C 41.8mg51%
Calcium 21mg2%
Iron 1.6mg9%
* Percent Daily Values are based on a 2000 calorie diet.

Here’s one more to pin on your Pinterest boards!Enjoy this yummy chicken fajita rice bowl, with seasoned chicken, bell peppers, onion, avocado, pico de gallo, cilantro and lime juice on a bed of brown rice.

Save

Save

Portobello Bleu Cheese Burger

Looking for a flavorful “meatless” burger? Try this marinated Portobello Bleu Cheese Burger, with grilled onions, bleu cheese, and creamy Dijon sauce!Looking for a flavorful "meatless" burger? Try this marinated Portobello Bleu Cheese Burger, with grilled onions, bleu cheese, and creamy Dijon sauce!

You’ve gotta try this delicious Portobello Bleu Cheese Burger! The “meatless” sandwich is easy to make, and tastes wonderful.  Your “Meatless Mondays” will never be the same, with this recipe in your toolbox!!

Now I have to start this blog post by saying that I have never had a portobello burger before. Ever. I’ve had my fair share of of meatless burgers, like black bean  (thanks to one of our sons who is a vegetarian), but never a burger patty made out of a huge portobello mushroom. I love portobello mushrooms, and yes, they are known for their “meaty” taste, but until I tried this recipe, the concept had eluded me. Until now.

I found the recipe on Pinterest for the basic burger part of the recipe, then tweaked the recipe a bit to let me marinate the mushroom before cooking, which gave it additional flavor! I’m a traditional beef burger girl all the way, but was open to trying a meatless version.  The result? A tasty burger, which my husband and I really enjoyed!  Even if you’re not a vegetarian, you will probably enjoy this flavor-filled sandwich.

Scroll Down For A Printable Recipe Card At The Bottom Of The Page

Make The Sauce For The Portobello Bleu Cheese Burger

The first thing you will need to do is make a sauce for the finished burgers.  In a small bowl, combine plain Greek yogurt, olive oil, minced garlic cloves, dijon mustard, dried basil, parsley and salt. Mix the ingredients well, then cover the bowl and refrigerate the portobello bleu cheese burger sauce until you’re ready to use it. Easy!

Mixing up the dijon sauce for a portobello bleu cheese burger.

Prepare The Mushrooms

Wipe mushrooms clean with a damp cloth. Remove stems and gills from underside of mushroom. Clean the gills out by carefully running a small spoon around the underside of the mushroom. Discard the stems and gills, because you won’t need them!

This is what the portobello mushroom caps looked like before they were marinated. Each mushroom is about 4 inches wide (which is perfect size for a standard hamburger bun)!

Two large portobello mushrooms for burgers, ready to marinate.

Make The Marinade For The Portobello Mushrooms

Make a simple marinade for the mushrooms by mixing together olive oil, balsamic vinegar, dried basil, garlic powder, onion powder, and a pinch of salt. Pour the marinade over prepared portobello mushrooms, turning to cover, and let them sit in the marinade for 20 minutes (with mushroom top face down in the marinade most of the time).

The marinade is ready for the portobello mushrooms.

Cook The Portobello Mushrooms

Heat a large skillet on medium-high.  Lightly brush the skillet with olive oil. Add the marinated mushrooms and red onion slices to the hot skillet. Cook the mushrooms for approximately 4 minutes per side, until they are tender and they begin to release their juices.  Cook the onions until they are tender and lightly browned.

Marinated portobello mushrooms and some red onion slices are cooked for burgers.

While the mushrooms cook, split and lightly butter each half of the hamburger buns. Grill them, butter side down in a skillet, until toasted and lightly browned.

Buns are lightly toasted in skillet for portobello bleu cheese burgers.

Assemble The Portobello Bleu Cheese Burger

To assemble each portobello bleu cheese burger, spread a Tablespoon of the herb sauce on the bottom side of a toasted bun.

Dijon sauce is spread on toasted bun for the portobello bleu cheese burger.

Top the bun with the cooked red onion. Place the cooked mushroom on top of the onions with the top (smooth side) down.

Cooked portobello mushroom and blue cheese crumbles are added to hamburger bun.

Sprinkle with some of the bleu cheese crumbles, then cover with a lettuce leaf. Cover the top with the bun, and this delicious portobello bleu cheese burger is ready to eat!

The portobello bleu cheese burger is covered with lettuce and top bun, and is ready to eat!

Hope you enjoy this delicious portobello bleu cheese burger. It is a tasty alternative to a traditional beef burger!  We really enjoyed it and were pleasantly surprised by it’s great flavor! Have a great day.

Looking For More MEATLESS Meals?

You can find all of my recipes in the Recipe Index, located at the top of the page. A few favorites include:

Interested In More Recipes?

Thank you for visiting this website. I appreciate you using some of your valuable time to do soIf you’re interested, I publish a newsletter 2 times per month (1st and 15th) with all the latest recipes, and other fun info. I would be honored to have you join our growing list of subscribers, so you never miss a great recipe!
There is a Newsletter subscription box on the top right side (or bottom) of each blog post, depending on the device you use, where you can easily submit your e-mail address (only) to be included in my mailing list.

You Can Also Find Me On Social Media:

Facebook page: The Grateful Girl Cooks!
Pinterest:
The Grateful Girl Cooks!
Instagram:
jbatthegratefulgirlcooks

Author's signature

Recipe Adapted From: https://www.cleaneatingmag.com/recipes/grilled-portobello-burgers-with-blue-cheese-creamy-dijon

↓↓ PRINTABLE RECIPE BELOW ↓↓

0 from 0 votes
Portobello Bleu Cheese Burger
Prep Time
25 mins
Cook Time
10 mins
Total Time
35 mins
 
Looking for a flavorful "meatless" burger? Try this marinated Portobello Bleu Cheese Burger, with grilled onions, bleu cheese, and creamy Dijon sauce!
Category: Dinner, Vegetarian
Cuisine: American
Keyword: portobello bleu cheese burger
Servings: 2 burgers
Calories Per Serving: 532 kcal
Author: JB @ The Grateful Girl Cooks!
Ingredients
  • 2 large portobello mushrooms (wiped clean, stems and gills removed)
  • 2 slices red onion
  • 1½ Tablespoons olive oil
  • 2 kaiser rolls (or hamburger buns)
  • Butter (for toasting buns)
  • 1/4 cup bleu cheese (crumbled)
  • 2 Romaine lettuce leaves
For Mushroom Marinade:
  • 2 Tablespoons olive oil
  • 2 Tablespoons balsamic vinegar
  • 1/8 teaspoon onion powder
  • 1/4 teaspoon garlic powder
  • 1/4 teaspoon dried basil
For Burger Sauce:
  • 1 Tablespoon plain Greek yogurt
  • 1 teaspoon Dijon mustard
  • 1/2 Tablespoon olive oil
  • 1½ cloves garlic , minced
  • 1 teaspoon dried basil
  • Pinch of salt
Instructions
  1. Make the sauce for the finished burgers. In a small bowl, combine plain Greek yogurt, olive oil, minced garlic cloves, dijon mustard, dried basil and salt. Mix well, then refrigerate (covered) until ready to use.
  2. Wipe mushrooms clean with a damp cloth. Remove stems and gills from underside of mushroom. Clean the gills out by carefully running a small spoon around the underside of the mushroom. Discard gills. Make marinade for mushrooms by mixing together olive oil, balsamic vinegar, dried basil, garlic powder and a pinch of salt. Pour marinade over prepared portobello mushrooms, turning to cover; let them sit in marinade for 20 minutes (with mushroom top face down in marinade most of the time).
  3. Heat a skillet on medium-high. Lightly brush skillet with the olive oil. Add mushrooms and red onion slices to hot skillet. Cook mushrooms 4 minutes per side, until tender. Cook onions until tender and lightly browned.
  4. While mushrooms cook, split and lightly butter each cut side of hamburger buns. Grill them, butter side down in a skillet, until toasted and lightly browned.
  5. To assemble burgers, spread a Tablespoon of the dijon sauce on the bottom side of a toasted bun. Top with cooked red onion, then put the cooked mushroom on top of onions with the top (smooth side) down. Sprinkle with bleu cheese crumbles, then cover with lettuce leaf. Top with bun, and it's ready to eat!
Nutrition Facts
Portobello Bleu Cheese Burger
Amount Per Serving (1 burger)
Calories 532 Calories from Fat 360
% Daily Value*
Fat 40g62%
Saturated Fat 11g69%
Cholesterol 28mg9%
Sodium 547mg24%
Potassium 511mg15%
Carbohydrates 31g10%
Fiber 3g13%
Sugar 8g9%
Protein 11g22%
Vitamin A 2745IU55%
Vitamin C 3.4mg4%
Calcium 192mg19%
Iron 2.7mg15%
* Percent Daily Values are based on a 2000 calorie diet.

Here’s one more to pin on your Pinterest boards!Looking for a flavorful "meatless" burger? Try this marinated Portobello Bleu Cheese Burger, with grilled onions, bleu cheese, and creamy Dijon sauce!

Chicken Wild Rice and Bacon Soup

Chicken wild rice soup, w/ thick-cut bacon, carrots, onions and spices are the backdrop for this easy, delicious, creamy and filling dish!On a cool Fall day, nothing warms you up better than a hearty bowl of Chicken wild rice and bacon soup!  Chicken, wild rice, thick-cut bacon, carrots, onions and spices are the backdrop for this easy, delicious, creamy and filling meal!

On a cool Fall day, nothing warms you up better than a hearty bowl of Chicken wild rice and bacon soup!  Chicken, wild rice, thick-cut bacon, carrots, onions and spices are the backdrop for this easy, delicious, creamy and filling meal!

I found this recipe in a cookbook I bought for my friend Shari last Christmas!  I gave her the cookbook (she LOVES to cook), and cringed just a bit when she said her son had given her the exact same cookbook. It was funny (and kind of sad) when she gave it back to me and told me to keep it. Gadzooks!

Of course, I kept it (a small sacrifice, right?), and I have loved finding new soup recipes for our family in it, including THIS one.  My husband and I loved this amazing Chicken wild rice soup (with bacon)!

Scroll Down for A Printable Recipe Card At the bottom Of the Page

Is This An Easy Soup To Prepare?

The chicken wild rice soup has a rather long cook time (60 minutes) in order to soften the wild rice, but other than that, it was a simple soup to prepare. I recommend this recipe (AND the cookbook) whole-heartedly, and hope you will consider trying it!  Here’s how to make the soup:

How To Make Chicken Wild Rice and Bacon Soup

Cook bacon pieces in a large, heavy pot.  *TIP: I cut the bacon into 1″ strips with kitchen scissors before cooking, because it cooks faster. Simply stack the bacon, then cut through strips with scissors (or sharp knife).

Cook the bacon on medium-high heat until crisp (takes about 5-7 minutes). When done, transfer bacon with a slotted spoon to paper towels to drain. Set aside. Leave bacon grease in pot.

Cooking bacon for chicken wild rice soup.

Place butter, chopped carrot and onion into the pot. Cook on medium-high, stirring often, until carrot begins to soften (about 5-6 minutes).

Carrots and onions are cooked for chicken wild rice soup.

Add minced garlic and dried thyme. Cook for one minute, stirring, so the garlic doesn’t burn. Pour in the white wine. Cook for 3 minutes, stirring often to scrape up any bacon “bits” from bottom of pan (these will add flavor to soup).

Spices and white wine are cooked with vegetables for wild rice chicken soup.

Add Wild Rice And Cook Until Tender

Now add chicken broth and wild rice to pot. Stir to combine. Turn heat down to Low, put a lid on the pot and cook for 60 minutes or until rice is tender.

Wild rice and chicken broth is added to the soup pot.

Once rice is tender, add cooked bacon and chicken to soup. By the way, I quickly cooked the chicken while the soup was cooking, so it was ready to go once the rice was tender. TIP: You can also use rotisserie chicken or leftover baked or boiled chicken to save time, as well!

Chicken and bacon are added to the pot full of chicken wild rice soup.

Add the heavy whipping cream. Stir to combine. Return the chicken wild rice soup to a low simmer; cook soup, uncovered for 5 more minutes, until heated through, and soup has thickened a bit.

Heavy whipping cream is added to the chicken wild rice soup.

Once chicken wild rice soup has heated through, season with salt and black pepper, to taste. Now it’s ready to serve!

The chicken wild rice soup is heated through, then it's ready to eat.

Chicken Wild Rice Soup Is Ready To Serve!

This is how it looked when I ladled it into our soup bowls… doesn’t it look yummy?  Guess what… it TASTES yummy, too! Serve the soup with some crusty french bread, and enjoy!

A bowl full of chicken wild rice soup.

A white bowl, full of chicken wild rice soup, with bacon.

I really hope you will consider trying this soup!  I know it’s hard to look at a picture and wonder if it actually tastes good… but it does!  The kitchen smelled incredibly good, too, while this was cooking!

The leftovers were good for lunch the next day, as well.  You will notice with the leftovers (IF you have any leftovers… wink, wink) that the rice absorbs more of the broth if refrigerated overnight.  Simply add a bit more broth when you reheat the soup, and it will be as good as the first night you made it! Have a great day… and make some SOUP!

Looking for More SOUP Recipes?

You can find ALL of my recipes in the Recipe Index, which is located at the top of the page. I have lots of yummy, comforting homemade soup recipes, including:

Interested In More Recipes?

Thank you for visiting this website. I appreciate you using some of your valuable time to do soIf you’re interested, I publish a newsletter 2 times per month (1st and 15th) with all the latest recipes, and other fun info. I would be honored to have you join our growing list of subscribers, so you never miss a great recipe!
There is a Newsletter subscription box on the top right side (or bottom) of each blog post, depending on the device you use, where you can easily submit your e-mail address (only) to be included in my mailing list.

You Can Also Find Me On Social Media:

Facebook page: The Grateful Girl Cooks!
Pinterest:
The Grateful Girl Cooks!
Instagram:
jbatthegratefulgirlcooks

Author's signature

Recipe Adapted From: The cookbook “Williams-Sonoma Soup Of The Day”, published by Weldon Owen, Inc. and Williams-Sonoma, Inc., 2011, page 61.

0 from 0 votes
Chicken Wild Rice and Bacon Soup
Prep Time
20 mins
Cook Time
1 hr 5 mins
Total Time
1 hr 25 mins
 
Chicken, chewy wild rice, thick-cut bacon, carrots, onions and spices are the backdrop for this delicious, creamy and filling soup!
Category: Soup
Cuisine: American
Keyword: chicken wild rice soup
Servings: 4 servings
Calories Per Serving: 471 kcal
Author: JB @ The Grateful Girl Cooks!
Ingredients
  • 6-7 slices thick cut bacon , cut into 1" strips (use kitchen scissors or sharp knife to cut)
  • 1 Tablespoon butter
  • 1 carrot , peeled and chopped
  • 1 yellow onion (medium), chopped
  • 2 cloves garlic , minced
  • 1/2 teaspoon dried thyme
  • 1/4 cup dry white wine
  • 4 cups chicken broth
  • 1 cup uncooked wild rice
  • 1 chicken breast (skinless, boneless), cooked and chopped (1" chunks)
  • 3 Tablespoons heavy whipping cream
  • Salt and fresh ground black pepper , to taste
Instructions
  1. Cut bacon into 1" strips with kitchen scissors (stack bacon, then cut through strips with scissors or sharp knife). Cook bacon pieces in a large, heavy pot on medium-high heat until crisp (takes about 5-7 minutes). When done, transfer bacon with a slotted spoon to paper towels to drain. Set aside. Leave bacon grease in pot.

  2. Place butter, chopped carrot and onion into the pot. Cook on medium-high, stirring often, until carrot begins to soften (about 5-6 minutes). Add minced garlic and dried thyme. Cook for an additional minute, stirring, so the garlic doesn't burn. Add wine. Cook for 3 minutes, stirring often to scrape up any bacon "bits" from bottom of pan (these add flavor to soup). Add chicken broth and wild rice to pot. Stir to combine. Turn heat down to Low, put a lid on the pot and cook for 60 minutes or until rice is tender.
  3. Once rice is tender, add cooked bacon and chicken to soup. Add heavy whipping cream. Stir to combine. Return soup to a low simmer; cook soup, uncovered, for 5 minutes, until heated through, and soup has thickened a bit. Once soup is heated through, season with salt and pepper, to taste. Serve, and enjoy!
Nutrition Facts
Chicken Wild Rice and Bacon Soup
Amount Per Serving (1 serving)
Calories 471 Calories from Fat 234
% Daily Value*
Fat 26g40%
Saturated Fat 9g56%
Cholesterol 62mg21%
Sodium 1291mg56%
Potassium 669mg19%
Carbohydrates 36g12%
Fiber 3g13%
Sugar 3g3%
Protein 20g40%
Vitamin A 2655IU53%
Vitamin C 20.2mg24%
Calcium 39mg4%
Iron 1.8mg10%
* Percent Daily Values are based on a 2000 calorie diet.

Here’s one more to pin on your Pinterest boards! Chicken wild rice soup, w/ thick-cut bacon, carrots, onions and spices are the backdrop for this easy, delicious, creamy and filling dish!

Smothered Pork Chops

Smothered Pork Chops are pan-seared, then baked until tender and smothered in a rich, thick onion gravy. Full of flavor, you will LOVE these glazed chops!Smothered Pork Chops are pan-seared, then baked until tender and smothered in a rich, thick onion gravy. Full of flavor, you will LOVE these glazed chops!

Smothered Pork Chops, how I love thee! Pan-seared, bone-in pork chops, baked until tender, and smothered in a rich, thick onion gravy. How could I NOT love you?

I found this recipe for smothered pork chops in a cookbook I got for my birthday.  The photo in the cookbook LOOKED really good, and the recipe sounded wonderful, so I gave it a try.  Wow… were they ever YUMMY!  Tender and packed with flavor, this pork chop dinner for two was a winner!

There are a few steps involved in making these smothered pork chops, but it’s actually easy to prepare if you prep everything before beginning. You will LOVE the finished dish! The recipe, as written, serves two, but is EASILY doubled.  Here’s how to make this delicious pork dish:

Scroll Down for A Printable Recipe Card At the Bottom Of The Page

How To Make Smothered Pork Chops

Preheat oven to 300° F.  While oven is preheating, mix paprika, onion powder, salt, pepper, and cayenne pepper in a small bowl.  Pat the pork chops dry with a paper towel, then rub both sides with spice mix, to evenly cover meat.

Bone in pork chops are seasoning with spices before pan-searing.

Place the oil in an ovenproof 10 inch skillet. Heat oil on medium-high heat until it just begins to smoke. Place the chops into the skillet and cook each side 3-5 minutes until well browned. Transfer the chops to a plate and keep warm, but DO NOT clean out skillet.

Pork chops are seared until brown on both sides before baking.

Add butter to the skillet and melt, on medium heat.  Add the onion slices; cook them for 8-10 minutes until well browned.

Onion slices are cooked in butter for smothered pork chops.

Once the onions have browned fully, stir the thyme and minced garlic into the skillet.  Cook, stirring constantly for 30 seconds.

Thyme and garlic is added to cooked onions for smothered pork chops gravy.

Add Broth To Make The Sauce

Add 1/2 cup beef broth (reserve the remaining Tablespoon of broth called for in recipe) and the bay leaf to the skillet. Stir well, making sure to scrape up all those browned bits from the bottom of the skillet (flavor-packed!). Bring this liquid mixture to a simmer in the skillet.

Beef broth is added to cooked onions to make gravy for smothered pork chops.

Bake The Smothered Pork Chops

Place the chops (and any juices that have accumulated on the plate) back into the skillet. Spoon a bit of the sauce over the chops. Cover the skillet, and place the smothered pork chops into the preheated oven.  Bake for 1½ hours, until the pork is tender.

Smothered Pork Chops are baked for 90 minutes in oven.

Making The Sauce AFTER The Pork Chops Have Baked

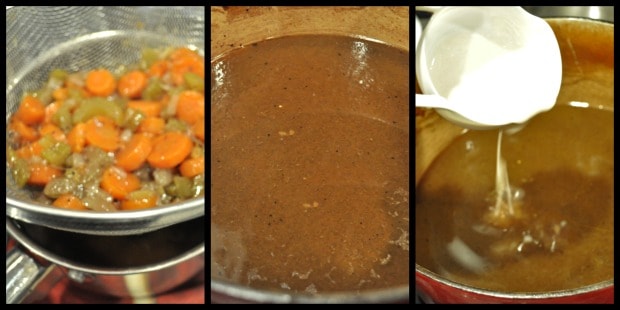
When the pork chops are done, carefully remove the hot skillet from the oven.  Place the chops onto a serving platter, and cover with foil to keep them warm. Pour the liquid from the skillet through a strainer into a medium bowl.

Throw away the bay leaf, then place the remaining onions into a small bowl. As you can see in the photo below, those are onions in the strainer. The liquid has been strained through, into the bowl under the strainer.

Cooked onions are strained with sauce going into a bowl underneath strainer.

Let the liquid settle for a couple minutes, then remove any accumulated fat from the surface of the liquid with a large spoon.  Measure out 1/3 cup of the liquid and put it back into the (still hot) skillet. Bring this to a low simmer.

In a small bowl, whisk together the remaining Tablespoon of beef broth, and the cornstarch until smooth. Add this mixture to the skillet, and whisk to combine. The sauce will thicken slightly as you continue to cook it. Stir the sauce for about a minute. Once slightly thickened, add the onions to the sauce, then season with additional salt and pepper, to taste.

Corn starch is added to onion gravy for smothered pork chops.

Onions and gravy have thickened for smothered pork chops.

Time To EAT!

Spoon the sauce over the smothered pork chops, and serve!  The meat will be extremely tender, and full of FLAVOR!

Smothered pork chops on plate with baked potato and brussel sprouts on the side.

I hope you will consider making this recipe. We absolutely LOVED it!  Don’t be put off by the low and slow baking time- that is what makes the pork chops so tender! If you enjoyed these pork chops, be sure to check out my recipe for Creamy Honey Dijon Pork Chops! They’re sooo good! 

While the smothered pork chops baked, I was able to get the dishes cleaned up and make the side dishes, with no time constraints! I’m very grateful to have found this recipe, and thankful to be able to share it with YOU!

Looking For More PORK CHOP Recipes?

You can find all of my pork chop recipes in the Recipe Index, located at the top of the page. I have some delicious ones, including:

Interested In More Recipes?

Thank you for visiting this website. I appreciate you using some of your valuable time to do soIf you’re interested, I publish a newsletter 2 times per month (1st and 15th) with all the latest recipes, and other fun info. I would be honored to have you join our growing list of subscribers, so you never miss a great recipe!
There is a Newsletter subscription box on the top right side (or bottom) of each blog post, depending on the device you use, where you can easily submit your e-mail address (only) to be included in my mailing list.

You Can Also Find Me On Social Media:

Facebook page: The Grateful Girl Cooks!
Pinterest:
The Grateful Girl Cooks!
Instagram:
jbatthegratefulgirlcooks

Author's signature

Recipe Adapted From: The cookbook: “The Complete Cooking For Two Cookbook, Published 2014 by The Editors at America’s Test Kitchen, pages 151-152.

0 from 0 votes
Smothered Pork Chops
Prep Time
20 mins
Cook Time
1 hr 30 mins
Total Time
1 hr 50 mins
 
Smothered Pork Chops are pan-seared, then baked until tender and smothered in a rich, thick onion gravy. Full of flavor, you will LOVE these glazed chops!
Category: Entree
Cuisine: American
Keyword: smothered pork chops
Servings: 2 servings
Calories Per Serving: 434 kcal
Author: JB @ The Grateful Girl Cooks!
Ingredients
  • 1/4 teaspoon paprika
  • 1/2 teaspoon onion powder
  • 1/4 teaspoon (each) salt and pepper
  • 1/8 teaspoon cayenne pepper
  • 2 (8-10 oz. each) bone-in pork chops (about 3/4-1 inch thick)
  • 1 Tablespoon vegetable oil
  • 1 Tablespoon butter
  • 1 large brown onion , halved (top to bottom), sliced thin
  • 1 clove garlic , minced
  • 1/2 teaspoon fresh thyme, minced , or 1/8th teaspoon dried
  • 1/2 cup plus 1 Tablespoon beef broth
  • 1 bay leaf
  • 3/4 teaspoon cornstarch
Instructions
  1. Preheat oven to 300° F. Mix paprika, onion powder, salt, pepper, and cayenne pepper in a bowl. Pat pork chops dry with a paper towel, then rub both sides with spice mix, to evenly cover meat.
  2. Heat oil in an ovenproof 10 inch skillet on medium-high heat until it barely begins to smoke. Place chops into skillet and cook each side 3-5 minutes until well browned. Transfer chops to a plate; keep warm. Do NOT clean out skillet.
  3. Add butter to same skillet; melt using medium heat. Add onion slices; cook for 8-10 minutes until well browned. Once browned, stir thyme and garlic into skillet. Cook and stir for 30 seconds. Add 1/2 cup beef broth (reserve remaining Tablespoon broth called for in recipe) and bay leaf to skillet. Stir well, scraping browned bits from bottom of skillet (flavor-packed!). Bring to a simmer.
  4. Place chops (and any juices accumulated on plate) back into skillet. Spoon sauce over chops. Cover skillet, and place into oven. Bake for 1½ hours, until pork is tender.
  5. When done, carefully remove hot skillet from oven. Place chops onto a plate; cover with foil to keep warm. Pour the liquid from skillet through a strainer into a medium bowl. Throw away the bay leaf, then place onions into a small bowl. Let liquid in bowl settle a couple minutes, then remove any accumulated fat from surface with a spoon.
  6. Measure out 1/3 cup of the liquid; put it back into skillet. Bring to a low simmer. In a small bowl, whisk the reserved Tablespoon of beef broth and cornstarch until smooth. Add this to skillet, and whisk to combine. The sauce will thicken slightly as you cook and stir, for about a minute. Once slightly thickened, stir onions back into to sauce; season with salt and pepper, to taste. Place chops on plate, and spoon sauce over the top. Serve, and enjoy!
Nutrition Facts
Smothered Pork Chops
Amount Per Serving (1 chop with gravy)
Calories 434 Calories from Fat 252
% Daily Value*
Fat 28g43%
Saturated Fat 14g88%
Cholesterol 132mg44%
Sodium 660mg29%
Potassium 696mg20%
Carbohydrates 7g2%
Sugar 2g2%
Protein 36g72%
Vitamin A 325IU7%
Vitamin C 5.4mg7%
Calcium 45mg5%
Iron 1.3mg7%
* Percent Daily Values are based on a 2000 calorie diet.

Here’s one more to pin on your Pinterest boards!

Smothered Pork Chops are pan-seared, then baked until tender and smothered in a rich, thick onion gravy. Full of flavor, you will LOVE these glazed chops!

Lemon Rosemary Chicken Breasts

Lemon Rosemary Chicken Breasts – low in calories, big in flavor! Marinated and grilled, with a lemon glaze, this easy, delicious chicken is sure to impress!Lemon Rosemary Chicken Breasts - low in calories, big in flavor! Marinated and grilled, with a lemon glaze, this easy, delicious chicken is sure to impress! / The Grateful Girl Cooks!

If you’re looking for a light chicken recipe, you should try Lemon Rosemary Chicken Breasts! Marinated, grilled, and served with a lemon glaze (made from the marinade), this simple, delicious chicken dish is sure to impress!

Scroll Down For A Printable Recipe Card At The Bottom Of The Page

Lemon Rosemary Chicken Breasts Are A Weight Watchers Recipe

I found this lemon rosemary chicken breasts recipe on the Weight Watchers website, and decided to give it a try.  My husband and I loved this dish! Lemon rosemary chicken breasts are low in calories, yet full of flavor, thanks to the incredible marinade and glaze! The recipe is incredibly easy, and the chicken (when prepared as written) counts as 2 WW Smart Points per serving!

TIP: I marinated the chicken EARLY in the day, so that when dinner time came around, all I had to do was grill the chicken and make the quick glaze while the chicken was cooking.  By doing it that way, it was EASY and quick to prepare our evening meal!

Preparing Lemon Rosemary Chicken Breasts

This recipe for lemon rosemary chicken breasts calls for thin chicken cutlets or tenderloins. If you don’t have those handy (which I did not, the day I took these photos), you can easily substitute a thick boneless, skinless chicken breast.

You can cut the chicken breast in half lengthwise horizontally, OR take a thick chicken breast, and cut it in half vertically. Once sliced in half, pound it out thin between two pieces of plastic wrap (see photo below).

Pounding chicken breast with mallet to make cutlet for lemon rosemary chicken.

Prepare Marinade For Chicken

In a medium-sized bowl, place the olive oil, lemon zest, minced garlic, rosemary, thyme, white wine and the chicken broth. Stir well, to combine all of the ingredients. Add the chicken breasts to the lemon marinade. Turn them over to make sure all sides are covered with the marinade.

Lemon marinade for lemon rosemary chicken breasts.

Chicken breast is coated in marinade for lemon rosemary chicken.

Cover the bowl with plastic wrap, and refrigerate the chicken pieces in the marinade for at least 6 hours. TIP: Turn the lemon rosemary chicken breasts a couple of times during the marinating time, to ensure great flavor on all sides of the chicken.

Lemon Rosemary Chicken Breasts in bowl with marinade.

Pan Grilling The Marinated Lemon Rosemary Chicken Breasts

When you’re ready to cook, generously spray a grill or grill pan with non-stick cooking spray (off the heat). Preheat the grill (or grill pan) to medium-high.

Once the grill is hot (but not smoking), transfer chicken pieces from marinade onto hot grill. Importantsave the remaining marinade sauce. Cook for 3-5 minutes per side, or until the lemon rosemary chicken breasts are done and reach an internal temperature of 165 degrees F.

Lemon Rosemary Chicken Breasts are grilled after marinating.

Making The Glaze For Lemon Rosemary Chicken Breasts

While the lemon rosemary chicken breasts are cooking, use the remaining marinade to make a glaze. To make the glaze, combine remaining marinade with 1/2 cup chicken broth in a small saucepan. Heat the sauce on high heat. Bring the lemon sauce to a boil. Continue cooking for about 5 minutes, until glaze has reduced a little in volume, and has slightly thickened.

Marinade is cooked to thicken it into a glaze for lemon rosemary chicken breasts.

Time To Serve The Chicken!

When the lemon rosemary chicken breasts are done, transfer them to a serving platter or plates.  Drizzle the lemon glaze over the cooked chicken, and serve!

Lemon Rosemary Chicken Breasts are served on a platter garnished with lemon wedges and rosemary sprig.

Close up photo of Lemon Rosemary Chicken Breasts on serving platter.

I hope you will consider trying this delicious recipe for lemon rosemary chicken breasts! Have a fantastic day.

Looking For More Chicken Recipes?

I have LOTS of chicken recipes on this website! You can search them by using the Recipe Index at the top of the page. The list includes these and many more chicken recipes:

Interested In More Recipes?

Thank you for visiting this website. I appreciate you using some of your valuable time to do soIf you’re interested, I publish a newsletter 2 times per month (1st and 15th) with all the latest recipes, and other fun info. I would be honored to have you join our growing list of subscribers, so you never miss a great recipe!
There is a Newsletter subscription box on the top right side (or bottom) of each blog post, depending on the device you use, where you can easily submit your e-mail address (only) to be included in my mailing list.

You Can Also Find Me On Social Media:
Facebook page: The Grateful Girl Cooks!
Pinterest: The Grateful Girl Cooks!
Instagram: jbatthegratefulgirlcooks

Author's signature

Original Recipe Source:  https://www.weightwatchers.com/us/recipe/rosemary-lemon-chicken-breasts-1/5626a646a6d5b396107020a6

0 from 0 votes
Lemon Rosemary Chicken Breasts
Prep Time
5 mins
Cook Time
8 mins
Marinating Time
6 hrs
Total Time
6 hrs 13 mins
 

Lemon Rosemary Chicken Breasts - low in calories, big in flavor! Marinated and grilled, with a lemon glaze, this easy, delicious chicken is sure to impress! 

Category: Entree
Cuisine: American
Keyword: lemon rosemary chicken breasts
Servings: 4 servings
Calories Per Serving: 173 kcal
Author: JB @ The Grateful Girl Cooks!
Ingredients
  • 2 Tablespoons olive oil
  • 2 teaspoons lemon zest
  • 2 teaspoons fresh squeezed lemon juice
  • 2 teaspoons fresh rosemary , minced
  • 1 Tablespoon minced garlic
  • 1 teaspoon fresh thyme , minced
  • 1 Tablespoon dry white wine
  • 1/4 cup low-sodium chicken broth
  • 4 boneless skinless chicken breasts , 3 ounces each (thin cutlets OR tenderloins)
  • Non-stick cooking spray
  • 1/2 cup chicken broth (for glaze)
Instructions
  1. In a medium-sized bowl, place olive oil, lemon zest, minced garlic, rosemary, thyme, white wine and the chicken broth. Stir well, to combine ingredients.
  2. Add chicken breasts to marinade. Turn them over to coat all sides. Cover bowl with plastic wrap, and refrigerate chicken in marinade for at least 6 hours.
  3. When ready to cook, generously spray a grill or grill pan with non-stick cooking spray (off the heat). Preheat the grill (or grill pan) to medium-high. Once grill is hot, transfer chicken pieces from marinade onto hot grill (save remaining marinade sauce). Cook 3-5 minutes per side, until chicken is done, and reaches an internal temperature of 165 degrees F.
  4. Use the remaining marinade to make a glaze while the chicken is cooking. To make the glaze, combine the remaining marinade with 1/2 cup chicken broth in a small saucepan. Heat the sauce on high heat. Bring glaze to a boil, and continue cooking for about 5 minutes, until glaze has reduced slightly, and thickened a bit.
  5. When chicken is done, drizzle the glaze over the cooked chicken, and serve!
Recipe Notes

Recipe calls for thin cutlets or tenderloins. If you don't have those handy, you can substitute a thick boneless, skinless chicken breast and cut it in half horizontally lengthwise, OR take a thick chicken breast, and cut it in half vertically, then pound it out thin between two pieces of plastic wrap. WW= 2 Smart Points (freestyle)

Nutrition Facts
Lemon Rosemary Chicken Breasts
Amount Per Serving (1 breast)
Calories 173 Calories from Fat 81
% Daily Value*
Fat 9g14%
Saturated Fat 1g6%
Cholesterol 54mg18%
Sodium 212mg9%
Potassium 366mg10%
Carbohydrates 2g1%
Fiber 1g4%
Sugar 1g1%
Protein 19g38%
Vitamin A 50IU1%
Vitamin C 7.3mg9%
Calcium 11mg1%
Iron 0.5mg3%
* Percent Daily Values are based on a 2000 calorie diet.

Here’s one more to pin on your Pinterest boards!Lemon Rosemary Chicken Breasts - low in calories, big in flavor! Marinated and grilled, with a lemon glaze, this easy, delicious chicken is sure to impress!

Save

Save

Save

Save

Save

Save

Save

Save

Save