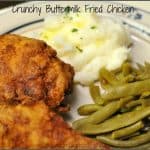
Why pay for a bucket of chicken for dinner when it’s easy to make delicious, crunchy buttermilk fried chicken at home for a fraction of the cost? Today I want to share with you the way I cook Crunchy Buttermilk Fried Chicken. It’s delicious! Really crispy/crunchy on the outside, and moist, tender, and flavorful on the inside!
Scroll Down For A Printable Recipe Card At The Bottom Of The Page
Family Memories With Crunchy Buttermilk Fried Chicken
My Mom and Dad were raised in Texas, and both grew up eating fried chicken. As a result, I also grew up eating my Mom’s fried chicken. In fact, when we drove from Los Angeles to Texas each summer to visit my grandparents, my Mom ALWAYS made fried chicken before we left.
Our family of five didn’t have a lot of money to eat at restaurants back in those days. Mom lovingly packed her crunchy buttermilk fried chicken in an ice chest in the car so we could have it for dinner, along with cheese and crackers.
My husband’s parents were also from Texas, and he loves fried chicken, too. Guess you could say our mutual love of crunchy buttermilk fried chicken part of both of our family heritage!. I guess we both come by our love of Southern style buttermilk fried chicken honestly. I don’t make it too often, but when I do, it’s a delicious “old-school” treat.
How To Cook Buttermilk Fried Chicken
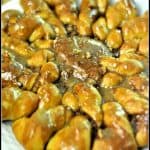
First, mix together a variety of spices with some all purpose flour in a bowl.

Pour cold buttermilk into a separate bowl. Now you should have a bowl of the flour/spice mixture, a bowl of buttermilk, and the chicken (skin on), ready to go.

Time To Batter the Chicken
Coat each piece of chicken on all sides with the flour mixture. I use my clean hands to do this. It will get a little messy, but I can live with that. You can also use tongs.

Next, completely coat each piece of chicken with buttermilk, letting the excess liquid drip back into the bowl.

Put each piece of chicken back into the flour and coat it completely, again. That’s right… this buttermilk fried chicken is double coated.

After the coating of flour/buttermilk/flour has been applied to each piece, I set the chicken on a platter to rest while I wash my flour-coated fingers, and heat up the pan of oil.

Time To Fry The Chicken!
It’s wonderful if you have a large skillet (or large Dutch oven) to cook the chicken in. I put about 3 inches of vegetable oil in the skillet (or pan), and heat it on high until it reaches 370 – 375 degrees. NOTE: It is very important to get the oil this hot to ensure a good crisp coating on the chicken. Be VERY careful… this oil is HOT!

Using tongs, carefully (and GENTLY) place each of the pieces of chicken into the hot oil. It will bubble, etc. The chicken should begin to brown on the bottom pretty quickly. After 4-5 minutes (once golden brown), turn the chicken carefully to the other side. I usually use a splatter screen on top of the skillet to help keep the “splatter” down to a minimum.

Continue to cook chicken, turning and browning for about 5 minutes. After chicken has cooked for about 10 minutes total (since adding the chicken), reduce the heat from high to medium/low and continue cooking an additional 10 minutes.
If you are using extra large pieces of chicken, adapt cooking time to ensure chicken is fully cooked. Chicken should be a wonderful brown color before removing. Place a wire rack on top of some paper towels. The paper towels will help absorb any oil that might drip off the hot chicken.

Hot And Delicious Crunchy Buttermilk Fried Chicken
When the crunchy buttermilk fried chicken is done cooking, carefully remove the pieces to wire rack to cool just a bit.

Serve the chicken with some good ol’ mashed potatoes and a veggie on the side, and you will have comfort food at it’s very best! Enjoy the crunch as you bite into this delicious Southern style crunchy buttermilk fried chicken!
 It’s really not that hard at all to make good old Southern Style Crunchy Buttermilk Fried Chicken. Why pay someone else (KFC) to make it for you when you can make it yourself for a fraction of the cost?
Sure hope you will give it a try! This buttermilk fried chicken is DELICIOUS! Have a great day, and please come back soon.
Looking for More CHICKEN Recipes?
You can find all of my recipes in the Recipe Index, located at the top of the page. I have LOTS of chicken recipes you’ll enjoy, including:
- Honey BBQ Chicken Strips
- Chicken Fried Chicken with Country Gravy
- Chicken And Veggie Stir Fry
- Easy Cashew Chicken
Interested In More Recipes?
Thank you for visiting this website. I appreciate you using some of your valuable time to do so. If you’re interested, I publish a newsletter 2 times per month (1st and 15th) with all the latest recipes, and other fun info. I would be honored to have you join our growing list of subscribers, so you never miss a great recipe!
There is a Newsletter subscription box on the top right side (or bottom) of each blog post, depending on the device you use, where you can easily submit your e-mail address (only) to be included in my mailing list.
You Can Also Find Me On Social Media:
Facebook page: The Grateful Girl Cooks!
Pinterest: The Grateful Girl Cooks!
Instagram: jbatthegratefulgirlcooks

Why pay for a bucket of chicken for dinner when it's easy to make delicious, crunchy buttermilk fried chicken at home for a fraction of the cost?
- 5 Chicken thighs and legs total of 5 pieces (see note)
- 1 1/2 cups all purpose flour
- 1/2 teaspoon salt
- 1/2 teaspoon pepper
- 1/4 teaspoon garlic powder
- 1/4 teaspoon onion powder
- 1/4 teaspoon celery salt
- 1/4 teaspoon dried thyme
- 1/4 teaspoon seasoning salt
- 1 1/2 cups buttermilk
- Vegetable oil (enough for about 3 inches in bottom of pan)
- In a medium bowl, mix together the flour and spices.
- Place the buttermilk in a separate medium bowl.
- Dredge chicken pieces in flour to coat all sides.
- Dredge chicken pieces in buttermilk to coat all sides.
- Re-dredge chicken pieces in flour to coat all sides. Lay chicken pieces on platter to rest while oil is heating.
- In a large skillet or large Dutch oven, pour enough vegetable oil to cover bottom with about 3 inches of oil. Turn heat to high, and heat until oil reaches 370 or 375 degrees F.
- When oil temperature is at 370 degrees, carefully add chicken pieces to hot oil, using tongs. Let cook for 4-5 minutes (should start to turn golden brown on bottom), then carefully turn each piece of chicken over and cook for an additional 4-5 minutes.
- After chicken has cooked for 10 minutes, reduce heat to medium/low and continue cooking (and turning) chicken for an additional 10 minutes. Chicken should be medium brown and cooked through when time is up. Remove chicken with tongs to a wire rack (which is on top of paper towels), to drain and cool down just a bit.
- Serve chicken with side dishes of your choice, and enjoy the crunch!
If you are going to be cooking a large quantity of chicken, you will need to increase the amount of flour/spice mixture, and buttermilk slightly to adequately cover all the chicken.
Nutrition calculation is based on 5 chicken thighs (bone-in). Caloric count will be lower if using chicken legs and/or breasts. Oil that chicken is cooked in was not factored into caloric calculation (as almost all of oil is for cooking, and is not eaten)
Here’s one more to pin on your Pinterest boards!


, so there's plenty for everyone to enjoy! / The Grateful Girl Cooks!")


, so there's plenty for everyone to enjoy! / The Grateful Girl Cooks!")


