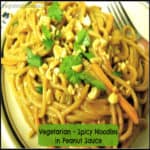
Flourless, 3 Ingredient Peanut Butter Cookies

Easy and DELICIOUS is how I would describe these flourless peanut butter cookies, with only 3 ingredients! I admit, I was a skeptic… until I tried them!
Easy and DELICIOUS is how I would describe these flourless peanut butter cookies, with only 3 ingredients! I admit, I was a skeptic... until I tried them!These peanut butter cookies were wonderful… (how did I not know this all these years????)  I saw this recipe pop up on my Pinterest feed, and thought there was no way these could be truly tasty, but I was completely WRONG.

The recipe makes between 15 and 18 flourless peanut butter cookies, and took only 20 minutes from start to finish! Not bad for a kitchen experiment! I’ve posted some photos of the whole process, but trust me… it all boils down to this: mix the ingredients, place by spoonfuls onto baking sheet, flatten with sugar-dipped fork, bake, and EAT!

Scroll Down For A Printable Recipe Card At The Bottom Of The Page

How To Make These Yummy Flourless Peanut Butter Cookies

Here you go… some quick pics of the “process”… so easy! Here are the three ingredients for flourless peanut butter cookies ready to mix: peanut butter, egg, and sugar. THAT’S IT!

Ingredients for cookies (peanut butter, eggs, and sugar), in white bowl

The dough for the peanut butter cookies is mixed up using a spoon… then is ready to drop by spoonfuls onto baking sheet.

Peanut butter cookie dough is mixed in white bowl

The cookie dough balls are rounded off, then scored criss-cross with a sugar-dipped fork, and then are ready to put into the preheated oven…

The flourless cookies, on baking sheet, ready to put in oven

Who Wants Some Flourless Peanut Butter Cookies To Eat?

When the peanut butter cookies are golden brown and finished baking, they are transferred to a wire rack to cool, then they are ready to eat! YES!

Close up of baked peanut butter cookies

See? Even the bottoms of the peanut butter cookies look good. I’m not kidding… they are really quite tasty!

Bottom, browned side of flourless peanut butter cookie

That’s it! Trust me, these peanut butter cookies are ridiculously EASY and seriously GOOD. You won’t even miss the flour. Hope you’ll give these simple cookies a try. I’m confident you’ll be as surprised as I was at how good they are!

If you enjoy these flourless peanut butter cookies, be sure to also check out my recipe for flourless chocolate cake! It is really delicious, too!

Looking For More COOKIE Recipes?

If you enjoy these peanut butter cookies, you might also be interested in some of my other cookie recipes, including a Giant Chocolate Chip Cookie Pizza, Butterscotch Chip, Butter Pecan Crisps,Chocolate Crinkle, Cinnamon Chip, Date Roll, Peanut Butter Chocolate Chip n’ Nut Cookies, or Giant Sugar Cookies, to name a few. All of my cookie recipes can be found in the Recipe Index, located at the top of the page.

Interested In More Recipes?

Thank you for visiting this website. I appreciate you using some of your valuable time to do soIf you’re interested, I publish a newsletter 2 times per month (1st and 15th) with all the latest recipes, and other fun info. I would be honored to have you join our growing list of subscribers, so you never miss a great recipe!
There is a Newsletter subscription box on the top right side (or bottom) of each blog post, depending on the device you use, where you can easily submit your e-mail address (only) to be included in my mailing list.

You Can Also Find Me On Social Media:

Facebook page: The Grateful Girl Cooks!
Pinterest:
The Grateful Girl Cooks!
Instagram:
jbatthegratefulgirlcooks

Author's signatureOriginal Recipe source: http://www.aroundmyfamilytable.com/2010/10/flourless-peanut-butter-cookies/

↓↓ PRINTABLE RECIPE BELOW ↓↓

0 from 0 votes
Flourless, 3 Ingredient Peanut Butter Cookies
Prep Time
5 mins
Cook Time
14 mins
Total Time
19 mins
 
Easy and DELICIOUS is how I would describe these flourless peanut butter cookies, with only 3 ingredients! I admit, I was a skeptic... until I tried them!
Category: Cookies
Cuisine: American
Keyword: flourless peanut butter cookies
Servings: 18 cookies
Calories Per Serving: 130 kcal
Author: JB @ The Grateful Girl Cooks!
Ingredients
  • 1 cup peanut butter (creamy or crunchy- I used crunchy)
  • 1 cup granulated sugar (reserve 1 teaspoon)
  • 1 egg
Instructions
  1. Preheat oven to 350 degrees. Spray a large baking sheet with non-stick spray.
  2. Mix the peanut butter, sugar and egg together in a large bowl. Combine thoroughly.
  3. Drop the dough by rounded teaspoons onto prepared baking sheet. Slightly round out the dough with your fingers, once on baking sheet.

  4. Lightly moisten a fork with water. Dip it into a tiny bit of sugar, and press the tines of the fork crosswise (two different directions) into top of each dough ball to flatten. Repeat for each cookie.

  5. Bake cookies at 350 degrees for about 14 minutes. Do not let cookies overbake or get too brown. When done, transfer cookies to a wire rack to cool. Enjoy!

Nutrition Facts
Flourless, 3 Ingredient Peanut Butter Cookies
Amount Per Serving (1 cookie)
Calories 130 Calories from Fat 63
% Daily Value*
Fat 7g11%
Saturated Fat 1g6%
Cholesterol 9mg3%
Sodium 69mg3%
Potassium 96mg3%
Carbohydrates 13g4%
Sugar 12g13%
Protein 3g6%
Vitamin A 15IU0%
Calcium 8mg1%
Iron 0.3mg2%
* Percent Daily Values are based on a 2000 calorie diet.

Here’s one more to pin onto your Pinterest boards!Easy and DELICIOUS is how I would describe these flourless peanut butter cookies, with only 3 ingredients! I admit, I was a skeptic... until I tried them!


Save

Save

A Thankful Heart…

Having a thankful heart is my desire. Sometimes life doesn’t go exactly the way I “think” it should go… do YOU ever have days or weeks like that? I have… and so have many of my friends and family members, several of whom I’ve talked with recently about this very thing.A Thankful Heart... / The Grateful Girl Cooks!
If we’re being honest, we ALL have times in our lives like that. You know… times where you can’t see the forest for the trees…and our focus starts becoming “Out Of Focus”.. I love this quote by Henry Ward Beecher. It inspires me!

At times when life gets a bit out of focus, I hold on to my faith tightly and pray that God will give me eyes to see all the blessings around me that I tend to “forget” when I focus only on the challenges or troubles I am facing. This, in itself, can be a challenge, but I find it extremely helpful to pull back the magnifying glass a bit and take a look at the much bigger picture. It sure helps my perspective, attitude, etc. become much clearer.

I keep a Gratitude journal. It keeps me well-grounded, because it is a great discipline I’ve practiced for years to remind me to open my eyes, take a good, hard look around and realize just how truly blessed my life is. I try to write a few things I am thankful for in it each morning. My entire life I’ve always thought it was important to say “Thank You” to the people in my life who have blessed, inspired, challenged, and loved me. I feel it is just as important to tell the God who made me and blesses me with more than I deserve a big “Thank You” each day I have breath. It’s also  encouraging to look back at my journal over time and see a visual reminder of the many ways God has brought me through a tough time OR to be reminded how many things I have to be truly thankful for.

A Thankful Heart / The Grateful Girl Cooks!
If you don’t already keep a Gratitude Journal, I would humbly suggest you give it a try. You don’t need any fancy “stuff”… Seriously… I just use a spiral bound notebook for my gratitude journal. It’s not what you write it on, it’s what you write on it.

Discipline yourself to list out blessings daily, as they come to mind. Then thank God for bringing them into your life. “Give thanks to the Lord, for He is good; His love endures forever.” (Psalms 107:1) Blessings are all around, if we’ll just take the time to search them out and name them  It’s a great way to stay centered, and have a grateful, thankful heart for God’s many blessings. And that, in my humble opinion, is the best blessing to have!

Author's signature

.


Save

Save

Mom’s Apple Cake

Mom’s Apple Cake is a classic family dessert OR coffeecake, with fresh baking apples, cinnamon and pecans (or walnuts). Easy to prepare, and tastes delicious!Mom's Apple Cake is a classic family dessert OR coffeecake, with fresh baking apples, cinnamon and pecans (or walnuts). Easy to prepare, and tastes delicious!
I’m gonna let you in on a little secret….shhh… don’t tell. My Mom’s Apple Cake is amazing! Seriously. It’s packed with fresh apples and cinnamon, and is so moist, you don’t need to “fancy it up” with any extra frosting. It’s absolutely perfect just the way it is, for dessert OR as a coffeecake!

Scroll Down for A Printable Recipe Card At The Bottom Of The Page

Our Family History With This Apple Cake

My mom used to make this cake for our family as I was growing up, and this simple recipe has been in my collection for over 35 years. I don’t know where she got the original recipe, but I DO KNOW that it is absolutely delicious, and is perfect anytime, but especially in the Fall!

The recipe is super simple to make, and you probably already have the ingredients in your home. My mom always makes this cake in a 13×9 inch cake pan (I’ve made it this way for decades). This time I tried making it in a spring form pan and 2 miniature spring form pans (just as an experiment). They turned out PERFECT!

Result…ALWAYS fantastic, no matter WHAT you bake it in. This is a great dessert cake, but is equally good in the morning with a cup of good coffee. Well, someone had to try it for breakfast…*cough, cough*…I don’t mind “taking one for the team”). Here’s a few pics taken while making this yummy apple cake.

Making Mom’s Apple Cake

Mix the eggs, oil and sugar together in a large bowl. A whisk works very well!

Eggs, sugar and oil are mixed together to make batter for apple cake.

Add the sifted dry ingredients to the liquid ingredients in the bowl. EASY!

Dry ingredients are sifted into the cake batter.

The apple cake dough is a very thick dough. You will want to mix it up well, by hand.

The batter for Mom's apple cake is very thick.

Add the vanilla, peeled and chopped apples and nuts, and mix them into the dough. Keep stirring that thick batter until all ingredients are fully incorporated.

Apples, nuts and vanilla are added to the thick cake batter.

Time To Bake Mom’s Apple Cake!

Spread the cake batter into your prepared pan(s), and then bake until done (approximately 55 minutes). I used a little of the cake batter to make two small individual cakes at the same time! NOTE: Mom’s apple cake can also be made in a standard sized 13×9 inch baking pan.

The cake batter is spread into prepared baking pans.

Look how cute the miniature cakes turned out! I’m giving these little apple cakes to some of our friends!

Made tiny versions of the apple cake to give to friends.

Time To Serve Mom’s Apple Cake!

Yum… all I need now is some coffee to go with a nice slice of Mom’s Apple Cake! Once the cake has cooled, lightly sift powdered sugar over the top. You can also garnish it with mint sprigs and dried apple slices, if desired.

A side view of Mom's apple cake.

Here is a nice slice of cake, ready to serve. Wow – this slice of Mom’s apple cake looks so good! See all the apple chunks? YUM!

A piece of Mom's apple cake, on a plate, ready to eat!

Sure hope you’ll try this apple cake. It is absolutely FANTASTIC, and I know you’re gonna LOVE it! Thanks, Mom, for another great childhood recipe!

If You Enjoy Mom’s Apple Cake, You Will Like These Cake Recipes, Too!

If you enjoy baking or simply EATING cake, be sure to check out my other cake recipes on this blog, including German Chocolate, Raspberry Lemon, Poppyseed, Lemon, Hummingbird, Gingerbread, Carrot and Mom’s Easy Chocolate Cake. You can find ALL my recipes in the Recipe Index, located at the top of the page.

Collage of cakes with recipes on "The Grateful Girl Cooks!" blog.

Interested In More Recipes?

Thank you for visiting this website. I appreciate you using some of your valuable time to do soIf you’re interested, I publish a newsletter 2 times per month (1st and 15th) with all the latest recipes, and other fun info. I would be honored to have you join our growing list of subscribers, so you never miss a great recipe!
There is a Newsletter subscription box on the top right side (or bottom) of each blog post, depending on the device you use, where you can easily submit your e-mail address (only) to be included in my mailing list.

You Can Also Find Me On Social Media:

Facebook page: The Grateful Girl Cooks!
Pinterest:
The Grateful Girl Cooks!
Instagram:
jbatthegratefulgirlcooks

Author's signature

↓↓ PRINTABLE RECIPE BELOW ↓↓

0 from 0 votes
Mom's Apple Cake
Prep Time
15 mins
Cook Time
55 mins
Total Time
1 hr 10 mins
 
Mom's Apple Cake is a classic family dessert OR coffeecake, with fresh baking apples, cinnamon and pecans (or walnuts). Easy to prepare, and tastes delicious!
Category: Dessert
Cuisine: American
Keyword: Mom's apple cake
Servings: 12 slices
Calories Per Serving: 354 kcal
Author: JB @ The Grateful Girl Cooks!
Ingredients
  • 3 cups all purpose flour
  • 1 teaspoon salt
  • 1 teaspoon baking soda
  • 1 teaspoon cinnamon
  • 2 eggs
  • 2 cups granulated sugar
  • 1 1/4 cups vegetable oil
  • 1 teaspoon vanilla
  • 3 cups Granny Smith apples (chopped ) (approximately 4-5 small)
  • 1 cup chopped walnuts or pecans
Instructions
  1. Preheat oven to 350 degrees.
  2. In a large mixing bowl, beat eggs, oil and sugar together by hand until well blended. Add sifted dry ingredients. Stir until well blended. Dough will be stiff... just keep on stirring! Add vanilla, chopped apples and nuts. Stir well until thoroughly combined. Dough will be stiff.

  3. Grease and flour a Springform pan, plus two miniature springform pans (or use a greased and floured 13x9 inch baking pan). Spread batter evenly in baking pan.

  4. Bake at 350 degrees for 55 minutes (for regular sized springform pan) *SEE NOTES SECTION FOR BAKING TIMES, IF USING OTHER TYPES OF BAKING PANS*
Recipe Notes

*BAKING TIMES:
1 regular-sized Springform pan = 55 minutes 
Miniature Springform pans = 40 minutes
13 x 9 inch cake pan = 1 hour

Nutrition Facts
Mom's Apple Cake
Amount Per Serving (1 (one 12th of total))
Calories 354 Calories from Fat 81
% Daily Value*
Fat 9g14%
Saturated Fat 2g13%
Cholesterol 27mg9%
Sodium 205mg9%
Potassium 119mg3%
Carbohydrates 63g21%
Fiber 2g8%
Sugar 36g40%
Protein 5g10%
Vitamin A 55IU1%
Vitamin C 1.6mg2%
Calcium 22mg2%
Iron 1.9mg11%
* Percent Daily Values are based on a 2000 calorie diet.

Here’s one more to pin on your Pinterest boards!Mom's Apple Cake is a classic family dessert OR coffeecake, with fresh baking apples, cinnamon and pecans (or walnuts). Easy to prepare, and tastes delicious!


Save

Save

Save

Save

Miracle Bread

You’re gonna love this easy, homemade Miracle Bread. The recipe makes two loaves and is so easy, even my son can make it! That’s gotta be some kind of MIRACLE!You're gonna love this easy, homemade Miracle Bread. Recipe makes two loaves and is so easy, even my son can make it! That's gotta be some kind of MIRACLE!Today I am sharing a recipe I’ve used for making homemade French bread loaves the last couple of years. It’s called “Miracle Bread” and it is DELICIOUS!

Scroll Down For A Printable Recipe Card At The Bottom Of The Page

I found the recipe for this easy, simple French bread on the internet, from Gina at Home Joys. I’ve made it at least 10 times since then, and can heartily recommend this, EVEN if you’ve never baked bread before! The slices are fantastic toasted, or they can be used to make French Toast, also (YUM).

Miracle bread can be used to make French toast!
Miracle Bread Is So Easy To Make… It’s A Miracle!

I guess that’s the Miracle of it… even if you’ve NEVER made homemade bread before, you can make this delicious, and amazingly simple bread to enjoy! The loaves are wonderful sliced and warm, with butter. The recipe makes two loaves, so you can eat one and give the other one away (or freeze for later), if you want!

I love to bake this bread, especially in the Fall. One year I baked 8 loaves and wrapped them up really nicely and surprised several neighbors on our street and some friends with a loaf of warm, freshly baked Miracle bread.

Loaves of miracle bread, wrapped to give to friends!

It’s So Easy To Make Miracle Bread, Even Our Son Can Make It!

A couple years ago I taught our youngest son and his girlfriend how to make miracle bread! Some of the pictures shown below are from this fun morning! I sure hope you will try this recipe. You’ll be surprised at just how easy it is to make fresh, homemade Miracle Bread!

Okay… we’ve mixed the dough all together. I guess now we have to wait for it to rise? YEP! I personally think they are really cute bread makers!

Our son and girlfriend mixing up dough for miracle bread.

Okay… this dough has risen and is rolled out. Are you saying I’m now supposed to roll this dough thing up like a log?

Our son rolling the dough to make a loaf of miracle bread.

Rolling the miracle bread dough up… like a boss!

Rolling dough for miracle bread into a loaf shape.

Now It’s Time To Bake The Miracle Bread!

Okay… the dough is rolled out, formed into loaves, and diagonal slits have been made on top of the loaves, and the dough has risen again. Time to bake!!!! Bake the bread for 15-20 minutes, and then it is DONE!

Miracle bread loaves ready to go into oven.

Hey- guess what? We just made homemade French bread… It’s a MIRACLE! Miracle Bread, that is!

Our son and his girlfriend each made a loaf of homemade miracle bread!

Ready To EAT!

The golden brown loaves of Miracle Bread sure look good, straight out of the oven! I sure could slice a piece right now, and gobble it up (with some butter, of course).

Two loaves of baked miracle bread, fresh from the oven!

Time for a warm slice, with some butter! Isn’t it nice looking? Yay- we have Miracle Bread success!

A slice of miracle bread, ready for some butter!

Don’t be afraid to try this “no kneading necessary” miracle bread. If you can stir ingredients, and roll out dough, you CAN make this! Most of the prep time involved is really just the sitting around, waiting for the dough to rise.

Simply go ahead and get lots of other things accomplished while waiting… and STILL end up with two delicious loaves of home baked bread (and an incredible smelling home)! You’ll be the hero of the day when your family sits down and enjoys your freshly baked miracle bread! Enjoy!

Looking For More BREAD Recipes?

You can find all of my bread recipes in the Recipe Index, located at the top of the page. A few favorites include:

Interested In More Recipes?

Thank you for visiting this website. I appreciate you using some of your valuable time to do soIf you’re interested, I publish a newsletter 2 times per month (1st and 15th) with all the latest recipes, and other fun info. I would be honored to have you join our growing list of subscribers, so you never miss a great recipe!
There is a Newsletter subscription box on the top right side (or bottom) of each blog post, depending on the device you use, where you can easily submit your e-mail address (only) to be included in my mailing list.

You Can Also Find Me On Social Media:

Facebook page: The Grateful Girl Cooks!
Pinterest:
The Grateful Girl Cooks!
Instagram:
jbatthegratefulgirlcooks

Author's signatureOriginal Recipe Source: http://homejoys.blogspot.com/2011/01/miracle-bread.html

↓↓ PRINTABLE RECIPE BELOW ↓↓

3 from 1 vote
Miracle Bread
Prep Time
2 hrs 30 mins
Cook Time
15 mins
Total Time
2 hrs 45 mins
 
You're gonna love this easy, homemade Miracle Bread. Recipe makes two loaves and is so easy, even my son can make it! That's gotta be some kind of MIRACLE!
Category: Bread
Cuisine: American
Keyword: miracle bread
Servings: 20 slices (2 loaves)
Calories Per Serving: 156 kcal
Author: JB @ The Grateful Girl Cooks!
Ingredients
  • 1/2 cup warm water
  • 2 Tablespoons active dry yeast
  • 2 Tablespoons sugar (or honey)
  • 2 cups warm water
  • 2 Tablespoons melted butter
  • 2 teaspoons table salt
  • 6-7 cups all purpose flour (will use 6 cups plus more, if necessary)
  • Non-stick spray (or a bit of oil)
  • 1 egg
  • 2 Tablespoons milk
  • Sesame seeds , if desired, for garnish
Instructions
  1. In a small bowl, mix together 1/2 cup warm water with the yeast and sugar (or honey). Stir until the yeast has fully dissolved. Let sit for a 3-4 minutes.
  2. In a large bowl, mix together 2 cups warm water, 2 Tablespoons melted butter, and the salt. When fully mixed, add the yeast/water mixture from the small bowl. Stir to combine well.
  3. Add 6 cups of all purpose flour to dough mixture. Stir well by hand until fully combined (or use a dough hook and stand mixer). If the dough is way too sticky, add a bit more flour a little at a time, until mixture is not sticky.
  4. Form the dough into a ball. Spray a large bowl with non stick spray, or lightly oil the bowl. Add the dough ball to the bowl; turn dough over, to coat sides with spray (or oil).
  5. Cover bowl with a tea towel, and let rise for 30-60 minutes in a warm place, free from drafts. The dough should double in size. Once doubled in size, divide the dough in half.
  6. Roll each half section of dough out (like making a pie!) on a very lightly floured work surface. Shape the dough into a 9-10 inch long rectanglular shape. Using your (clean) hands, roll up the dough, starting with the long edge of the dough and roll tightly up into a loaf shape. Tuck the edges in slightly and carefully place the "loaf" onto a greased or sprayed baking sheet (large enough for two loaves!). Repeat process with other half of dough and place a couple inches apart from other loaf on prepared baking sheet.
  7. Using a very sharp knife, make diagonal slits (about an inch deep) across the tops of each loaf. Cover the loaves with a tea towel and let the dough rise again, for one hour, or until dough loaves have doubled in size. Preheat your oven to 425 degrees during the last 15 minutes of rising time.
  8. In a small bowl, beat together the egg and 2 Tablespoons milk. Using a pastry brush, lightly brush this mixture over the top of each loaf. Sprinkle each loaf with sesame seeds (or can substitute poppy seeds, if desired).
  9. Bake bread at 425 degrees for 15-20 minutes, or until golden brown on top. Remove loaves to wire racks. Let bread cool slightly before slicing, for best results. Enjoy!
Nutrition Facts
Miracle Bread
Amount Per Serving (1 slice)
Calories 156 Calories from Fat 9
% Daily Value*
Fat 1g2%
Cholesterol 11mg4%
Sodium 247mg11%
Potassium 48mg1%
Carbohydrates 30g10%
Fiber 1g4%
Sugar 1g1%
Protein 4g8%
Vitamin A 45IU1%
Calcium 9mg1%
Iron 1.8mg10%
* Percent Daily Values are based on a 2000 calorie diet.

Here’s one more to pin on your Pinterest boards!You're gonna love this easy, homemade Miracle Bread. Recipe makes two loaves and is so easy, even my son can make it! That's gotta be some kind of MIRACLE!


Save

Save

Save

Rich Chocolate Mini-Cakes

Made in mini-muffin pans, you will LOVE these fudgy, rich chocolate mini-cakes, drizzled with white chocolate icing. Recipe makes 24 decadent treats!Made in mini-muffin pans, you will LOVE these fudgy, rich chocolate mini-cakes, drizzled with white chocolate icing. Recipe makes 24 decadent treats!

Sweet, dense, fudgy, amazingly delicious! These are just a few of the words I would use to describe these Rich Chocolate Mini-Cakes! I found this recipe online at Hershey’s Kitchens several years ago, and am sure glad I did!

Recently I made these for a chocolate-themed dinner party with friends. I was responsible for bringing several chocolate-based treats, and this is one of the “small bite” desserts I made.

I don’t have photos of them while I prepared them, but they are easy enough to make with the instructions below.

Scroll Down For A Printable Recipe Card At The Bottom Of The Page

Why We Love These Rich Chocolate Mini-Cakes

These miniature “chocolatey” cakes are rich and decadent. They are made in miniature muffin tins, so this recipe makes 24 mini-cakes. Each cake may be fairly small in size, but they make up for it in FLAVOR! They are unbelievably moist, dense, and completely, ridiculously, “chocolatey”!

The rich chocolate mini-cakes were a cinch to make and were perfect, small bite treats to add to the dessert tray offerings. Everyone loved them, and I recommend them, without hesitation. Hope you will give them a try… you won’t be disappointed!

Looking For More CHOCOLATE Recipes?

You can find ALL my recipes in the Recipe Index, located at the top of the page. I have some wonderful chocolate desserts you’ll enjoy, including:

Want More Recipes? Get My FREE Newsletter!

I publish a newsletter 2 times per month (1st and 15th) with lots of recipes, tips, etc..
Would you like to join our growing list of subscribers?

There is a Newsletter subscription box on the top right (or bottom) of each blog post, depending on the device you use.
You can submit your e-mail address there, to be added to my mailing list.

Find Me On Social Media:

Facebook page: The Grateful Girl Cooks!
Pinterest:
The Grateful Girl Cooks!
Instagram:
jbatthegratefulgirlcooks

Author's signatureOriginal Recipe Source: https://www.hersheys.com/recipes/recipe-details.aspx?id=5190

↓↓ PRINTABLE RECIPE BELOW ↓↓

0 from 0 votes
Rich, Chocolate Mini-Cakes
Prep Time
15 mins
Cook Time
12 mins
Total Time
27 mins
 

Made in mini-muffin pans, you will LOVE these fudgy, rich chocolate mini-cakes, drizzled with white chocolate icing. Recipe makes 24 decadent treats!

Category: Dessert
Cuisine: American
Keyword: chocolate mini-cakes
Servings: 24 mini-cakes
Calories Per Serving: 98 kcal
Author: JB @ The Grateful Girl Cooks!
Ingredients
For mini-cakes:
  • 2/3 cup all purpose flour
  • 1/2 cup granulated sugar
  • 3 Tablespoons cocoa
  • 1/2 teaspoon baking powder
  • 1/4 teaspoon baking soda
  • 1/4 teaspoon salt
  • 1/2 cup water
  • 3 Tablespoons vegetable oil
  • 1 teaspoon vanilla extract
For Chocolate Glaze:
  • 2 Tablespoons butter
  • 2 Tablespoons cocoa
  • 2 Tablespoons water
  • 1 cup powdered sugar
  • 1/2 teaspoon vanilla extract
For White Drizzle:
  • 1/2 cup white chocolate chips
  • 1 Tablespoon vegetable shortening (do NOT use butter, margarine or oil!)
Instructions
  1. Preheat oven to 350 degrees. Lightly grease or spray miniature muffin cups (1 3/4 inches in diameter). Set aside.
  2. To Make the Mini-Cakes:
  3. In a large bowl, mix together the flour, sugar, cocoa, baking powder, baking soda and salt. Add the water, oil and vanilla to the dry ingredients. Mix ingredients together until well blended. The batter will be fairly thin, so don't worry. Carefully spoon the batter into the greased muffin cups (these can be made in two batches if you only have one muffin pan). Fill each muffin cup 2/3 of the way full.
  4. Bake at 350 degrees for 12-14 minutes or until the top springs back when you gently touch it in the middle. When done, remove the muffin pan to a wire rack to cool. Let them cool for 3-4 minutes, then remove cakes from the muffin pan. (If making in two batches, clean pan, re-grease it and repeat previous directions for rest of the batter).
  5. Make sure cakes cool completely before glazing.
  6. To Make the Chocolate Glaze:
  7. Melt the 2 Tablespoons of butter in a saucepan on low heat. Stir in the 2 Tablespoons water and 2 Tablespoons cocoa. Cook, stirring constantly until smooth, and slightly thickened, but do not let mixture come to a boil. Remove the pan from heat and let it cool slightly. Add the powdered sugar and vanilla in gradually. Whisk the sauce as you add the sugar until mixture is smooth and lumps are gone.
  8. Carefully spread the chocolate glaze over the tops of each cooled mini-cake. Place frosted cakes on a wax-paper or parchment lined baking sheet. Refrigerate cakes for 10-15 minutes to let the glaze "set" and firm up. While the cakes are refrigerating, prepare the white drizzle.
  9. To Make The White Drizzle:
  10. Place 1/2 cup white chocolate chips and 1 Tablespoon of shortening into a microwave-safe bowl. Microwave on MEDIUM (50%) power for 30 seconds. Remove and stir until smooth. If it is necessary, microwave the chips an additional 10-15 seconds, just until the chips can be stirred and become smooth. Let cool slightly. Drizzle this onto the mini-cakes.
  11. Let drizzle firm up a bit, then serve and enjoy!
Nutrition Facts
Rich, Chocolate Mini-Cakes
Amount Per Serving (1 g)
Calories 98 Calories from Fat 36
% Daily Value*
Fat 4g6%
Saturated Fat 2g13%
Cholesterol 3mg1%
Sodium 47mg2%
Potassium 29mg1%
Carbohydrates 14g5%
Sugar 11g12%
Vitamin A 30IU1%
Calcium 12mg1%
Iron 0.2mg1%
* Percent Daily Values are based on a 2000 calorie diet.

Here’s one more to pin on your Pinterest boards!Made in mini-muffin pans, you will LOVE these fudgy, rich chocolate mini-cakes, drizzled with white chocolate icing. Recipe makes 24 decadent treats!


Save

Save

Easy Crock Pot Refried Beans

Easy crock pot refried beans – It is EASY (and economical) to make your own delicious and inexpensive Mexican refried beans, using a slow cooker!Easy crock pot refried beans - It is EASY (and economical) to make your own delicious and inexpensive Mexican refried beans, using a slow cooker!
I made some Crock Pot Refried Beans recently. From scratch. No cans involved. Guess what? They were absolutely delicious!  Really… these refried beans taste fantastic, they are inexpensive to make, and EASY!

I have been reading through a great book I own called “100 Days Of Real Food”, by author Lisa Leake, and came across this recipe for non-fried, refried beans, made from scratch.

The recipe can be thrown together in about 10 minutes in a crock pot. The pinto beans and spices are slow-cooked for 8-10 hours, lightly mashed, then served. How easy is THAT???

Scroll Down For A Printable Recipe Card At The Bottom Of The Page

Crock Pot Refried Beans Are EASY To Prepare

I started my crock pot when I got my morning coffee, and we enjoyed them with our evening meal later that day. They were so good! When the beans were ready, I took out half of them, mashed them and served them with cheddar cheese melted on top.

I took the other half of the beans (which were still in the flavored broth and served them just as they were (un-mashed) to my husband (because that is his favorite way to eat pinto beans).

Pinto beans are used to make refried beans... very economical!

The cost of a bag of dry pinto beans is minimal, and this recipe produces just under 4 cups of refried beans, so it is a great budget item, too! And, seriously, these beans are amazingly good!

We have used crock pot refried beans with tacos, burritos and tostadas, all with fantastic results. Here are some pics from while I made them:

How To Make Crock Pot Refried Beans

Here are the ingredients in my crock pot with the onions and other spices. The beans are ready to start cooking. This step will only take about 10 minutes or less!

Let them cook all day (9 hours), because you won’t have to mess with them! You just need to start them cooking, then go about your business! EASY!

Refried beans cook in crock pot all day.

After 9 hours in the crock pot this is what the crock pot refried beans looked like. Drain the beans over the crock pot, removed, and then mash the beans, using a potato masher. You can add a little broth from the crock pot to the beans if you don’t want them too thick.

Refried beans are ready to mash after cooking all day in the crock pot

The Crock Pot Refried Beans Are Ready To Serve

This was such an easy, economical way to make refried beans, and I will make them this way quite often. I really hope you will try making refried beans from scratch. They are so inexpensive to make, and taste absolutely delicious!

Here are the finished crock pot refried beans ready to eat! They were garnished with a little grated cheddar cheese and cilantro leaves on top, to serve! Muy bueno!

Crock pot refried beans are garnished with cheese and are ready to ea!

Crock pot refried beans are served with a garnish of grated cheddar cheese and cilantro.

Hope you enjoy this recipe for crock pot refried beans. Have a great day, friends! Make it count for something GOOD and courageous!

Thanks for stopping by, and I hope you will come back soon for more family-friendly recipes. Take care, may God bless you… and have a GREAT day!

Looking For More Mexican-Style Recipes?

You can find all of my recipes in the Recipe Index, located at the top of the page. I have a good variety of Mexican-style recipes you might enjoy, including:

Interested In More Recipes?

Thank you for visiting this website. I appreciate you using some of your valuable time to do soIf you’re interested, I publish a newsletter 2 times per month (1st and 15th) with all the latest recipes, and other fun info. I would be honored to have you join our growing list of subscribers, so you never miss a great recipe! 

There is a Newsletter subscription box on the top right side (or bottom) of each blog post, depending on the device you use, where you can easily submit your e-mail address (only) to be included in my mailing list.

You Can Also Find Me On Social Media:

Facebook page: The Grateful Girl Cooks!
Pinterest:
The Grateful Girl Cooks!
Instagram:
jbatthegratefulgirlcooks

Author's signatureRecipe Source: “100 Days Of Real Food”, by Lisa Leake (page 155), Published 2014, William Morrow Publishers.

↓↓ PRINTABLE RECIPE BELOW ↓↓

0 from 0 votes
Easy Crock Pot Refried Beans
Prep Time
5 mins
Cook Time
8 hrs
Total Time
8 hrs 5 mins
 

Easy crock pot refried beans - It is EASY (and economical) to make your own delicious and inexpensive Mexican refried beans, using a slow cooker!

Category: Side Dishes
Cuisine: Mexican
Keyword: crock pot refried beans, refried beans
Servings: 8 (1/2 cup servings)
Calories Per Serving: 174 kcal
Author: JB @ The Grateful Girl Cooks!
Ingredients
  • 2 cups dried pinto beans , rinsed
  • 1 yellow onion , peeled, and cut in half
  • 1/2 medium jalapeno , cored, seeded, and diced
  • 2 garlic cloves , peeled and crushed
  • 1 1/4 teaspoons salt
  • 1/2 teaspoon ground black pepper
  • 1/8 teaspoon ground cumin
  • 6 cups water
Optional toppings:
  • Grated cheddar or monterey jack cheese , cilantro, or sour cream
Instructions
  1. Place all ingredients (except for optional toppings) into a crock pot.
  2. Cover pot and cook beans for 8-9 hours on high.
  3. When finished, remove beans from crock pot, drain, and mash them with a potato masher until they reach the correct consistency. Add a little broth from the crock pot to the beans while mashing, if they seem a bit dry. That's it! You just made refried beans from scratch!
  4. Serve with a garnish of grated cheese, cilantro, or sour cream, if desired. Enjoy!

Recipe Notes

NOTE: Caloric calculation does not include optional garnishes (sour cream, cheese or cilantro)

Nutrition Facts
Easy Crock Pot Refried Beans
Amount Per Serving (1 serving)
Calories 174
% Daily Value*
Sodium 369mg16%
Potassium 692mg20%
Carbohydrates 31g10%
Fiber 7g29%
Sugar 1g1%
Protein 10g20%
Vitamin A 10IU0%
Vitamin C 5.4mg7%
Calcium 59mg6%
Iron 2.5mg14%
* Percent Daily Values are based on a 2000 calorie diet.

Here’s one more to pin on your Pinterest boards!Easy crock pot refried beans - It is EASY (and economical) to make your own delicious and inexpensive Mexican refried beans, using a slow cooker!


Save

Save

Save

Hoisin Asian Meatballs

Hoisin Asian Meatballs are made using ground beef, baked not fried, and are covered with an Asian-inspired hoisin glaze. They are a great appetizer or main dish.Hoisin Asian Meatballs are made using ground beef, are baked not fried , and are covered with an Asian-inspired hoisin glaze. Great appetizer or main dish.

I found this recipe for Hoisin Asian Meatballs a couple of years ago on Pinterest and thought I’d give it a try. It didn’t disappoint!

The ground beef meatballs are easy to make. To make it even easier, they are cooked in the oven, so they are baked, not fried. The baked hoisin asian meatballs are then coated with a wonderful sweet and mildly spicy Asian-inspired Hoisin glaze before serving.

Scroll Down For A Printable Recipe Card At The Bottom Of The Page

What Is Hoisin Sauce?

Hoisin sauce is a commonly used Asian glaze for meat or as an addition to a stir-fry dish… think “Chinese BBQ Sauce”… a bit sweet and a bit spicy. It is commonly made from soybeans, peppers, garlic and sugar. This sauce is widely used in Chinese cooking. When used in this recipe as a base and combined with a few other Asian-inspired ingredients, creates a pretty tasty sauce for the meatballs.

Hoisin sauce is commonly found in most grocery stores in the Asian foods section.  It is also very easy to make at home. I’ve done it, and posted the recipe for hoisin sauce here.

How To Make Hoisin Asian Meatballs

This recipe could not be any easier!  Basically, you mix up the meatball ingredients, roll into meatballs, then bake them for about 15 minutes. While the meatballs bake, mix up the sauce.  Once the meatballs come out of the oven, you simply drizzle each of the meatballs with the hoisin sauce mix, then serve.

See how easy it is to make hoisin Asian meatballs? About 15 minutes total for the prep time, and 12-15 minutes to bake. That’s it!!

How Many Meatballs Does This Recipe Make?

The recipe yields approximately 18 one and a half inch meatballs. Because of the short cooking time, they can easily be ready to serve in 30 minutes, which is an added bonus, right? Right!

Hoisin Asian meatballs can be used solely as individual appetizers. Just stick a fancy toothpick into each one, and serve them on a pretty platter. You can also serve them as a main course (which is how I served them), paired with some rice and a vegetable.

Hoisin Asian Meatballs are served as a main dish, on a bed of rice, with asparagus on the side.

Hope you will give these yummy Hoisin Asian Meatballs a try… I think you will like them! I know we did! Thanks for stopping by, and I hope you will come back soon. Have a great day.

Looking For More Meatball Recipes?

There are several other meatball recipes, using ground beef on this website!  They include:

Interested In More Recipes?

Thank you for visiting this website. I appreciate you using some of your valuable time to do soIf you’re interested, I publish a newsletter 2 times per month (1st and 15th) with all the latest recipes, and other fun info. I would be honored to have you join our growing list of subscribers, so you never miss a great recipe!
There is a Newsletter subscription box on the top right side (or bottom) of each blog post, depending on the device you use, where you can easily submit your e-mail address (only) to be included in my mailing list.

You Can Also Find Me On Social Media:

Facebook page: The Grateful Girl Cooks!
Pinterest:
The Grateful Girl Cooks!
Instagram:
jbatthegratefulgirlcooks

Author's signatureOriginal Recipe Source: http://damndelicious.net/2012/12/16/hoisin-asian-meatballs-sundaysupper/

↓↓ PRINTABLE RECIPE BELOW ↓↓

0 from 0 votes
Hoisin Asian Meatballs
Prep Time
15 mins
Cook Time
15 mins
Total Time
30 mins
 
Hoisin Asian Meatballs are made using ground beef, are baked not fried , and are covered with an Asian-inspired hoisin glaze. Great appetizer or main dish.
Category: Entree
Cuisine: Asian
Keyword: hoisin Asian meatballs
Servings: 18 meatballs
Calories Per Serving: 88 kcal
Author: JB @ The Grateful Girl Cooks!
Ingredients
FOR THE MEATBALLS:
  • 1 pound ground beef
  • 1 teaspoon sesame oil
  • 1/2 cup Panko bread crumbs
  • 1/4 teaspoon ground ginger
  • 1 large egg
  • 2 cloves garlic , finely minced
  • 4 green onions , thinly sliced (stem and bulb), divided (3 for meatballs, 1 for garnish)
  • Sesame seeds , for garnish
FOR THE HOISIN GLAZE:
  • 1/4 cup Hoisin sauce (found in ethnic section at grocery store)
  • 2 Tablespoons rice vinegar
  • 1 Tablespoon soy sauce
  • 1/2 teaspoon sesame oil
  • 2 cloves garlic , finely minced
  • 1/2 teaspoon ground ginger
Instructions
  1. Before making meatballs, preheat your oven to 400 degrees. Place a sheet of parchment paper onto a large baking sheet.
  2. Prepare the meatballs: Mix the ground beef, sesame oil, Panko bread crumbs, ginger, egg, garlic and green onion together in a large bowl. Make sure the ingredients are fully incorporated together. Once combined, use your (clean) hands to form the meat mixture into approximately 18 one and a half inch wide meatballs.
  3. As each meatball is formed, place it on the parchment-lined baking sheet. Bake the meatballs at 400 degrees for 12-15 minutes (meatballs should be browned and cooked through).
  4. Prepare hoisin glaze while meatballs are baking: Mix the glaze ingredients (hoisin sauce, rice vinegar, soy sauce, sesame oil, ginger and garlic) in a small bowl until fully combined.
  5. As soon as meatballs are done, drizzle hoisin glaze over the top of each meatball, garnish with reserved green onions and sesame seeds and serve while hot.
  6. If serving as appetizer, insert toothpicks or small skewers into each meatball on serving tray. If serving as main dish, serve it along with rice and a vegetable. ENJOY!

Nutrition Facts
Hoisin Asian Meatballs
Amount Per Serving (1 meatball)
Calories 88 Calories from Fat 45
% Daily Value*
Fat 5g8%
Saturated Fat 2g13%
Cholesterol 27mg9%
Sodium 124mg5%
Potassium 86mg2%
Carbohydrates 3g1%
Sugar 1g1%
Protein 5g10%
Vitamin A 40IU1%
Vitamin C 0.7mg1%
Calcium 13mg1%
Iron 0.7mg4%
* Percent Daily Values are based on a 2000 calorie diet.

Here’s one more to pin on your Pinterest boards!Hoisin Asian Meatballs are made using ground beef, baked not fried , and are covered with an Asian-inspired hoisin glaze. Great appetizer or main dish.


Save

Save

Chocolate-Dipped Coconut Macaroons

You’ll enjoy chocolate-dipped coconut macaroons! Easy to make, with chocolate bottoms and drizzle, they’re a delicious chewy treat for eating and gift giving!You'll enjoy chocolate-dipped coconut macaroons! Easy to make, with chocolate bottoms and drizzle, they're a delicious chewy treat for eating and gift giving!

The holidays are coming… the holidays are coming! Hope that fact doesn’t stress anyone out! This is the time of year I begin planning out the goodies I will make for my family and friends during the holiday season. Do you plan your Christmas goodies, too? My list this year will include these easy and delicious Chocolate-Dipped Coconut Macaroons!

Scroll Down For A Printable Recipe Card At The Bottom Of The Page

Do You Like Chocolate-Dipped Coconut Macaroons?

I really like the slightly crisp outside on these wonderful, sweet cookies. The inside is chewy coconut and tastes amazing. The taste of these chocolate-dipped coconut macaroons is complemented by dipping the bottoms of each treat in melted chocolate, then drizzling some on top. Yum!

If you like coconut and chocolate, you’re gonna love these chocolate-dipped coconut macaroons! They are very easy to make, and taste great any time of the year.

I tend to make these yummy treats each December for the holidays. They are easy to plate up, and are fun to give to friends and neighbors for Christmas. There’s a lot of love shown to those you care for, when you give them a homemade food gift!

Chocolate-dipped coconut macaroons, ready to eat, on a Christmas plate.

The chocolate-dipped coconut macaroons are full of flavor! Go ahead… grab one. There’s enough to share! The recipe makes 2 dozen, so I saved you one. Yum.

Chocolate-dipped coconut macaroons, on a Christmas plate, ready to eat!

These chocolate-dipped coconut macaroons are a great treat to add to your homemade food gift list to bless family or friends with over the holidays, or ANY TIME during the year.

The recipe makes approximately 2 dozen of these beautiful macaroons, and they are pretty simple to make. The coconut cookie mixture is mixed, formed into balls, then baked. Once done, the bottoms are coated with chocolate, then chocolate is drizzled over the tops. EASY!

I hope you will give them a try! They’re fun to make them during the holidays, but since when do we need a special holiday to eat a great cookie, right? I really hope you enjoy these delicious macaroons!

Looking For More Christmas Goodies To Make?

You can find all my desserts in the Recipe Index at the top of the page.  Some of our favorite holiday goodies to eat (and give to others) include:

Interested In More Recipes?

Thank you for visiting this website. I appreciate you using some of your valuable time to do soIf you’re interested, I publish a newsletter 2 times per month (1st and 15th) with all the latest recipes, and other fun info. I would be honored to have you join our growing list of subscribers, so you never miss a great recipe! 

There is a Newsletter subscription box on the top right side (or bottom) of each blog post, depending on the device you use, where you can easily submit your e-mail address (only) to be included in my mailing list.

You Can Also Find Me On Social Media:

Facebook page: The Grateful Girl Cooks!
Pinterest:
The Grateful Girl Cooks!
Instagram:
jbatthegratefulgirlcooks

Author's signature

Recipe Source: http://www.bakerita.com/black-bottomed-coconut-macaroons/

↓↓ PRINTABLE RECIPE BELOW ↓↓

0 from 0 votes
Chocolate-Dipped Coconut Macaroons
Prep Time
50 mins
Cook Time
13 mins
Total Time
1 hr 3 mins
 
You'll enjoy chocolate-dipped coconut macaroons! Easy to make, with chocolate bottoms and drizzle, they're a delicious chewy treat for eating and gift giving!
Category: Cookies
Cuisine: American
Keyword: macaroons
Servings: 24
Calories Per Serving: 184 kcal
Author: JB @ The Grateful Girl Cooks!
Ingredients
For cookies
  • 5 cups shredded , sweetened coconut (20 oz.)
  • 6 large egg whites
  • 1/2 cup granulated sugar
  • 1/2 teaspoon salt
  • 1 teaspoon vanilla extract
  • 1/2 teaspoon almond extract
For chocolate base and drizzle
  • 6 oz. semi-sweet chocolate
  • 1 Tablespoon vegetable shortening
Instructions
  1. In a large bowl, place the egg whites, sugar, salt, vanilla and almond extract. Whisk these ingredients together until they are fully incorporated; mixture will be a bit foamy. Add the coconut to the egg mixture, and stir until well combined. Cover the bowl with plastic wrap; refrigerate for approximately 30 minutes. This mixture will thicken.

  2. While mixture is refrigerating, preheat your oven to 375 degrees. Make sure your oven racks are set in the middle and lower positions. Place parchment paper on the bottoms of two large baking sheets. Spray the parchment paper with a non-stick spray or grease the paper.

  3. With wet (clean) hands, roll 1 Tablespoonful of the macaroon mixture into a round ball. (You can also use a cookie scoop if desired, but find it easier to use my hands). Place each of the "dough" balls onto the prepared baking sheets, spacing them 1 inch apart. You should have approximately 24 macaroons.
  4. Bake macaroons at 375 degrees for 13-15 minutes. Halfway through baking time, rotate baking sheets (from one rack to the other for even baking). When done, the macaroons should be light golden brown on top. Remove from oven. Keep macaroons on the baking sheets while they cool, for about an hour. They need to be completely cooled before removing from baking sheets or dipping in chocolate glaze. Once macaroons have completely cooled, lay a clean piece of parchment paper on counter, then make the chocolate glaze.

  5. To make glaze: Melt the semi-sweet chocolate and 1 Tablespoon shortening in a microwave. Cook on high for 45 seconds. Stir, then continue to cook in 30 second increments, stirring after each increment, until chocolate is smooth. Be careful not to overcook and burn the chocolate.
  6. Carefully (macaroons are delicate) dip the bottom of each macaroon into the melted chocolate (just enough to cover), then place macaroon on clean parchment paper to let chocolate harden. Repeat with remaining macaroons. Use remaining chocolate to decoratively drizzle over tops of macaroons.

  7. Let macaroons cool, at room temperature, until the chocolate is completely "set". This will take about 30-45 minutes. Keep macaroons stored in an air-tight container for best results! Hope you enjoy them!

Recipe Notes

Note: If you do not want to use vegetable shortening when you make the chocolate glaze, simply omit it, and proceed per instructions. I use it, because I it thins out the chocolate slightly, and makes the chocolate a bit shinier, but choose your own preference!

Nutrition Facts
Chocolate-Dipped Coconut Macaroons
Amount Per Serving (1 macaroon)
Calories 184 Calories from Fat 99
% Daily Value*
Fat 11g17%
Saturated Fat 9g56%
Sodium 123mg5%
Potassium 132mg4%
Carbohydrates 19g6%
Fiber 1g4%
Sugar 17g19%
Protein 1g2%
Vitamin A 5IU0%
Vitamin C 0.2mg0%
Calcium 8mg1%
Iron 0.9mg5%
* Percent Daily Values are based on a 2000 calorie diet.

Here’s one more to pin on your Pinterest boards!You'll enjoy chocolate-dipped coconut macaroons! Easy to make, with chocolate bottoms and drizzle, they're a delicious chewy treat for eating and gift giving!


Save

Save

Tuscan Chicken & Vegetable Soup

Tuscan Chicken Vegetable Soup is a delicious, Italian-inspired soup. This hearty soup (with 7 veggies) is perfect anytime, especially on a cold day!Tuscan Chicken Vegetable Soup is a delicious, Italian-inspired soup. This hearty soup (with 7 veggies) is perfect anytime, especially on a cold day!
Fall is here! I am ready for cool, crisp mornings… and soup! I made a pot of Tuscan Chicken & Vegetable Soup yesterday, and it was really good!

We’re had a gorgeous summer here in the beautiful Pacific Northwest, but I am really enjoying the cooling air, the trees beginning to turn into their Fall colors, etc. There’s just something about Fall that calls for a large pot of delicious smelling soup cooking away on the stove.

Scroll Down For A Printable Recipe Card At The Bottom Of The Page

How I Came Up With This Recipe For Tuscan Chicken Vegetable Soup

Yesterday I was in the mood for a yummy, Italian-inspired Tuscan chicken vegetable soup. I’ve seen many recipes online for Tuscan Soup over the years (trust me, there’s a bazillion of them). Because of that, I had a basic idea of what items COULD go into this soup. I I ended up not using any ONE particular recipe, because I decided to simply create my own version. Guess what? We LOVED it!!!!

Seriously, people, we LOVED this Tuscan chicken vegetable soup! Success! Lots of “good-for you-veggies”, cannelini beans, chicken, and spices in a light Italian broth produces one great pot of soup!

Can You Make This Soup Vegetarian?

If you wish to make this a vegetarian friendly soup, it is easy! I typically use chicken broth and chicken in this soup when I make it. However, this soup tastes just as good using vegetable broth and NO chicken (if you’re vegetarian).

A bowl of the Tuscan chicken vegetable soup, ready to eat!

The Tuscan chicken vegetable soup was fun to make, because I was able to use some of the veggies I grew in our garden. These home-grown veggies included onion, garlic, oregano, thyme, basil, carrots, kale and spinach! Of course, all those ingredients can also be found at your local grocery store!

All that said, this Tuscan chicken vegetable soup is an easy recipe to prepare, and is absolutely delicious! I sure hope you’ll try it. Serious… you just gotta try this soup, because it is so yummy! Throw on a warm sweater, some sweatpants, turn on some great music, and make a pot of this soup. While you’re at it, enjoy the beauty of this glorious Fall season! Enjoy!

Looking For More SOUP Recipes?

You can find all of my soup recipes in the Recipe Index, located at the top of the page. These recipes include:

Interested In More Recipes?

Thank you for visiting this website. I appreciate you using some of your valuable time to do soIf you’re interested, I publish a newsletter 2 times per month (1st and 15th) with all the latest recipes, and other fun info. I would be honored to have you join our growing list of subscribers, so you never miss a great recipe!
There is a Newsletter subscription box on the top right side (or bottom) of each blog post, depending on the device you use, where you can easily submit your e-mail address (only) to be included in my mailing list.

You Can Also Find Me On Social Media:

Facebook page: The Grateful Girl Cooks!
Pinterest:
The Grateful Girl Cooks!
Instagram:
jbatthegratefulgirlcooks

Author's signatureRecipe Source: My brain. In “Fall” mode.

↓↓ PRINTABLE RECIPE BELOW ↓↓

0 from 0 votes
Tuscan Chicken & Vegetable Soup
Prep Time
15 mins
Cook Time
50 mins
Total Time
1 hr 5 mins
 

Tuscan Chicken Vegetable Soup is a delicious, Italian-inspired soup. This hearty soup (with 7 veggies) is perfect anytime, especially on a cold day!

Category: Soup
Cuisine: Italian
Keyword: Tuscan chicken vegetable soup
Servings: 6 servings
Calories Per Serving: 194 kcal
Author: JB @ The Grateful Girl Cooks!
Ingredients
  • 2 boneless chicken breasts , cooked and cubed
  • 7 cups chicken broth (may substitute vegetable broth, if desired)
  • 1/2 cup onion , chopped
  • 3 carrot stalks , sliced thinly
  • 3 celery stalks , sliced thinly
  • 1/2 cup sliced mushrooms
  • 1/2 small zucchini , sliced thinly
  • 2 Tablespoons olive oil
  • 1 cup kale , chopped (stems removed) (if omitting, double the spinach quantity!)
  • 1 cup baby spinach , chopped
  • 1 can cannellini beans , drained
  • 1/2 teaspoon Salt & pepper , to taste (may have to add more)
  • 1/2 teaspoon dried basil
  • 1/2 teaspoon dried oregano
  • 1/4 teaspoon dried thyme
  • 1/4 teaspoon garlic powder
  • 1/3 cup tomato paste
  • Parmesan cheese , grated (for garnish if desired)
Instructions
  1. In a large soup pot, saute the onion, carrots, celery, mushrooms, and zucchini in olive oil for 3-4 minutes. Add the chicken broth and cooked, cubed chicken to soup pot. Now add the salt & pepper, basil, oregano, thyme, and garlic powder to season the soup. Bring soup to a boil, then reduce heat to low.

  2. Add tomato paste, Mix well to combine. Add cannellini beans, kale and spinach. Season again with salt & pepper to taste, if necessary. Cook on low for 45 minutes, stirring occasionally.

  3. When ready, ladle hot soup into bowls, garnish with grated Parmesan cheese, and serve. Enjoy!

Recipe Notes

Tip: Use a pre-cooked rotisserie chicken for the fastest way to make this recipe.

*I boiled the chicken breasts in water for 45 minutes earlier in the day... then used them later in this recipe. Whatever works best for you is the bottom line.

Nutrition Facts
Tuscan Chicken & Vegetable Soup
Amount Per Serving (1 serving)
Calories 194 Calories from Fat 54
% Daily Value*
Fat 6g9%
Saturated Fat 1g6%
Cholesterol 24mg8%
Sodium 1556mg68%
Potassium 826mg24%
Carbohydrates 21g7%
Fiber 5g21%
Sugar 4g4%
Protein 15g30%
Vitamin A 7035IU141%
Vitamin C 44.1mg53%
Calcium 116mg12%
Iron 3.4mg19%
* Percent Daily Values are based on a 2000 calorie diet.

Here’s one more to pin on your Pinterest boards!Tuscan Chicken Vegetable Soup is a delicious, Italian-inspired soup. This hearty soup (with 7 veggies) is perfect anytime, especially on a cold day!


Save

Save

Marinated, Pan-Seared Mexican Chicken

Marinated, pan-seared Mexican chicken is a delicious, low-fat, easy to prepare dish. The chicken will surprise you with its depth of flavor.Marinated, pan-seared Mexican chicken is a delicious, low-fat, easy to prepare dish. The chicken will surprise you with its depth of flavor.

Do you cook with chicken often? I sure do!  The recipe I want to share today with you is for Marinated, Pan-Seared Mexican Chicken. This recipe is delightfully GOOD. An added benefit is that it’s low in calories (under 200 per serving), so it’s a win-win in my book!

My favorite food to eat is Mexican food. I love the flavors in most Mexican-inspired dishes, which is why I really like this one. Pan-seared Mexican chicken has great flavor, from spices like cumin, chili powder, garlic, oregano and lime juice. YUM!

The recipe for pan-seared Mexican chicken is easy to prepare. I have modified it slightly from a recipe I found on Skinnytaste.com a while ago.

If you can mix up a marinade, add chicken to the marinade, then cook it, you can make this delicious chicken! Here’s how to make it:

Scroll Down For A Printable Recipe Card At The Bottom Of The Page

It’s Easy To Make Marinated Pan-Seared Mexican Chicken!

Marinate the chicken breasts for at least half an hour. TIP: The chicken tastes even better if you let it marinate all day! If you have the time, go for all day marinating.

As you can see in the photo below, I only made two small chicken breasts, since there was only two of us eating this meal.

Chicken breasts are marinated before cooking.

Time To Cook The Pan-Seared Mexican Chicken Breasts!

Spray a large skillet with non-stick cooking spray OR add a Tablespoon of oil. Once the oil is hot, add the marinated chicken breasts.

You can see in the photo below the little pieces of minced garlic on each piece. There’s a lot of flavor saturated on those chicken breasts!

The marinated chicken breasts are pan-seared in a hot skillet.

Cook each side of the pan-seared Mexican chicken until it is golden brown, and cooked through. This usually will take about 4-8 minutes per side depending on the chickens thickness.

The internal temperature of the cooked chicken should be at 165°F. when the chicken breasts are finished cooking.

Two of the marinated, pan-seared Mexican chicken breasts cook in a skillet.

Add the reserved batch of marinade plus 1/4 cup water to the skillet, halfway through cooking the second side of the chicken breasts.

Cook the pan-seared Mexican chicken in the marinade for 3-4 minutes (until cooked through). Spoon the pan drippings over the chicken as it cooks. Once done, the chicken is ready to serve!

Serve The Pan-Seared Marinated Chicken

This pan-seared Mexican chicken recipe is to prepare, and it’s delicious! We enjoy this chicken, and usually serve it with white steamed rice on the side.

You might also enjoy topping the cooked chicken breasts with some pico de gallo salsa as a garnish! That really takes the flavor up another notch!

Finished cooking, the pan-seared Mexican chicken has darkened in color.

Hope you enjoy these tasty (and easy) pan-seared Mexican chicken breasts! They are really easy to prepare, and have good flavor!

Thanks for stopping by today, and I invite you to come back again soon for more family-friendly recipes. Take care, and have a GREAT day!

Looking For More CHICKEN Recipes?

You can find all of my chicken recipes in the Recipe Index, located at the top of the page. A few of those recipes include:

Want More Recipes? Get My FREE Newsletter!

I publish a newsletter 2 times per month (1st and 15th) with lots of recipes, tips, etc..
Would you like to join our growing list of subscribers?

There is a Newsletter subscription box on the top right (or bottom) of each blog post, depending on the device you use.
You can submit your e-mail address there, to be added to my mailing list.

Find Me On Social Media:

Facebook page: The Grateful Girl Cooks!
Pinterest:
The Grateful Girl Cooks!
Instagram:
jbatthegratefulgirlcooks

Author's signatureRecipe Adapted from: http://www.skinnytaste.com/2013/08/grilled-chicken-with-black-bean-mango.html

↓↓ PRINTABLE RECIPE BELOW ↓↓

0 from 0 votes
Marinated, Pan-Seared Mexican Chicken
Prep Time
5 mins
Cook Time
12 mins
Total Time
17 mins
 
Marinated, pan-seared Mexican chicken is a delicious, low-fat, easy to prepare dish. The chicken will surprise you with its depth of flavor.
Category: Entree
Cuisine: Mexican
Keyword: pan-seared Mexican chicken
Servings: 4 servings
Calories Per Serving: 140 kcal
Author: JB @ The Grateful Girl Cooks!
Ingredients
  • 4 boneless skinless chicken breasts (4 ounces each)
  • salt and pepper (to taste)
  • 6 cloves minced garlic
  • 2 teaspoons cumin
  • 1 teaspoon dried oregano
  • 2 limes, JUICE OF
  • 1/4 cup water
Instructions
  1. Season chicken breasts lightly with salt and pepper. Place chicken breasts in large bowl.

  2. In separate bowl, mix together minced garlic, cumin, oregano, and lime juice. Pour HALF of the marinade sauce over chicken. Reserve the other half of  marinade for later.

  3. Coat chicken with marinade. Cover and refrigerate for at LEAST half an hour. (The longer the chicken marinates, the better the flavor!)

  4. Spray skillet with non-stick cooking spray. Heat on medium high until very hot. Once skillet is hot, place marinated chicken into skillet. They should sizzle when added to skillet. Discard marinade that the chicken was in. Cook chicken 3-4 minutes, then turn to other side. Halfway through cooking second side of chicken, add the reserved marinade, plus 1/4 cup water to the skillet. Cook for 3-4 additional minutes, continually spooning sauce over the top of chicken breasts. This will coat the chicken and will help to darken the color. Cook chicken until cooked all the way through.

  5. When chicken is done, remove from skillet. If desired, serve with pico de gallo as a garnish. Serve chicken with rice, or your favorite side dish. Enjoy!

Recipe Notes

Caloric calculation was made based on using a 4 ounce small boneless, skinless chicken breast per serving. Larger portions of chicken will have more calories.

Nutrition Facts
Marinated, Pan-Seared Mexican Chicken
Amount Per Serving (1 (4 ounce) breast)
Calories 140 Calories from Fat 27
% Daily Value*
Fat 3g5%
Cholesterol 72mg24%
Sodium 134mg6%
Potassium 455mg13%
Carbohydrates 2g1%
Protein 24g48%
Vitamin A 45IU1%
Vitamin C 6.4mg8%
Calcium 26mg3%
Iron 1.3mg7%
* Percent Daily Values are based on a 2000 calorie diet.

Here’s one more to pin on your Pinterest boards!Marinated, pan-seared Mexican chicken is a delicious, low-fat, easy to prepare dish. The chicken will surprise you with its depth of flavor.


Save

Save

Save