
Using Up My Garden Kale

So once again I found myself with fresh picked kale, looking for a new, creative way to enjoy this wonder-veggie, straight from our garden. I found this recipe for “coleslaw” (with an Asian twist) on Pinterest, and decided to give it a try.
I made Asian kale slaw yesterday afternoon (only took about 15 minutes prep) and served it with our dinner. My husband and I LOVED it! We had the slaw on the side with a chicken dinner, and it tasted wonderful!

What Is IN Asian Kale Slaw?
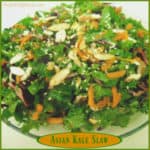
The ingredients for the Asian kale slaw are chopped and sliced, and placed in a salad bowl. The slaw has grated carrots, kale, shredded purple cabbage, and sliced green onions. The simple Asian sauce that covers all the ingredients really makes this kale slaw shine!

Making The Salad Dressing For Asian Kale Slaw Is EASY!
This Asian flavored slaw dressing is incredibly easy to mix up. The sauce will be used as the salad dressing for the Asian kale slaw.
There are several ingredients in the dressing, including lime juice, sesame oil, soy sauce, ginger, etc., which gives this salad it’s distinctive Asian flavor. The salad is tossed with the dressing, then refrigerated for 15-20 minutes, until chilled.

The finished Asian kale slaw is garnished with sliced almonds, sesame seeds and sea salt, and is served chilled. The flavor of the salad dressing coats the entire bowl of slaw with great flavor!

Asian kale slaw is an amazingly wonderful, crunchy and delicious side salad I really hope you will enjoy. Even though my old photos aren’t the best quality, I hope you will still consider trying this delicious salad!
It’s also a great way to “eat your veggies” (as my Mom used to say to me and my sisters). Yum! Have a GREAT day!
Looking For Other SALAD Recipes?
You can find all of my recipes in the Recipe Index, located at the top of the page. A few favorite side salad recipes include:
Interested In More Recipes?
Thank you for visiting this website. I appreciate you using some of your valuable time to do so. If you’re interested, I publish a newsletter 2 times per month (1st and 15th) with all the latest recipes, and other fun info. I would be honored to have you join our growing list of subscribers, so you never miss a great recipe!
There is a Newsletter subscription box on the top right side (or bottom) of each blog post, depending on the device you use, where you can easily submit your e-mail address (only) to be included in my mailing list.
You Can Also Find Me On Social Media:
Facebook page: The Grateful Girl Cooks!
Pinterest: The Grateful Girl Cooks!
Instagram: jbatthegratefulgirlcooks

Recipe Source: http://www.tasteloveandnourish.com/2013/07/19/asian-kale-slaw/
↓↓ PRINTABLE RECIPE BELOW ↓↓
Asian kale slaw is a delicious, healthy side dish with kale, cabbage, carrots, green onions and almonds, in a fantastic Asian inspired sauce!
- 1 bunch curly kale , shredded/cut into thin strips
- 1/2 head red/purple cabbage , shredded
- 3-4 medium carrots , shredded
- 4 green onions , sliced thin (green and white parts)
- 1/4 cup soy sauce
- 3 Tablespoons lime juice
- 1 Tablespoon fresh grated ginger
- 3 Tablespoons apple cider vinegar
- 2 Tablespoons dark brown sugar
- 1/2 teaspoon sesame oil
- 1 Tablespoon vegetable oil
- 1 Tablespoon sesame seeds , lightly toasted (dry "toast" them in a skillet for a couple minutes)
- 1/2 cup almond slivers , toasted (same method as sesame seeds)
- 1/4 teaspoon sea salt
Using a knife, thinly slice/shred the kale leaves, removing/discarding the large, thick stems. **Don't use a food processor for this, as it will shred the kale too fine** Place sliced kale into salad bowl.
Thinly slice/shred red cabbage and green onions. Add to kale in bowl. Grate carrots into bowl, using a hand/box grater.
In a small bowl, combine the soy sauce, lime juice, ginger, apple cider vinegar, brown sugar, sesame oil and vegetable oil. Mix well to combine. Pour dressing over the shredded slaw. Toss slaw until coated; cover and refrigerate for at least 15-20 minutes. Once chilled, the slaw is ready to serve!
When ready to serve, sprinkle the top of the slaw with toasted sesame seeds, almond slices and sea salt. Toss the salad again. SERVE AND ENJOY!
*Recipe can be easily halved for smaller amounts.
Here’s one more to pin on your Pinterest boards!
! We've used the same recipe for over 50 years to grill fantastic chicken. / The Grateful Girl Cooks!")


! We've used the same recipe for over 50 years to grill fantastic chicken. / The Grateful Girl Cooks!")


, with a few common kitchen ingredients! / The Grateful Girl Cooks!")


, with a few common kitchen ingredients! / the Grateful Girl Cooks!")
 and save money! / The Grateful Girl Cooks!")


 and save money! / The Grateful Girl Cooks!")
, with chicken breasts, broccoli, and an amazing Asian inspired stir fry sauce! / The Grateful Girl Cooks!")


, with chicken breasts, broccoli, and an amazing Asian inspired stir fry sauce! / The Grateful Girl Cooks!")